All posts by Rene Averett

Championing Celeriac

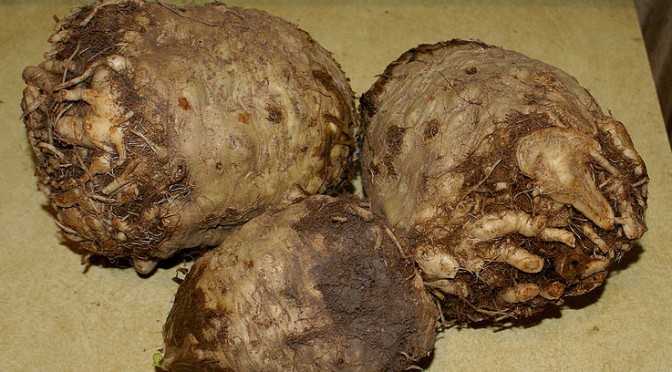
I only discovered celery root in the past few years and it truly is a wonderful and under-appreciated vegetable. Yes, it looks weird and has an ugly-looking skin that harbors dirt when you get it. But it cleans up nicely and it is delicious in so many ways. It’s one of three vegetables that people frequently ask me about when I check out at the grocery. The other two are Daikon radish and kohlrabi, both of which I’ll cover in this series. These vegetables seriously need a publicist!

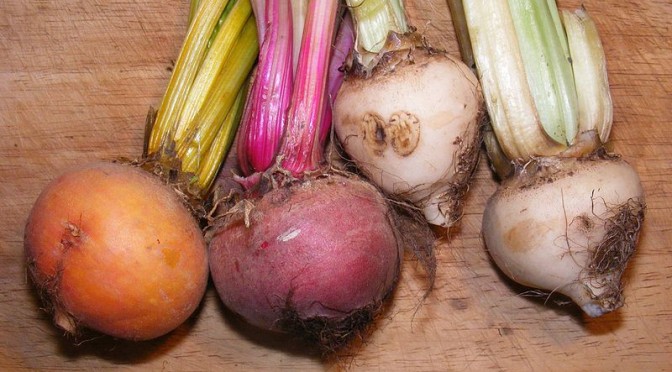
Once again, this is an old world vegetable that dates back to the classic times. It was called selinon when it was mentioned in Homer’s “Odyssey”. Also known as celery root, knob celery and turnip root celery, this knarly-looking vegetable originated from wild celery. Unlike the usual celery with its trim green stalks, celery roots grow thicker stalks with lush green leaves and a large bulb root below the ground. The entire vegetable, excepting the string roots off the bulb, is edible, although the stalks tend to be a little tuff. When I’m fortunate enough to find a celery root bulb with the greens still attached at the grocery store, I buy it. The leaves are easily dried in a food drier or out on a sheet of waxed paper in a sunny place for a few hours.

Describing a flavor isn’t always easy, but the root portion has a mild celery flavor with a bit of nuttiness — it’s amazing how many food are described as having a nutty flavor. It is crisp when freshly cut and can be used raw in salads. But when it’s cooked, it becomes creamy and it is the closest vegetable in texture that I’ve found to the potato. I often use it as a potato substitute, particularly when making French fries. It’s great in soups, stews, stir fry dishes and other places where you would use potatoes. It can be roasted and baked.

The leaves and stalks also have a celery taste, but the stalks I’ve encountered tend to be woodier than normal celery. The leaves are nice for garnishes or adding to soups and stews or in with cooked greens. Dried, they can be added to many dishes whenever you want to add a hint of celery to flavor.

Cleaning and Preparing

I admit it’s a bit of a challenge to clean and trim the celery root. Use warm running water and a scrub brush to clean up the skin as much as possible. There are many little cracks in the root’s surface where dirt can hide. Once clean, dry it off, then cut the knobs off with a chef’s knife or a sharp paring knife.

Peel the outer skin off and dig in where the exterior skin may have made a crevice in the vegetable. It’s like a potato eye, just take the paring knife and cut in under it to remove. Then cut the root into cubes or planks, depending on how you want to use it. The bigger roots can be difficult to cut through and it may take a lot of muscle to get the knife through the whole root.

Once you’ve trimmed the root, parboil it in a pan of boiling water with a splash of lemon juice for about 3 minutes. This will help prevent browning. If you aren’t going to use the cubes or planks right away, then put in freezer bags, press out as much air as possible, label with the date and put in the freezer. If you’re using it soon, just put in a plastic bag until ready to use.

Celery root cleaned and cut into quarters to bake.

If you want to bake the celery root, you can just clean the exterior as much as possible, poke with knife a few times, rub a little oil and seasoning on it, then put in the oven at 375 degrees (F.) to bake for about 45 minutes to an hour. This will vary with the size of the celery root. Once done, peel off the outside skin and serve the creamy insides like you would a baked potato.  It’s great with butter, sour cream and bacon bits.

Baked celery root is creamy and delicious with a texture similar to a baked potato.


Nutrition Info for 1 cup Celery root
   Calories: 66 Fat: 0.5 Net Carbs: 11.9 g Protein: 2.3 g

Recipes

I use celery root frequently as a replacement for potatoes and just as a delicious vegetable on its own. Here are a couple of recipes from this site that use celery root.

Quick Roasted Celery Root (mid-way down the page)
Warming Beef Stew for Fall
Corned Beef Hash
Celery Root Fries (near the bottom of the page)

My references for this article include the following web sites: Wikipedia, Eat the Seasons and The Vegetable World’s Ugly Duckling

Bountiful Beets

When I used to think of beets, I thught of the red canned ones that we added in little strips to salads or to make into Harvard Beets for the holidays. Then I discovered the taste of freshly cooked beets.  There are so many other uses and other types of beets that can make this vegetable a real star in your meals.

Like many of our foods, beets originated in the Mediterranean region and North Africa and were cultivated by ancient Greeks and Romans. Originally, they were grown primarily for their leaves, which can be chopped and cooked into greens or eaten raw. It wasn’t until the 14th century that eating the bulbous root became common. By then the root had developed from a thin, parsnip-like shape into the rounded vegetable we now know.

When it comes to the taste of the beet, it is a “like it or not” personal preference. The beet has an earthy taste that comes from geosmin, a substance that also yields a sweet spring scent when it rains. This is more prominent in the red beet while the golden beet has a much milder taste. As with eating most vegetables, the freshly prepared vegetable usually tastes better than a canned version.

Other uses for beets have included beet sugar, a beet alcohol and red natural dye. As soon as you cut a red beet, it will immediately begin bleeding a red juice that can stain your hands, any material near it and anything else that comes in contact with it. A picked eggs recipe uses the water that red beets are cooked in to dye hard boiled eggs red. This recipe from All Recipes uses canned beets, but could be made with freshly cooked beets. For low carb, be sure to use a sugar substitute in place of the sugar.

I didn’t use to be much of a beet fan, but as I grew older and tried Harvard beets, I discovered the flavor was better than I remembered it.  Incidentally, I once red that people’s taste buds change every seven years and I have seen a steady growth in the number of foods that I now enjoy that I didn’t use to like, so maybe there’s some truth to it.  Once I tried fresh beets, I became a real fan. I just recently found Chiogga beets at my grocery store for the first time and picked up a few. These are small red and white beets with circular rings of each color inside.

Here are a couple of recipes from this site that use beets in their preparation. They can be used in surprising ways.

Amazing Chocolate Beet Cake 
Short Ribs with Root Vegetables

Nutrition Information for 1 cup beets
   Calories: 59 Fat: 0.2 Net Carbs: 9.2 g Protein: 2.2 g

Want to know about the health benefits of beets? Visit The World’s Healithest Foods.

References for this article include The History Kitchen,  Love Beetroot.co.uk, Aggie Horticulture and The World’s Healthiest Foods

Top Photo used with authorization from Wikipedia: By Beet man (Own work) [CC BY-SA 3.0 (http://creativecommons.org/licenses/by-sa/3.0)], via Wikimedia Commons

Awesome Artichokes – an Ancient and Strange Vegetable

I grew up eating artichokes,. In my house, as in many houses, the only way to eat them was to boil or steam the artichoke, peel off the cooked leaves one by one and dip them in either mayonnaise or a small bowl of melted butter with lemon. Delicious. Then when you got to the heart, you just savored the creamy, richness of it.  But there are many recipes that use artichokes and I will be exploring more of these over the next year.

What is an artichoke anyway? Where did it come from and who on earth decided to eat this thorny-looking plant? Well, we can blame the Romans and the Greeks and just about anyone else in the Mediterranean area. In Rome, a variant of the vegetable called a cardoon was native to the area and widely enjoyed by the people in the region. While the plant was originally a wild species, the Greeks were cultivating it in the Classical period. By the 9th century, globe artichokes were grown around Naples. The vegetable spread across Europe and in the 14th century, the Dutch introduced it to the English court. It was grown in Henry VIII’s garden at Newhall. But it wasn’t until the 19th century that the artichoke arrived in America, traveling with the French to the New Orleans area and the Spanish to California.

The artichoke itself is a fierce-looking vegetable with a globe shape that can grow several inches in length. Each of its triangular leaves wrap around the heart or the center bottom of the vegetable and they are tipped with a sharp point. It also produces a beautiful purple flower, which makes it attractive in an ornamental garden.

When it comes to eating an artichoke, here are the key things to remember.

• Most of the vegetable is edible.
• You need to trim off the spiky points before cooking.
• The lower part of the leaf is the meaty part and is best scraped off with your teeth.
• Savor the tender leaves at the center that are covering the choke.
• Don’t eat the choke. It’s the fuzzy center of newly developing leaves and it pretty much will choke you if you try to swallow it.
• Do eat that lovely lump under the choke, which is the heart and is the real prize of the artichoke.
• Part of the stem is also edible so long as it is tender.

Preparing the Basic Boiled Artichoke

This is the method that both my family and PK’s family used.  It is very much like the Romans prepared it long ago.

To prepare to cook the artichoke, begin by placing it on its side on a cutting board and use a sharp knife to cut across the top quarter of so of the leaves to make a flat top. Then use kitchen shears to trim the rest of the leaves down about ¼ of the way to remove the spikes and the tough part of the leaf.

The simplest way to cook an artichoke is to put on a pan of water big enough to submerge the whole artichoke. Bring the water to a boil then add a tablespoon of vinegar to the water, a little lemon and a teaspoon or more of garlic. Put the artichoke into the water with the stem bottom down in the pan. They may float to the top, so push them down and turn them often while cooking. Boil until a fork inserted in the bottom goes in and the leaves pull off easily.

Remove the artichoke and drain it in a colander, then prepare your dipping sauce. The basic one is mayonnaise, plain or with a little lemon. I added a bit of cayenne pepper the other night. You can also melt about 3 tablespoons of butter and add a ½ teaspoon of lemon juice to have a wonderful sauce. Or you can just pour some Ranch Dressing in a small bowl and dip the leaves in that. Many options work, so experiment around.

Artichokes are easy to share as an appetizer as two or three people can easily pull leaves and dip. When you reach the choke, use a spoon and a knife to cut under it and remove it. Then slice the heart into pieces and enjoy.

Nutritionally-speaking, the artichoke is good news for a low carb lifestyle and it is so good for your health.

Nutrition Info for one medium artichoke (about 3 “height from the base)
   Calories: 60.2 Fat: 0.2 g Net Carbs: 6.2 g Protein: 4.2 g

Artichoke Trivia

Here are few interesting bits about the artichoke.

• In 2012, Worldwide production yielded 1,634,219 artichokes.
• The top production of artichokes was in Egypt with 387,304.
• The United State is ninth on the list of top growers with 51,300, but almost all of the US commercial crop is grown in California.
• Castroville, California is the self-proclaimed “Artichoke Center of the World” with over three-quarters of the artichokes grown in the U.S. coming from there.

References for this article include: Wikipedia, California Artichoke Advisory Board, and Oceanmist.com

Tasty Low Carb Hazelnut Chocolate Energy Bite

Inspired by a recipe from Stevia, this quick-to-make energy bite is a tasty fat bomb.  I made a few adjustments to make it  a little sweeter and not as grainy-tasting.    Most of the ingredients are easy to find at your grocery store.  If you can’t find hazelnut flour, then use hazelnuts and grind them in your food processor until they are the consistency of flour.

Chocolate Hazelnut Quick Bites

Filling:
1 cup Hazelnut Flour
1/4 teaspoon Salt
1/4 cup Golden Flax Meal
1/2 teaspoon Cardamom
1/2 cup Butter
1 teaspoons Sugar Free Hazelnut Syrup
1 tablespoon Sugar Substitute

Chocolate Coating:
8 tablespoons Coconut Oil
1/4 cup unsweetened Cocoa Powder
1/4 to 1/3 cup Sugar Substitute

Mix the flour, flax meal, 1 tablespoon sugar substitute and salt together in a food processor, then add the butter and hazelnut syrup, pulsing until they are well blended.   Scoop up about one tablespoon of the dough and roll into a ball about 1 inch in diameter.  Set on a wax paper covered plate.  Repeat until all the dough has been made into balls.  You should have one dozen.  Put the balls into the refrigerator to chill until they are hard.    Allow 45 minutes to an hour.

To coat, mix the cocoa powder and 1/4 cup sugar substitute in a bowl and add the coconut oil. Stir until completely mixed and syrupy. If it is too thick, add a little more coconut oil.  Taste it!  If it is too bitter for you, then add additional sugar.

Prepare a plate with parchment paper or waxed paper. Remove a few balls at a time from the refrigerator and drop one at a time into the chocolate coating mix. Roll the ball around with a fork, then slide the fork under it to lift it from the chocolate and place onto the plate. Repeat with each of the balls until they are all done. Return to the refrigerator to harden the coating. Store in the refrigerator until ready to eat.

Makes 12 Balls

Nutrition Info per candy:
Calories: 170 Fat: 17.5 g Net Carbs: 1.3 g Protein: 2.5 g

Dixie Carb Counters All Natural White Bread Mix

Product Review:

I admit that I have a fondness for Dixie Carb Counters products and that’s because they taste good.  This is the first time I’ve tried their white bread mix as I usually prefer the wheat bread, but now and then it’s nice to have white bread in the house.  Besides, PK prefers it when making peanut butter toast.

This bread mix is billed as “One Step Homemade All Natural White Bread” and it is that.  It couldn’t be simpler.  Put the mix in a bowl, add egg and/or egg whites and butter. Then mix it together for about a minute.  The instructions say to use a whisk, which I tried, but find unsatisfactory as too much of the dough accumulates in the inner wires of the whisk and it’s just thick enough that it doesn’t want to release easily.  So I just used a big spoon and stirred really well, getting to the mix on the bottom of the bowl.

Put the mix in a greased (or cooking sprayed) bread pan and cook in a 325 degree oven for 50 minutes.  What could be easier?  And the result is a beautifully browned load of white bread that makes 24 thin slices at 2 net carbs each.

The flavor is great!  The ¾ cup of melted butter added to the mix insures that it will have a buttery delicious taste.  It holds up well when cut and stands up to the additional butter or peanut butter that you spread across it.

For breakfast today, I made French toast using two slices and I had a little trouble with a little-too-thin piece of bread absorbing the egg mixture and holding together, but it only broke into two pieces when I started to lift it from the soaking pan.  It did not alter the taste of the French toast in any way, so it was still a win.

This bread would also make excellent bread crumbs for making anything that requires them.  You could add additional ingredients, such as sugar substitute, cinnamon and chopped fruit (watch the carbs on that) to make a very tasty fruit bread.  One of the things I want to try with the next loaf that I make is adding yeast to it since this isn’t really a yeast bread, even though it has yeast flakes in it.

My silicone bread pan is slightly larger than the 9”x5” pan suggested in the instructions so the loaf is slightly flatter than the one pictured on the package, so I think it would be a regular-sized loaf in a normal bread pan.

The mix can be purchased from Dixie Diner or through Netrition. Other places may carry it.  The mix sells for $9.99 at Dixie Diner or for $7.79 at Netrition.  Both have shipping offers.

Disclaimer:  I have not received any promotional items to review and no one from any of the companies whose products I review have asked me to do so. I have purchased the product and am giving my honest opinion about it. Should any company send me a product to try, I will state it up front and will still give my honest opinion.