Category Archives: Appetizers

Texas Style in Deviled Eggs

Texas Deviled Eggs - Skinny Girl Bistro

My grandmother, a third-generation Texan, and my mother made the best deviled eggs I’ve ever had. When I moved away from home, I discovered not everyone made their deviled eggs the same way. Then I found that PK’s mother was from East Texas and made her eggs almost the same way, but didn’t include bacon. For this reason, I’ve dubbed these Texas Deviled Eggs since the sweet deviled egg seems to come from that part of the country. When I take them to parties, people usually want the recipe.

Eggs are great on a low carb lifestyle because they are so low in carbs and it takes your body a long time to digest them, which keeps you satisfied for a while. These deviled eggs are wonderful to take on picnics or to 4th of July parties or other summer occasions. Just be sure to keep them in the cooler (with ice) until you’re ready to eat.

I’ve adapted these ever so slightly for low carb, mainly using sugar-free sweet pickle relish or sugar-free sweet pickles in them. If you can’t find the relish, look for the sugar-free sweet pickles and chop them finely in a chopper or food processor.

Texas Deviled Eggs

7 hard-boiled eggs, peeled (See Tip)
2 to 3 tablespoons mayonnaise
1 teaspoon mustard (or more to taste)
1 1/2 tablespoons sweet pickle relish (sugar-free)
3 pieces of bacon, fried and broken into pieces or use Hormel bacon pieces
1/2 teaspoon salt
1/4 teaspoon pepper
Paprika to sprinkle on the tops

Cut 6 eggs in half and scoop the yolk into a bowl. Set the whites on a plate to be filled later.  Cut up the last egg and add to the bowl. This will be the filling and the extra egg ensures a mound of filling on each half. Mash the filling with a fork until it is completely crushed and mixed together. Add the mayonnaise, mustard and pickle relish. Be sure to get the juice in it. Mix together, then stir in the bacon bits.  If the mixture is too dry, add a little more mayonnaise.  Add salt and pepper and mix it in.

Put a mound of filling in the center of each egg white half so that it completely fills it and spreads over the top. It may help to use your spoon to make four even sections of the filling, then use 1/3 of each section to fill the egg whites. Sprinkle paprika over the top for a light dusting of red, then place on serving plate, cover with plastic wrap and put in the refrigerator until ready to serve.

Makes 1 dozen egg halves. Serves six – 2 egg halves per serving

Nutrition Info per serving
     Calories: 133.5 Fat:10.5 g Net Carbs: 0.5 g Protein: 8.2 g

Tip:  Getting decent-looking eggs after boiling is sometimes a challenge.  There is some truth to not using really fresh eggs for this.  I try to plan ahead to allow at least a week for the eggs to sit in the refrigerator.  This makes it easier for the membrane to separate from the egg.  I put cold eggs in a pan of cold water to cover, then put on the heat and bring to a boil over medium-high heat.  Turn down and cook another 5 minutes, then turn the water off.  Let the eggs sit another 5 to 10 minutes, then run cold water over the eggs.  You can add ice to help chill them quicker.  Break the egg shells in several places and carefully peel part of the shell away and lift the membrane away from the egg if it doesn’t come free with the shell.  Put the egg back in the cold water, then peel the rest of the egg while trying to pull the membrane away from the egg gently.  If this is too much work for you, purchase pre-peeled eggs at the grocery store. They cost almost double but are worth it if you’re in a hurry.

Guilt-Free Chicken Tenders

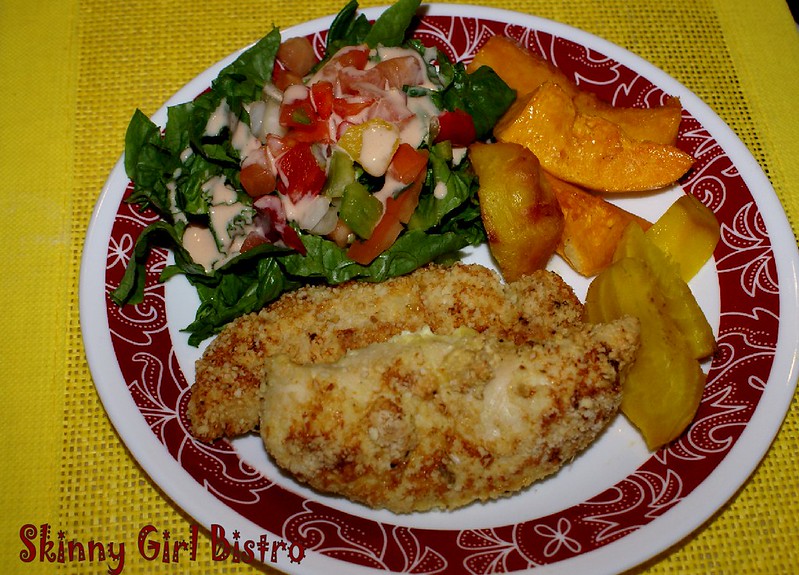
For everyone who loves chicken tenders, like me, but can’t have all the carbs in traditional breading, this is an alternate version I came up with based on the Betty Crocker recipe. It’s easy, not fried and uses low carb almond flour for the breading.  They taste wonderful, although not like a breaded one or an over-breaded one, in some cases.  The chicken is juicy and the flavor comes through beautifully.  This recipe makes 2 large servings or 3 to 4 smaller ones.  I found two of the tenders with the vegetables to be a very filling meal, but a  bigger appetite would probably want at least three of these.

Oven Baked Chicken Tenders

2 tablespoons low carb Flour (any fine mill type)*
1 Egg
1 tablespoon Water
1/2 cup Almond Flour or Ground Almonds
1/4 cup grated Parmesan cheese
1/2 lb Chicken Breast Tenders

Favorite dipping sauce, if desired

* Carbolose, CarbQuick, coconut flour, Bob’s Red Mill Baking Mix, LC Foods or any others.  You could possibly even use almond flour for the initial dredge as well as the final one. 

Preheat the oven to 425 degrees (F.) Prepare a baking pan with a piece of aluminum foil sprayed with baking spray.

Rinse the chicken tenders and dry with a paper towel. In a small bowl or saucer, put the low carb flour. In a small bowl, add the egg and water and beat until frothy. In another shallow bowl, add the almond flour, Parmesan cheese, salt, pepper and a garlic powder.

Lightly dredge a chicken tender through the plain flour, then dip in the egg mixture, then coat it on both sides in the almond flour. Put on the prepared baking pan. Repeat with the remaining chicken tenders. You should have about eight of them. Spray the top with butter-flavored cooking spray.

Bake for about 40 to 50 minutes until golden brown and no cloudy juices run out. Let sit a few minutes, then serve. Wonderful side dishes with it are roasted golden beets and butternut squash, as pictured, or celery root or kohlrabi fries or creamed cauliflower. A salad is a colorful additional also.

You can serve with a low carb ranch dressing or chipotle dressing or the honey mustard dressing below.

Makes 4 servings or 2 large servings.

Nutrition Info for 1 servings (based on 2)
Calories: 257 Fat: 11.7 g  Net Carbs: 2.3 g Protein: 35.3 g

Honey Mustard Dressing

1 teaspoon sugar-free Honey
1 tablespoon Dijon Mustard
3 tablespoons Mayonnaise

Mix all ingredients in a small bowl until completely blended. No carbs in this recipe!

Tip: If you can’t find sugar free honey – it can be ordered online at Netrition.com- then regular honey can be used. It will add 2.9 g of carbs to each serving.

If you try this recipe, please let me know how you like it or post any questions or suggestions you might have.

Wade into Water Chestnuts

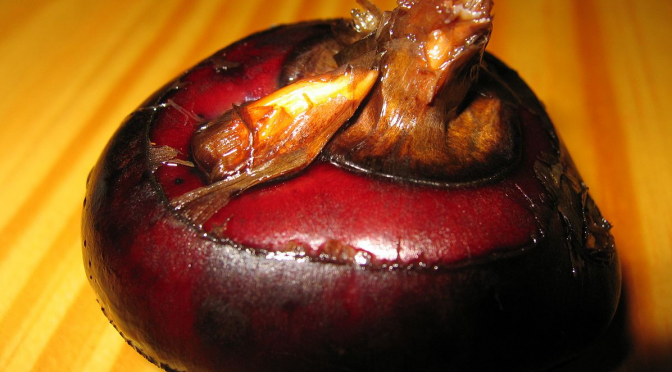
Quite literally. It’s called a water chestnut because that’s where this vegetable is grown — in a watery bed. In fact, it is often a rotating crop in rice paddy fields in many Asian countries and Australia, particularly because it is a popular ingredient in Asian cuisine. It has been cultivated in China since ancient times. Most likely, you’ve tasted it if you noticed a crunchy tan-looking nut thing in your Chinese food. It’s used in many recipes for the crunch and mild, fresh taste so it blends well with the other flavors.

The water chestnut isn’t actually a nut, but the root corm of a marsh grass in the sedge family. When they are fresh, they do resemble the actual tree-grown chestnuts and have what is described as a “mildly sweet apple-coconut flavor”.  Most of us obtain our water chestnuts from cans and some of this flavor has dissipated.

Like jicama, water chestnuts don’t get soft when they’re cooked, so they maintain that crisp crunch that works so well with stir-fried recipes. I love them in my broccoli beef or chicken stir-fries, but there are other ways to use them. The are a key ingredient in a Thai dessert dish called Rubies in Coconut Milk and in a Water Chestnut Cake that uses water chestnut flour, also called singoda flour. While I’d love to try this, the flour is entirely too high in carbohydrates to be effective in my meal plan, but if you’d like to give it a try, you can order it on-line from Amazon. Fortunately, I use the canned water chestnuts sparingly and a little goes a long way in a recipe.

Nutrition information for Water Chestnut 1/2 cup (62 grams)
Calories: 60 Fat: 0.0 Net Carbs: 13.0 g Protein: 1.0 g

Recipes:

Here are a couple of recipes from Skinny Girl that use water chestnuts:

Egg Foo Yung
Teriyaki Stuffed Mushrooms

My featured recipe is this simple to make and delicious appetizer. How can you go wrong with bacon and water chestnuts? The only caution is to not eat too many of them!

Bacon Wrapped Water Chestnuts

Bacon Wrapped Water Chestnuts

8 fresh Water Chestnuts
3 tablespoon Soy Sauce
2 tablespoons Brown Sugar Substitute
4 slices regular Bacon, cut in half
8 Toothpicks, use sturdy ones

Use warm water to rinse and drain the water chestnuts.

Put the soy sauce into a shallow dish and add the water chestnuts. Cover with plastic wrap and let marinate in the refrigerator for about 3 hours.

When ready to cook, preheat the oven to 350 degrees (F.)

Put brown sugar substitute on a saucer. Roll each water chestnut in the brown sugar, then wrap 1/2 slice of bacon around it and secure with a toothpick.  Roll each appetizer in the brown sugar mixture.

Put the wrapped chestnuts on a rack in a baking pan, then bake for 15 minutes, turn them over, then bake another 15 minutes, Baking them allows the bacon to cook thoroughly.

Makes 8 appetizers.

Nutrition Info per appetizer
Calories: 41.7 Fat: 2.8 g Net Carbs: 1.1 g Protein: 2.4 g

Tip: You can make these appetizers ahead of time and freeze until you are ready to cook them. Place them in a freezer bag and freeze for up to 3 months.

Information for this article was taken from Food Facts, Wikipedia,  About Food

Top photo is from Wikimedia Commons and is used with permission – “Wasserkastanie 2”. Licensed under Public Domain via Wikimedia Commons

Join In on Jicama

Oddly, even though I grew up adjacent to Mexico and thrived on Mexican food, jicama was something I really didn’t encounter. Not even when I moved to Southern California.  I didn’t “discover” it until about ten years ago when I spotted the odd-looking root in the grocery and decided to try it. What I found was an unusual vegetable that has a crisp, clean flavor and a bit of sweetness. It reminded me of an apple in texture and in crunch.

Most frequently, jicama seems to be cut into small sticks or grated and put into salads and slaws, where it does an admirable job. It can also be cooked, baked, boiled or fried. One of the interesting characteristics is that it doesn’t get soft. It keeps the crispness, which makes it great for a dipping chip, even if you fry it. It adds a bit of crunch to a stew while substituting for a higher carb’d vegetable.

Cultivated South of the Border

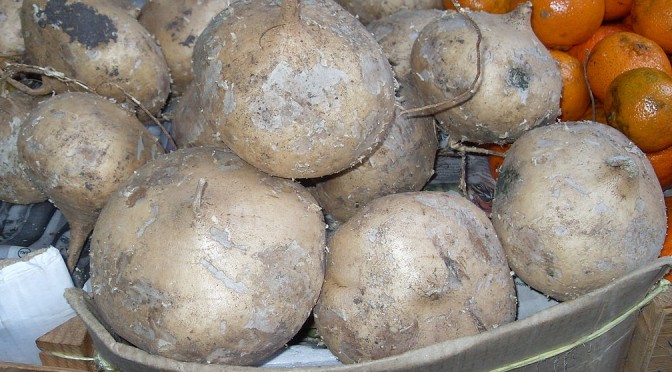
Pronounced hee-ca-ma, it is also called yambean, although it is not a yam. Jicama is native to Mexico and South America. It is part of the legume family and grows a vine in tropical and semi-tropical climates. The edible jicama root is a globular shape and has been referred to as Mexican turnip, although the flavor is nothing like a turnip, or Mexican water chestnut, which it resembles in crunch. Other names for it are bengkoang, sengkwang and yacon. The flavor suggest that it would also be good in Asian food as a water chestnut substitute. It is grown in Asia and in other tropical and semi-tropical areas, including Florida, Hawaii and Puerto Rico.

Nutrition Info per 100g (about3.5 oz)
Calories: 38 Fat: 0.19 g Net Carbs: 3.8 g Protein: 0.72 g

Jicama, how do I love thee?

Let me count the ways:

  • Peeled and cut into sticks as a snack.
  • Cut into rounds and fried as a dipper instead of potato chips.
  • Chopped and added to stir-fry.
  • Shredded and added to salad.
  • Cut into sticks and Tampura battered and fried.
  • Sliced and spread with peanut butter and sugar free jam.
  • Sliced and sprinkled with cinnamon and sugar substitute.
  • Sliced and roasted, then topped with cheese and bacon.
  • Sliced and sprinkled with lime juice and a bit of chili powder.
  • Cut into cubes and mixed with strawberries and blueberries in a fruit salad.
  • Or mixed with cantaloupe and honeydew melon in a fruit salad.

There are more ways than I can count to use this versatile vegetable.   If you have other ways you’d like to share, let me know.

Here are two ways to use jicama from this site:

Root Vegetable Fries (on the Celeraic page, go to the bottom)
Sizzlin’ Hot Snacks (toward the bottom, snack options with  beets, daikon and jicama)

And here’s a new recipe for jicama for this entry:

Cinnamon Battered Jicama Sticks

12 Jicama sticks, about 3 to 4” long, 1/2 inch cubed
1/4 cup Low Carb Flour
1 Egg
1/4 teaspoon Baking Powder
1 teaspoon ground Cinnamon
1/2 teaspoon ground Cardamom
2 tablespoons Sugar Substitute
1/4 cup sugar free Raspberry Jam or preferred flavor
Coconut Oil

Mix the flour, egg, baking powder, sugar substitute and spices together to make a batter.

Heat enough coconut oil in a small pan to bring it to about 1/2 inch. Reduce to a medium heat.

Dip a jicama sticks into the batter, then carefully slide into the pan of oil. Cook about three at a time until golden brown, then turn over to cook the other side to golden brown or spoon the oil over the top while cooking to brown the top. This only takes a couple of minutes. Remove to paper towels to drain. Spread with sugar free raspberry or other jam of choice.

Makes 12 snacks.

Nutrition info per snack
   Calories:16 Fat: 0.7 g Net Carbs: 2.0 g Protein: 0.8 g

All comments relevant to my posts are welcome. SPAM is not.  If the post has nothing to do with my site content, it will not be posted.

This article used the following for reference: Specialty ProduceNutrition and You,  Natural Society Newsletter

Top photo from WikiCommons, used with permission – By Wicki (Own work) [Public domain], via Wikimedia Commons

Sassy Salmon Spread for Tea Sandwiches

As I mentioned last week, I was helping with a tea party for a dear friend’s 90th birthday, which was on Saturday, Valentine’s Day. What a great party it turned out to be!

I posted the recipe for the Curried Chicken Sandwiches last week and this week, I am bringing you the recipe for the Smoked Salmon Spread. This is a fantastic and easy sandwich spread that incorporates the salmon into cream cheese to produce a lovely pink colored spread. I added a little dill to it along with a bit of red pepper. The result is delicious and has just a hint of bite. I forgot to take a photo as soon as the sandwiches were set out, so my photo shows most of the top layer of the carrier gone. I didn’t get any photos of the ones on my low carb focaccia bread, btu I can tell you, they were wonderful! You can use the spread on vegetable rounds, like cucumber or zucchini, instead of bread. Or you can put it on low carb crackers or Oopsie Rolls cut into finger-sized sandwiches.

Smoked Salmon Spread

4 oz. Cream Cheese, softened
1/2 tablespoon Heavy Cream
3  tablespoons chopped Cucumber
4 ounces  cold Smoked Salmon, thinly sliced
1/2  teaspoon  Lemon Juice
1/4 teaspoon dried Dill
1/8  teaspoon  ground Red Pepper
12  Low Carb Bread slices or 24 slices of thinly cut zucchini
1/4 cup Green Onions, chopped

Reserve 1 oz of the salmon for topping.

Process cream cheese and cream in a food processor until smooth, stopping to scrape down sides.

Add the chopped cucumber, 3 oz. of salmon, lemon juice, red pepper and dill; process until well blended.

Use low carb bread of your choice or thinly slice two or three large zucchini’s to use as a base. You could also serve on sliced cucumber rounds. I used low carb focaccia bread for my sandwiches. You could also use Oopsie Rolls as a base – make them into bread-sized squares.

Spread each slice of bread with the filling. Slice the bread into triangles or cut in half.  Top each sandwich with a small piece of smoked salmon and a sprinkling of green onions. Refrigerate for at least two hours before serving.

Makes 24 finger sandwiches.

Carb counts don’t include the bread or vegetable base, so that needs to be added.

Filling Only:
   Nutrition Info per recipe:
     Calories: 587  Fat: 49.8 g  Net Carbs: 7.3 g  Protein: 30.2 g

   Nutrition Info per sandwich – 24 yield:
     Calories: 24.5  Fat: 2.1 g  Net Carbs: 0.4 g  Protein: 1.3 g