Halloween is almost upon us and I am still celebrating pumpkin. If you’d like to make a special breakfast or brunch meal for Halloween or Thanksgiving or Christmas or traditionally for New Year’s Day, you can’t go wrong with biscuits and gravy. And yes, they can be made low carb. In fact, this dish, using one biscuit, is less than 4 net carbs when made with CarbQuick. It may be a little higher with other low carb flours.
Boy-oh-boy, this is a favorite dish of mine, so I have been working to get a really good recipe for them. I use CarbQuick for my low carb flour baking mix choice, but you can also use Bob’s Red Mill Baking Mix or Dixie Carb Counters or LC Foods. It might work okay with almond flour, but it’s best to try to mix another flour in with it. This recipe for biscuits is the tastiest one I’ve come up with so far. The gravy has a fall twist to it and also a bit of a spicy touch as I add pumpkin puree and chorizo sausage along with the regular sausage. It is a great flavor combination. Be bold. Give these a try.
Best Savory Biscuits
1 cup Low Carb Flour
2 tablespoons Shortening
1 teaspoon Baking Powder
1/2 teaspoon Baking Soda
1 teaspoon Sugar Substitute
1/3 cup Cheddar Cheese, shredded
1/2 teaspoon Garlic powder
Pinch Salt
Pinch ground Thyme
1 to 2 tablespoons Cold Water
Preheat oven to 375 degrees (F.) Spray a baking pan with cooking spray.
In a medium bowl, add the flour, baking powder, baking soda, garlic powder, salt, thyme and sugar substitute and mix together. Add the shortening and cut into the flour mixture with a pastry cutter or fork until the mixture resembles crumbles. Add 1 tablespoon of water and mix it into the dough. If it doesn’t pull together easily, add a little more water. You want the dough stiff but completely mixed.
Mix in the cheddar cheese until distributed. Divide the dough into quarters. Shape each quarter into a 3-inch round about 1/2-inch thick and place on the baking pan.
Bake for 18 to 20 minutes until golden brown. Makes 4 biscuits.
Nutrition Info per biscuit: Calories: 152.5 Fat: 12.8 g Net Carbs: 2.3 g Protein: 6.4 g
Pumpkin Chorizo Sausage Gravy
1/2 cup Heavy Whipping Cream
2 tablespoons Low Carb Flour
4 oz. Pork Sausage
2 oz. Basque Style Chorizo Sausage
1 teaspoon Worcestershire Sauce
1/2 teaspoon Cayenne Pepper
1 tablespoon Pumpkin Puree
In a medium skillet, brown the sausage and chorizo, breaking it into smaller pieces as you cook it. When lightly browned remove to a paper towel on a plate to drain. Stir the low carb flour into the grease in the pan to make a paste. If there isn’t enough, add a little oil to the pan.
Stir in the heavy whipping cream and 1 cup of water, the Worcestershire sauce and the cayenne pepper and mix well. Then stir in the pumpkin puree and the cooked sausage. The sauce will thicken as it cooks.
Split the biscuits in half and pour 1/4 of the sausage gravy over each biscuit.
Makes 4 servings or 2 hungry-man (or woman) servings.
Nutrition Information for both biscuit and gravy per serving: Calories: 327.4 Fat: 23.9 g Net Carbs: 3.9 g Protein: 12.4 g
In the northern hemisphere, the weather has begun cooling as we move into Fall. Places further to the north and at higher elevations are starting to see the first signs of fall with the trees beginning to change colors. Around here, all it takes is a cold snap at night and our trees begin the transition. I had one turn orange in spring one year when a false spring had lured it out, then a cold snap came in and the tree went into fall mode. It never got green through the whole summer, but the leaves stayed on until late fall.
This is truly the beginning of fall and for me that means cranberries and pumpkins and other winter squash. So I’m offering up my first fall recipe for this time of year– a delicious and wonderful low carb pumpkin muffin enhanced with chopped cranberries and pecans. I also have a secret ingredient to help keep them moist. So let’s just keep it between us, ok?
Cranberry Pumpkin Nut Muffins
I call these my deluxe muffins with everything good in them and less than 3.5 carbs! Yes, it looks like a lot of ingredients, but it mixes together quickly and with little fuss.
1/2 cup Low Carb Baking Mix
2 tablespoons Almond Flour
1/4 cup Vanilla Whey Protein Powder(optional)
1 tablespoon Sugar-Free Pudding mix (Vanilla, Butterscotch or Cheesecake)
1 teaspoon Baking Powder
1/2 cup Sugar Substitute
2 tablespoons Butter or Coconut Oil
1/2 cup Pumpkin Puree
1 teaspoon Pumpkin Pie Spice
1 oz Sugar-free Pumpkin Pie Spice Syrup (optional)
2 tablespoons Heavy Whipping Cream
2 tablespoons Water
2 large Eggs
3 tablespoons Liquid Egg Whites
1/3 cup Cranberries, chopped
1/2 cup Pecans or Walnuts, chopped
For the optional vanilla whey powder, use the equivalent amount of either baking mix or the almond flour if you prefer. For the pumpkin pie spice syrup, use just a little more sugar substitute and 2 tablespoons of water.
Preheat oven to 350 degrees (F.) Prepare 8 cupcake molds by spraying with baking spray or putting cupcake papers in them.
Chop the cranberries in a food processor so that they are small pieces but not too tiny. Chop the pecans into small pieces or break with your fingers.
In a medium bowl, add the flours, sugar, pumpkin pie spice and baking powder and mix together. Add the remaining ingredients, except the cranberries and nuts and mix until all the ingredients are moistened. Stir in the pecans and cranberries and mix into the batter well.
Spoon the batter into the muffin cups, about two tablespoons to each cup until they are about 2/3rds full. Bake for 25 to 30 minutes, depending on your oven. Check with a toothpick inserted in the middle. If it comes out mostly clean, they are done.
Makes 8 cupcakes.
Nutrition Info per cupcake: Calories:130.6 Fat: 10.2 g Net Carbs: 3.2 g Protein:5.9 g
I love the smell of cinnamon when it’s baking. It just brings the hint of good things; the fall and winter holidays that are just around the corner and the absolutely delicious taste it adds to baked goods. It also reminds me that I have less than two months until my holiday baking cookbook, Sweets by the Seasons, is due to be released. I am still making the recipes and taking photos, so I have lots of cooking yet to do, but it will be wonderful.
Here’s something I whipped together this morning, a quick to make breakfast muffin topped with a sweet and spicy streusel mix. I used a combination of low carb baking mix and whey protein powder, but you can make it with all baking mix. If you are using another type flour, like almond flour or coconut flour, then I suggest a combination of almond flour and coconut flour. Use 1/2 as much coconut flour as you would a regular flour and add two egg whites to the recipe in order to get the rise. You may need to add additional water for the coconut flour as it absorbs a lot of liquid.
Cinnamon Streusel Muffins
1 cup Low Carb Baking Mix
1/2 cup Vanilla Whey Powder
1/2 teaspoon Baking Powder
2 Eggs
1/2 cup Sugar Substitute
3 tablespoons Coconut Oil
1 teaspoon Vanilla Extract
1 teaspoon Cinnamon
1 tablespoon Heavy Cream
1 tablespoon Water
1/4 teaspoon Salt
Topping:
2 tablespoons Almond Flour
2 tablespoons Pecans, chopped (or walnuts or other nuts of choice)
1 tablespoon Butter, softened
1 tablespoon Sugar Substitute
1/2 teaspoon Cinnamon
1/4 teaspoon Cloves
Preheat oven to 350 degrees(F.) Prepare a 6 cup muffin tin by spraying with cooking spray or oil.
Prepare topping. In a small bowl, mix together the almond flour, chopped nuts, cinnamon, cloves and butter and mix with a fork until it forms small clumps.
In a medium bowl, add the baking mix or low carb flour, whey powder, salt and baking powder and mix together. Add the eggs, sugar substitute, oil, vanilla, cinnamon, heavy cream and water and mix together until the flour is completely mixed in. Add a little more water if the batter is too thick.
Spoon the batter into the prepared muffin wells, then top with the streusel mix. Bake for 20 minutes until golden brown. Cool at least 5 minutes before serving.
Makes 6 muffins.
Nutrition Info per muffin:
Calories: 225 Fat: 17.3 g Net Carbs: 2.2 g Protein: 14.3 g
Pizza is one of those things that is just so satisfying that it is missed terribly when you change to a low carb lifestyle. But it doesn’t have to be. You need to adjust your thinking. What makes a great pizza? For some, it may be the bread crust and if that’s the case, low carb is a definite challenge. But if it’s the toppings that are the main attraction, then it’s possible to make a different style low carb pizza. In fact, there are several ways to do it.
If you must have bread, you can make a flax meal pizza crust like the one here. Or you can order the flour or a completely made and partially cooked pizza crust, that is very good, from LC Foods. See it here. CarbQuick has a recipe on their box for a pizza crust that is also good. For those who may not know, CarbQuick is a low carb baking mix from Tova Foods. The box looks a little like Bisquick, but it is not the same.
Cauliflower crust pizza is a popular way to make a sort of crisp pizza crust that you can pile the topping ingredients on. There are many recipes on the web for this pizza, but here’s one from Your Lighter Side that is pretty tasty. One of my favorites, also from Your Lighter Side, is thechicken crust pizza. Don’t roll your eyes! It really works and it’s delicious. Chicken breast is baked, reduced to tiny crumbles in a food processor with mozzarella cheese and seasonings and pressed into your baking pan or pizza pan. It’s baked, flipped, then toppings go on and you bake it long enough to melt and brown the cheese. Delicious!
Other ways to make mini-pizzas include using a low carb tortilla base, a portobello mushroom base, and aneggplant slice base. Recently, I was thinking on this and inspiration struck! So I tried two new ways to do this. One is cauliflower base, but not like the riced cauliflower version, and the other is using spaghetti squash and this is my new favorite pizza base. Here are a couple of recipes with these options. I won’t say that these haven’t been tried before, but I came up with them, so they are new to me and the recipes are mine.
Cauliflower Pizza Slices
The roasted flavor on this gives a little more of the cauliflower than some people might like. It forms a solid base, but you still need a knife and fork to eat it.
1/2 lb Italian sausage
1/2 cup Bell Pepper, sliced
1/2 cup Mushrooms, sliced
1 cup Pasta Sauce (about 4 carbs per 1/2 cup)
1 cup Mozzarella Cheese, shredded
1 teaspoon Dried Red Chiles (optional)
Preheat the oven to 400 degrees (F.) Prepare a baking sheet with aluminum foil and cooking spray.
Slice the cauliflower into 1/3-inch thick slices. Trim off any leaves, but you want the slices to be large and flat. This will be the pizza base. Brush melted butter on each slice, then sprinkle garlic and oregano on top. Sprinkle Parmesan cheese on top of that.
Roast in the oven for about 10 minutes until the cauliflower is lightly browned and a fork penetrates easily. Remove from the oven and let cool for about five minutes. Turn the slices over so the browned side is face down.
Pre-cook the sausage in a skillet until just browned. Add the peppers and mushrooms and sauté another few minutes. If you wish to add onions, add them at this time also.
Spread 1/4 cup of pasta sauce over each slice of cauliflower then spread 1/4 cup of the filling on each slice. Top with 1/4 of the mozzarella cheese and sprinkle on dried red chiles, if you wish.
Makes 4 slices of “pizza”.
Nutrition Info per slice: Calories; 435 Fat: 34.2 g Net Carbs: 7.8 g Protein: 20.6 g
Spaghetti Squash Sausage Pizza
Simply the best tasting pizza crust that isn’t bread with delicious toppings highlighted by Italian sausage. This is basically the same topping as the pizza above, but you can vary your toppings however you like. The important part here is the crust. I have used spaghetti squash to sub for spaghetti, to make a tamale pie instead of masa and for many other things, so I thought, “Why not a pizza crust?” It does have a lot of moisture and I used a little almond flour to absorb the moisture. You could also use flax meal to do this. Or you could omit it entirely and it will still work. Just try to get as much water as possible out of the spaghetti squash.
Toppings:
2 links Italian Sausage
1/4 cup Bell Pepper, diced or sliced
1/2 cup Mushrooms, broken into pieces
1/2 to 3/4 cup Pasta Sauce (Vodka sauce is around 4 nc per 1/2 cup)
2 to 4 slices Provolone Cheese
1/2 teaspoon crushed Chile Peppers
Preheat oven to 400 degrees (F.) Line a 6″ x 10″ pan with parchment paper.
Check the spaghetti squash to make sure all seeds have been removed. Squeeze as much excess liquid out of the squash as you can and pat with a paper towel to dry. In a large bowl, mix the spaghetti squash, 1 cup of mozzarella cheese, Parmesan cheese, garlic powder, garlic salt and 1 egg together. Use a serving glove or wash your hand thoroughly, then mix the ingredients together, breaking the squash into smaller pieces. (You could use a food processor if you want, but it isn’t necessary.)
If it is very moist, you can add 2 tablespoons of Almond flour to help absorb the moisture. When completely mixed, spread the squash mixture into the pan on top of the parchment paper and smooth evenly to the edges.
Bake for about 25 minutes until the crust is turning a golden brown. Remove and cool for a few minutes, then lift the paper and flip the crust in the pan. Remove the paper.
Spaghetti squash pizza crust. I started to spread sauce on before I remembered to take the photo. It’s about 1/3 inch thick.
While the crust is cooking, prepare your toppings. In a skillet, add a little Olive Oil and saute the mushrooms and bell peppers. Remove to a dish. Add the Italian sausage (remove from the skin) and use a spatula or wooden spoon to break it up into small pieces. Cook until lightly browned.
Spread the pasta sauce to your liking over the top of the crust. Use between 1/2 cup and 1 cup, but be cautious. Pasta sauce varies in carbs per half cup and the lowest I’ve found is Mario Battali’s Vodka Sauce. Or you can make your own sauce.
Next, distribute the sausage over the top of the crust, then add the mushroom and peppers, sprinkling evenly. Spread mozzarella cheese over the top, then place the Provolone cheese on top. Sprinkle with crushed chile peppers for a bit of spice, if you like.
Loaded with topping and ready to bake.
Bake for about 15 minutes until the cheese is melted and lightly browned. Let set about 5 minutes then serve. Leftovers can be refrigerated or frozen.
Makes 4 slices.
Nutrition Info per slice: Calories: 467 Fat: 34.4 Net Carbs: 8.2 g Protein: 28.6 g
So there you have my options for low carb pizza. What have you tried and which do you like best?
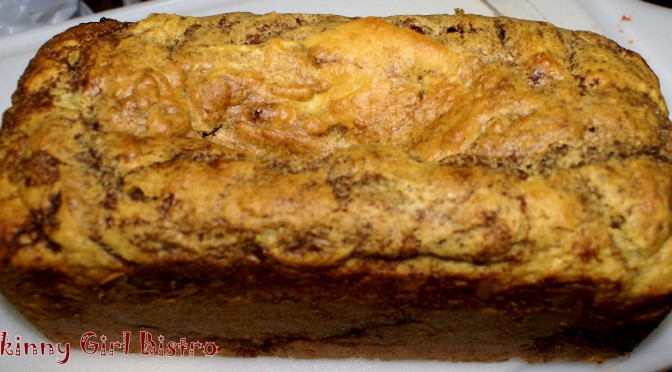
I tried the LC Cinnamon Rolls a couple of weeks ago and they were good, although small and somewhat troublesome to make. Read my review here. So this week, I am trying the Cinnamon Swirl Bread Mix from DCC. These are not really a cinnamon roll, but they have more cinnamon in them than many commercially made Cinnamon Breads from the market. They are also not a yeast bread, but more of an egg bread.
The mix goes together easily with the add-ins you need being 3 large eggs, 3 tablespoon soft butter, 1/4 cup sour cream, 1 teaspoon of oil and 2 tablespoons of water. The package has two packets in it; one has the bread mix and the other has the sugar free cinnamon sugar. You also need a 4”x 8” bread pan. This is the smaller loaf pan you usually use for fruit bread rather than the standard-sized loaf pan. To make it, you simply mix the first packet with the bread mix in with all the add-ins and stir, whisk or beat on a very low setting on the mixer to blend it together. Put 1/2 of the batter into the pan and spread it smoothly, then cut open the second pack and sprinkle the cinnamon over the batter evenly. Although it says to put all the cinnamon on this level, I saved some for the top because there is a lot of it.
Batter sitting on top of the cinnamon layer waiting to be spread.
Next you add the rest of the batter over the top of the cinnamon, smooth it out evenly. Add the rest of the cinnamon if you save some like I did, then use a knife to pull through the batter to spread the cinnamon into swirls. There’s really no right or wrong way to make this distribution. Just try to spread it evenly through without actually mixing it into the batter. Smooth the top out again and put it in a preheated 350-degree oven for 30 to 35 minutes. I cooked mine 30 minutes and it was a lovely golden brown, but I let it go a few minutes longer and pressed against the top to get the spring back. When it cooled, it did sink in the middle and was not completely cooked in the center. So I would say, depending on your oven, this might take 35 to 40 minutes to cook completely.
The flavor is wonderful. It has a very strong cinnamon flavor, as one would like a cinnamon bread to have, and it is more like bread than a coffee cake. A slice of this with a cup of coffee or tea makes a wonderful snack or light breakfast. Additional butter on top is optional. I don’t think it’s sturdy enough to pop in the toaster, but it would warm in a toaster oven or a microwave easily.
Ingredient-wise, the mix contains unbleached flour, soy isolate, cereal fiber, fructosaccharide (a naturally occurring fructose in plants), low glycemic monosaccharide (a simple low glucose sugar), baking soda, corn starch, dried egg whites, cinnamon, ground soy, vanilla powder, sucralose and low glycemic fruit concentrate. Sounds like a lot of chemical stuff, doesn’t it? But most of it is extracted from plants and is commonly used in baking.
The mix costs $9.30 plus shipping from Dixie Diners or you can buy it through Netrition.com for less (currently $7.29 plus shipping – hint, your whole order ships for $5.99 so order everything you want at one time). One of my biggest complaints about low carb mixes is that they are pretty pricey. In fact, almost any food mix that doesn’t use standard flours and sugar are usually more than double in price. I appreciate that these companies have gone to a lot of work and expense to develop the mix formulas, but it seems they would sell more if they weren’t so high.
Nutrition info for 1/16 of the loaf – it makes 16 slices. I usually cut it in eight slices, then cut each of those in half rather than trying to make 1/2-inch cuts.
Calories: 66 Fat: 0 g Net Carbs: 3.0 g Protein: 2.0 g
You could easily make these in muffin cups, making individual cinnamon rolls. Separate the batter into two sections, put about 1 tablespoon from the first section into each of 12 muffin cups, then sprinkle the cinnamon on top of each roll and add the rest of the batter from section 2 by tablespoons on top of that. Swirl the cinnamon through to mix and level the tops. Bake for about 25 to 30 minutes.
You could also add chopped nuts to the cinnamon layer if you’d like. For a dozen rolls, you would increase the net carb count to 4 nc per muffin.
On a scale of 5 spoons being the top, I would give this cinnamon bread mix five spoons and I am definitely ordering it again.
Tip: If you want to make this a great dessert bread, add a sugar-free Cream Cheese Glaze to it or a Warm Cinnamon Bourbon Syrup topping.
Mix the ingredients together by hand until completely mixed. If the icing isn’t thin enough to spread easily, add a little water until it is the desired consistency. Drizzle over the top of the bread.
In a small saucepan, add the ingredients and stir together well. Heat over medium heat until it thickens. Remove from the heat and spoon over the bread or cinnamon muffins.
Let me know if you try this bread (or the glazes)and how you like them.
Disclaimer: I have not received any promotional items to review and no one from any of the companies whose products I review has asked me to do so. I have purchased the product and am giving my honest opinion about it. Should any company send me a product to try, I will state it up front and will still give my honest opinion.


 The mix goes together easily with the add-ins you need being 3 large eggs, 3 tablespoon soft butter, 1/4 cup sour cream, 1 teaspoon of oil and 2 tablespoons of water. The package has two packets in it; one has the bread mix and the other has the sugar free cinnamon sugar. You also need a 4”x 8” bread pan. This is the smaller loaf pan you usually use for fruit bread rather than the standard-sized loaf pan. To make it, you simply mix the first packet with the bread mix in with all the add-ins and stir, whisk or beat on a very low setting on the mixer to blend it together. Put 1/2 of the batter into the pan and spread it smoothly, then cut open the second pack and sprinkle the cinnamon over the batter evenly. Although it says to put all the cinnamon on this level, I saved some for the top because there is a lot of it.