Category Archives: Breads

Product Review: Dixie Carb Counters Buns

Take a good look at that sandwich bun. It’s lovely, it’s fresh, and it’s easy to make as well as low carb!  What more do you need?!

To be specific, this is the Dixie Carb Counters ™ Multigrain Sandwich Bun Mix that I’m talking about. DCC makes excellent bread mixes. So far, when it comes to their breads, I haven’t found one that I didn’t like. The flavor is very good and they are sturdy breads. The same is true of the sandwich buns. Excellent taste and they hold up to a juicy hamburger just fine.

I made a few of these this weekend and tested one out with a hamburger at a friend’s BBQ and was pleased that it didn’t crumble at all under the big burger and the go-withs piled on it. Last night, I made a BLT sandwich with added guacamole and mayonnaise on it and the bun was sturdy enough to last through the sandwich. The best part is the bun is only 3 net carbs.

The mix is under $10 and it makes a dozen buns. The instructions include proportions for making 4 buns at a time or 1 bun, which I really appreciate. There are times you don’t want too many buns in the oven or the freezer although you can certainly make a batch and freeze them if you’d like. They are quick to make, mix together in about 5 minutes and cook about 12 minutes, then cut and use. The only ingredients you need to add to the mix are 1/3 egg whites for four buns, 2 teaspoons oil, and 1/3 cup warm water. They even provide four little aluminum pans in the package to bake the buns. What could be easier?

While I haven’t tried it yet, I’m pretty sure you could add some re-hydrated onion flakes to the mix to make an onion bun. Or you could add about 1/4 cup finely shredded cheese for a cheese bun or sprinkle the tops with sesame seeds if you are so inclined.

Nutrition information for one prepared bun, made following the instructions without any add-ins:
Calories: 126 Fat: 2 g Net Carbs: 3 g Protein: 14 g

On a scale of 1 to 5 with 5 being the top of the flavor profile, I would give this a 5 when prepared as stated on the package.

You can purchase this product from Dixie Diners website or through Netrition.com or any other stores that carry their products.

Disclaimer: I have not received any promotional items to review and no one from any of the companies whose products I review have asked me to do so. I have purchased the product and am giving my honest opinion about it. Should any company send me a product to try, I will state it up front and will still give my honest opinion.

A Darling Teacake for St. Patrick’s or Anytime

March 17 is just around the corner and the arrival of Spring is not far behind.

Why not celebrate St. Patrick’s Day or a belated St. David’s Day – a Welsh tradition celebrated on March 1 – with a tea? Nothing beats an afternoon pause in the day to have a cup of perfectly steeped Irish tea with a tasty cake or scone. It does wonders for your outlook.

In Irish, the tea is called cupan tae or cuppa tay.  How often have you heard let’s have a cuppa? Traditionally, teatime is around 11 a.m. for morning tea or between 3 and 5 p.m. for afternoon tea.  But there’s no need to stand on ceremony.  Anytime is a good time for tea. In Ireland, it’s common to have your tea with cream, but there’s a little trick to it. The custom began when folks put milk or cream into their fine china cups to prevent cracking when the hot tea was added.  Tea experts maintain that the milk needs to be added before the tea is poured as adding it afterward alters the taste of the tea.

To make a perfect cup of tea,  begin by filling a kettle with cool water and put it on to boil.  Next, add one teaspoon of fresh loose leaf Irish tea per person plus one for the pot. Add boiling water to the pot and allow it to steep for 5 minutes. While you wait, fill 1/3 of the teacup with milk or cream and pour the strong, hot Irish tea into each cup and stir.

Now for the tea cake to go with it…

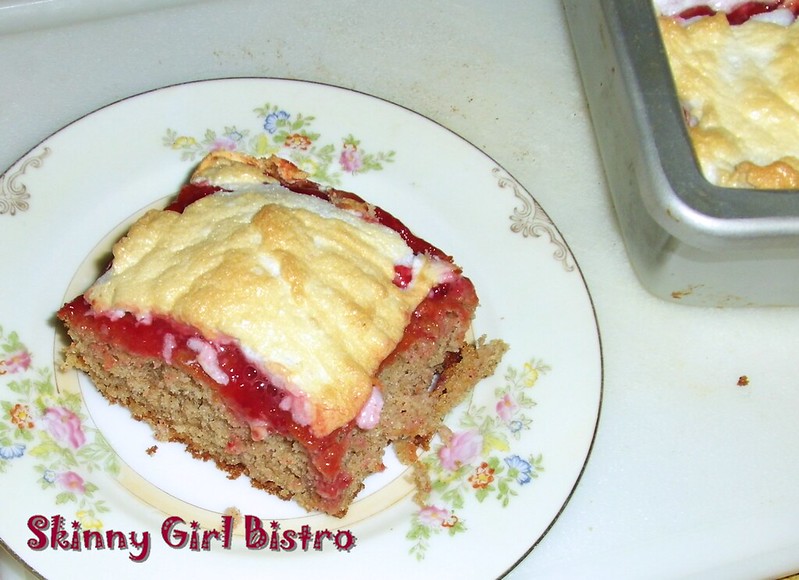
As I was browsing through a booklet of Welsh teatime recipes, I ran across this lovely little cinnamon cake, called a Teisen Sinamon in Welsh. I thought it was a little unusual since it called for a meringue topping, which I haven’t seen often on cakes. I made a few adjustments to make a low carb version and converted the ingredient measurements. This is a coarse-textured cake rather than a dessert cake, but it has excellent flavor and pairs well with either tea or coffee.

My version is also adjusted to a half-sized recipe to avoid too many leftovers. It’s best served right after the meringue is cooked.

Ingredient notes: I used vanilla whey protein powder as part of my flour mix since it brings additional flavor and texture to the cake. You can substitute any low carb flour you like into it. If you use any coconut flour, use 1/2 the called for amount it is replacing and add an extra egg. The net carb count will be higher with other flour choices. My baking mix is 3 net carbs per 1/4 cup and the whey powder is 1 net carb for 1/4 cup.

The recipe calls for 1 egg plus 1/4 cup liquid egg whites. You need to separate the egg and put the egg white from the egg aside to make the meringue.  Liquid egg whites won’t beat stiff enough to make a good meringue.

Cinnamon Cake baked in the pan. You can remove it and have a nice display cake or leave it in the pan and cut slices from it.

Welsh Cinnamon Cake

3/4 cup Low Carb Flour
1/4 cup Vanilla Whey Powder
1/2 teaspoon Baking Powder
1/4 cup Sugar Substitute
1/2 teaspoon Ground Cinnamon
1 Eggs, separated, plus 1/4 cup Liquid Egg Whites
Pinch of Salt
1/4 cup Butter
2 – 3 tablespoons Almond Milk or Cream
1/2 tablespoon Granulated Sugar Substitute
4 tablespoons Sugar-free Raspberry or Strawberry Jam

Preheat oven to 350 degrees (F.) Grease, or spray with baking spray, a 6-inch cake pan or square pan.

Mix the flour, cinnamon, and salt together in a bowl, then rub in the butter. Separate the egg, set the white aside, add the liquid white and beat together. Add the sugar and yolk mixture to the flour and mix well. Add enough milk to make a thick, moist dough. Pour or press the mixture into the cake pan and bake for 20  minutes until a toothpick tests cleanly.

Let cool in the pan for 5 minutes, then turn out onto a rack to cool.

Reduce temperature to 325 degrees (F.) Whip the egg whites until stiff, then fold in the sugar substitute. Put the cake on a paper-lined baking sheet and spread jam over the top of the cake, then pile on the meringue mixture. Put back in the oven and bake for about 20 minutes until the meringue is set and a pale brown.

Serve immediately. Makes 6 servings.

Nutrition Information per slice:
Calories: 148 Fat: 11.7 g Net Carbs: 4.6 g Protein: 7.4 g

Enjoy your tea break and let me know how you liked the tea cake!

White Pizza for a change of pace

Every once in a while, a body wants a packed-with-goodness pizza. That’s not always easy to do when you’re watching your carbohydrates. But it’s not impossible. You can use a couple of substitutes for the pizza crust that are pretty good, like chicken, portobello mushrooms, sliced eggplant, low carb tortillas, and this one I used for this recipe, a cauliflower pizza. Now, if you don’t like cauliflower, then choose one of the other options and just follow the toppings part of the recipe.

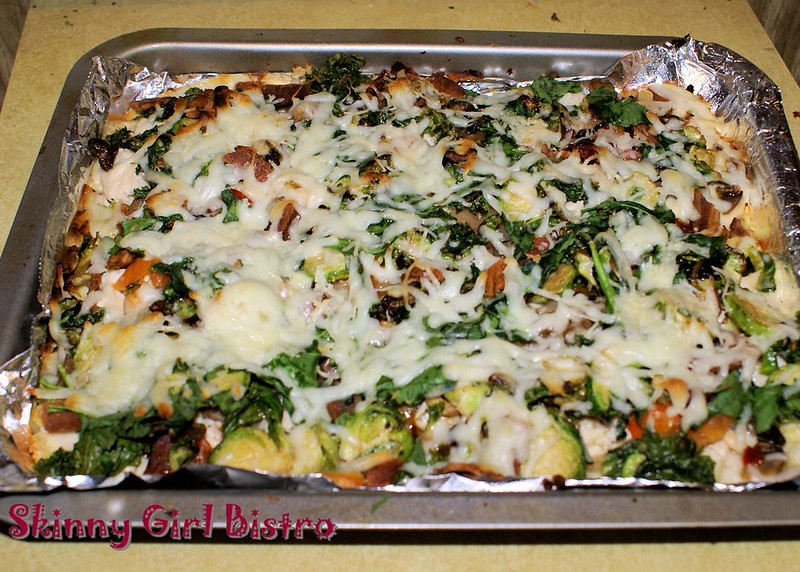
I made a vegetable-packed white sauce pizza. In this case the white sauce is simply an Alfredo pasta sauce. I used Classico because it is pretty low in carbs, but there are others that are also good for it. Check the jar and if it is around 3 net carbs per 1/4 cup, you’re in the ballpark. The taste of this is really great and the vegetables can be pretty flexible to what you like on it. Want it completely vegetarian, leave off the chicken and bacon, but it will have cheese. I’ve listed the carb counts for the crust separate from the toppings and the total combined as well. The crust is good for any pizza you’d like to make.

White Sauce Vegetable and Chicken Pizza

For the Pizza Cauliflower Crust
2 1/2 cups Cauliflower, grated
1/2 cup Parmesan Cheese, grated
1 Egg, slightly beaten
1/2 teaspoon Ground Oregano
1/2 teaspoon Garlic Powder
1/2 teaspoon Dried Basil

For the Toppings:
1/2 cup Brussels sprouts, sliced or shredded
1/2 cup Mushrooms, pieces or slices
1/2 cup Kale, chopped or torn
1/2 cup Spinach, chopped or torn
3 tablespoons Bell Peppers, chopped
1/4 cup Onions, chopped
1 1/4 cup Mozzarella Cheese, shredded
2 tablespoons Parmesan Cheese, shredded
1 cup Alfredo sauce (Classico)
1 cup Chicken Breast, cooked and sliced or shredded
2 slices Thick Bacon, cooked and crumbled

Preheat oven to 425 degrees (F.)

Crust:

Put your raw cauliflower in the food processor and pulse until it resembles rice or couscous. Or you can grate it by hand with a food grater. Put the grated cauliflower on a clean towel (flour sack towers are great for this), fold the towel over the cauliflower and squeeze to get as much water as possible out of the vegetable.

Put the dried cauliflower in a bowl and add the parmesan cheese, oregano, garlic powder, and dried basil. Mix in the egg, a dash of salt, and stir until completely blended. You can form it into ball at this point.

Put a sheet of parchment paper over a round stone or on a baking sheet. I used a baking pan lined with foil and it also works. Spray the foil with baking spray before you put the cauliflower in it. Shape the cauliflower dough into round pizza or a rectangle. Press it firmly together.

Bake for about 20 minutes until the crust is a golden brown. Pull it out and let it rest about five minutes, then add your toppings.

Vegetable Pizza

Prepare all the vegetables while the crust is cooking. Only the chicken and bacon are pre-cooked, although you can parboil the Brussels sprouts if you cut them in slices so that they aren’t too crunchy. Put them in a pan of boiling water for three minutes, then rinse in cold water and drain. OR put them in a bowl in the microwave for three minutes then drain.

Before the final cheese is spread and the pizza cooked.

Spread half of the Mozzarella cheese over the crust, then spread the Alfredo sauce over the top of that. Distribute the chicken and vegetables evenly over the crust and top with the bacon pieces. Sprinkle the rest of the mozzarella over the top and bake for 15 minutes until the cheese is melted and lightly browned.

Cut and serve. Makes 4 servings.

Nutrition Information per serving (crust and toppings):
Calories: 418 Fat: 26.2 g Net Carbs: 9.7 g Protein: 36.4 g

Nutrition Information per serving (crust only):
Calories: 92.5 Fat: 5.1 g Net Carbs: 2.5 g Protein: 8.1 g

Nutrition Information per serving (toppings only):
Calories: 325.8 Fat: 21.1 g Net Carbs: 7.2 g Protein: 28.3 g

Easy Pumpkin French Toast

You don’t have to go to a fancy pancake house to drool over pumpkin pancakes or French toast that’s out of your carb range.  You can make this delicious treat easily at home.  And it is so satisfying to know you can eat it and not feel guilty.

French toast variation and you will love it if you’re craving pumpkin. If you’re one of those that doesn’t care for pumpkin, you can make this without the pumpkin and have really great French Toast.

Pumpkin French Toast

1 Egg
1 tablespoon Coconut Oil or Vegetable Oil
2 tablespoons Pumpkin Puree
1 teaspoon ground Cinnamon
1/4 teaspoon ground Cloves
1/2 teaspoon Vanilla Extract.
1 tablespoon Sugar Substitute
Pinch of Salt
1 1/2 tablespoon Low Carb Flour  (Baking Mix or Almond Flour)
1 teaspoon Coconut Flour
1 tablespoon Vanilla Whey Protein Powder

For egg dip:
1 egg
1 tablespoon Cream
1 teaspoon Sugar Substitute
1 teaspoon Cinnamon
1/4 teaspoon Ground Cloves

1 tablespoon Butter
1 teaspoon Sugar-free Confectioner’s Sugar (optional)

In a microwaveable small bowl, prepare a magic muffin pumpkin muffin by mixing the egg and coconut oil together well until there are no white strings. Stir in the pumpkin, salt, sugar substitute, vanilla, cinnamon and cloves and mix well. Add the flours and vanilla whey powder and stir until mixed in well. Tap the bottom of the bowl to settle the mixture and release any air bubbles.

Microwave for one minute and let cool for about five minutes.

While the bread is cooling, mix one egg, cream, sugar substitute, cinnamon, and cloves in a bowl or shallow pan to make the dipping batter. Cut the muffin across the middle to make two evenly sized rounds. Put the bread in the pan and let it sit a couple of minutes to soak up the batter. Repeat on the other side.

Heat a non-stick skillet to medium heat and add 1 tablespoon of butter. Spread it around the pan as it melts. When the butter is slightly bubbly, put the soaked bread rounds into the pan and cook until they are browned on one side, about four to five minutes, then flip to cook the other side until browned. The cooking time varies with the temperature of the skillet, so watch them closely. If they are getting browned too quickly, lower the heat. You want the egg batter to cook all the way through.

Remove cooked rounds to your serving plate and sprinkle with sugar-free Confectioner’s Sugar. Serve with sugar-free maple syrup.

Makes one serving.

Nutrition information per serving:
Calories: 533.4 Fat: 43 g Net Carbs: 7.8 g Protein: 23.1 g

Apple Bread with Cinnamon

I’m continuing my celebration of the tastes of Fall with a real treat. Another staple of the fall season, although it is available year round these days, is the apple. If you’ve had an apple languishing in your kitchen for a while, it begins to get soft as it ripens and that’s the perfect time to make apple bread that tempts you with chunks of apple in the spiced dough.

You can make this with a combination of low carb flours, but don’t use all almond flour or all coconut flour as they tend to crumble. My recipe uses 1/4 coconut flour, which doubles in volume when it’s moistened,but use 1/2 cup with any other flour. I also used vanilla protein powder, which adds taste and texture, but you can substitute any other low carb flour for it.

1/2 cup Pecans or Walnuts, chopped (optional)
1 cup Apples, diced (about 1 medium)
3/4 cup Low Carb Flour
1/4 cup Coconut Flour
1/4 cup Vanilla Whey Protein Powder  (optional)
1 teaspoon Baking Soda
1 tsp Baking Powder
1/2 cup Coconut Oil
3 large Eggs
1 tablespoon Cinnamon, ground
1/2 tsp Clove, ground
1 teaspoon Vanilla Extract
1 cup Sugar Substitute

Core and chop the apple and it should yield about 1 cup. It’s not necessary to peel unless it has a tough skin. I used a Gala apple.

Preheat oven to 350 degrees F. Lightly grease or spray a small loaf pan with baking spray.

In a bowl, mix together the dry ingredients – flours, protein powder, coconut flour, baking soda and baking powder. In a separate larger bowl, mix the liquid ingredients – eggs and coconut oil – with the white sugar substitutes and the vanilla. Mix in the flour. If the batter is too thick to stir easily, add enough water to stir the ingredients. Then stir in the apples and nuts. Spoon into the prepared bread pan.

Bake for 35 to 40 minutes, then test with a toothpick inserted in the middle. The toothpick should come out clean. If not, bake another 5 minutes and retest. You want it to be moist, but not undercooked. Let cool for about 15 minutes. Run a knife around the edge of the pan, then turn out onto a cooling rack or a plate.

Makes about 12 slices.

Nutrition Info per slice:
Calories: 188 Fat: 15.7 g Net Carbs: 3.8 g Protein: 6.1 g