Category Archives: Breakfast & Brunch

Fantastic Figs – A Good and Versatile Fruit

Living in West Texas as I was growing up, figs weren’t a common fruit in our grocery stores and most of what I experienced were the ones in a dried fruit platter sent by relatives in California at Christmas. I wasn’t that impressed, leaving them to the rest of the family to eat. When I moved to Los Angeles after graduation, my Aunt Emilie introduced me to canned Kadota figs, which were beautiful and plump with a lovely, fruity taste. We usually ate them for breakfast. Still, figs have never been at the top of my favored fruit list.

Even though Nevada borders on California, I rarely see fresh figs at the grocery stores. When I do, they tend to be a little pricey, but I did pick some up a year ago only to cut them in half and dry them for later use, such was my enthusiasm for actually eating them. But when I chose to put them in this blog, I was reminded of the Kadota figs and how much I enjoyed them.

Health Benefits

When I started researching, I found that figs are extremely nutritious. They’re a good source of potassium, help lower blood pressure, reduce cholesterol, and are a fiber-rich food. Additionally, the leaves are also good for you. In some cultures, they are a regular part of the diet. One of the properties of fig leaves is that they have anti-diabetic properties and can help lower insulin. Fig leaves appear to also lower levels of triglycerides in animals and inhibit the growth of some types of cancer cells.  Research is underway to determine the effectiveness.

History

Figs have a Biblical beginning and certainly the fig leaf played a prominent role in the story telling. They were mentioned in the Bible and other ancient writings. One of the first foods cultivated by man, the edible fig is believed to have originated in Egypt and spread from there to Crete. Around the 9th century BC, they arrived in Greece and became such an important part of the Grecian diet that they passed laws to ensure the best quality ones stayed in Greece. Across the way, the Romans considered the fig a sacred fruit. At least 29 varieties of figs were known at this time.

In the late 19th century, figs were brought to California by Spanish missionaries to San Diego, but the trees were not equal to the quality of those that came from Europe. California horticulture began improving the cultivation and processing techniques in the early part of the 20th century. Now, California is one of the largest producers of figs, rising alongside Turkey, Greece, Portugal and Spain.

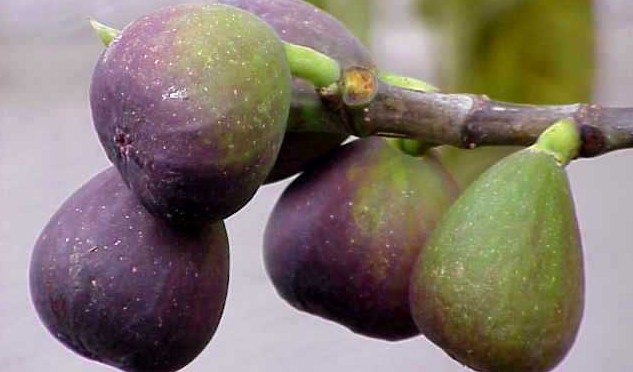
Popular figs in production in California are Brown Turkey Figs, Black Mission Figs, Kadota Figs and Calmyrna Figs. They come to market between mid-May and mid-December. Figs can be used fresh or dried. I dried my figs in a small dryer that I own and put them in a plastic bag to keep in the refrigerator or freezer. They can be reconstituted somewhat if you put them in hot water and let them sit about an hour. From a carbohydrate stand-point, I prefer drying my own fruit so that no additional sugar is added.

Nutrition Information for 1 medium fig (2 1/4 inch inch diameter)
   Calories: 37 Fat: 0.2 g Net Carbs: 8.6 g Protein: 0.4 g

For now, this recipe for scones made with figs is the only recipe on my site that uses them.  That will change when I can get my hands on more figs.  There are many wonderful-sounding recipes at California Figs.

Fig-a-licious Scones

1 cup Low Carb Flour
2 tablespoons Almond Flour
2 tablespoons Vanilla Whey Protein Powder*
1 tablespoon Oat Fiber*
3 tablespoons Sugar Substitute
1/4 teaspoon Salt
1/2 tablespoon Baking Powder
1/4 cup cold Butter
1/2 cup dried Figs, chopped (about five)
1/2 cup slivered Almonds, toasted and chopped
1 large Egg
1/2 teaspoon Vanilla extract
1/4 cup Buttermilk

* Vanilla Whey Powder and Oat Fiber are optional ingredients. The recipe will work perfectly fine if you use the equivalent amount of the other flours to replace them. They add texture and more fiber but are not necessary.

Chop the dried figs into small pieces. After I softened them and was able to cut them with a knife, I put them in my small food chopper and chop them to little bits. Toast the slivered almonds in a small skillet over medium heat, stirring until they just start to brown. Set aside for now.

In a medium bowl, mix together the flours, protein powder, oat fiber, sugar, salt and baking powder. In a small bowl or cup, add the egg, vanilla extract and buttermilk and beat together. Cut the cold butter into little pieces and add to the flour. Use a pastry cutter or your clean or gloved fingers to mix the butter into the flour until it resembles little crumbs. Add the egg and milk and mix together with a spoon until the flour is completely mixed in. Then add the chopped figs and almond and mix completely through the dough.

Prepare a baking pan with parchment paper or a silicone baking mat. Sprinkle a tablespoon of low carb flour on the pan, then turn the scone dough onto the paper or mat. Pull it together, kneading a few times, then shape it into a 6 or 7 inch round. Using a sharp knife, cut a score line across the middle, then score three slices on each side of the middle line. If you wish, you can cut all the way though and separate by easing each section out a little to allow them to bake with a crust on all sides. I left mine scored so the inside cuts are not crusted.

Put the pan in the freezer for 30 minutes to chill the dough well. This will help it to hold its shape while it bakes. 10 minutes before you are ready to bake, preheat the oven to 425 degrees (F.).

Bake the scones for 18 to 20 minutes. Let cool for a few minutes before serving with clotted cream or butter.

Nutrition Information per scone
   Calories:221.5 Fat: 17.5 g Net Carbs: 6.2 g Protein: 0.9 g

References used for this article include: Wikipedia, World’s Healthiest FoodsNature’s Pride and California Figs

Top photo permission from Wikipedia:  “Ficus carica0” by Kurt Stueber – link: [1], part of www.biolib.de. Licensed under CC BY-SA 3.0 via Wikimedia Commons

Hints of Spring with Ham & Asparagus Egg Muffins

Lovely spears of asparagus are on sale at the grocery store, which is a sure sign that spring is on the way.  Of course, we are all hoping for a big thaw in some parts of the country and in my area, we are expecting the usual spring snow or two.  In fact, weather may be coming in this weekend, but for now, I am enjoying the sunny, but cold, days and the sight of asparagus in the grocery store.

So that’s the inspiration for this simple, very low carb recipe for ham and asparagus egg muffins.  They’re muffins only in the sense that they’re baked in muffin cups.  They make a wonderful breakfast-on-the-run — just grab one or two, pop ’em in the microwave and take them out the door with you.  One thing I wouldn’t recommend on this, and I tried it, is to use muffin papers with it.  The paper just sticks to the egg or vice-versa and it’s a bit of a mess.  Grease the muffin wells with butter or baking spray to get the entire cavity covered and they should come out fairly cleanly.

Ham & Asparagus Egg Muffins

8 Eggs
1/2 cup Ham, cubed
4 to 6 speaks Asparagus, chopped
1/4 cup Mini Peppers, chopped
3 tablespoons Heavy Cream
1/2 cup Ricotta Cheese
1 cup Sharp Cheddar Cheese
1 teaspoon Salt
1/2 teaspoon Black Pepper

Preheat the oven to 355 degrees (F). Prepare a 12-well or two 6-well muffins tins by spraying with cooking spray or coating with butter or oil.  Make sure to come all the way up the sides.

In a large bowl, break the eggs and add the cream, salt and pepper and ricotta cheese and mix well with a whisk. Add the ham, asparagus and peppers, then stir in 3/4 cup of the cheese.

Use a 1/4 cup measure to scoop and fill each of the muffin cups to about 3/4 full  with the egg batter.

Bake for 25 minutes, then sprinkle the rest of the cheese on top of each muffin and cook an additional 10 minutes.

Let cool before serving or putting into storage bags to put in the refrigerator.  Heat in the microwave for about 30 seconds or eat at room temperature, if preferred.

Makes 12 egg muffins

Nutrition Info per muffin:
Calories: 129 Fat: 9.6 g Net Carbs: 1.3 g Protein: 8.9 g

Sassy Salmon Spread for Tea Sandwiches

As I mentioned last week, I was helping with a tea party for a dear friend’s 90th birthday, which was on Saturday, Valentine’s Day. What a great party it turned out to be!

I posted the recipe for the Curried Chicken Sandwiches last week and this week, I am bringing you the recipe for the Smoked Salmon Spread. This is a fantastic and easy sandwich spread that incorporates the salmon into cream cheese to produce a lovely pink colored spread. I added a little dill to it along with a bit of red pepper. The result is delicious and has just a hint of bite. I forgot to take a photo as soon as the sandwiches were set out, so my photo shows most of the top layer of the carrier gone. I didn’t get any photos of the ones on my low carb focaccia bread, btu I can tell you, they were wonderful! You can use the spread on vegetable rounds, like cucumber or zucchini, instead of bread. Or you can put it on low carb crackers or Oopsie Rolls cut into finger-sized sandwiches.

Smoked Salmon Spread

4 oz. Cream Cheese, softened
1/2 tablespoon Heavy Cream
3  tablespoons chopped Cucumber
4 ounces  cold Smoked Salmon, thinly sliced
1/2  teaspoon  Lemon Juice
1/4 teaspoon dried Dill
1/8  teaspoon  ground Red Pepper
12  Low Carb Bread slices or 24 slices of thinly cut zucchini
1/4 cup Green Onions, chopped

Reserve 1 oz of the salmon for topping.

Process cream cheese and cream in a food processor until smooth, stopping to scrape down sides.

Add the chopped cucumber, 3 oz. of salmon, lemon juice, red pepper and dill; process until well blended.

Use low carb bread of your choice or thinly slice two or three large zucchini’s to use as a base. You could also serve on sliced cucumber rounds. I used low carb focaccia bread for my sandwiches. You could also use Oopsie Rolls as a base – make them into bread-sized squares.

Spread each slice of bread with the filling. Slice the bread into triangles or cut in half.  Top each sandwich with a small piece of smoked salmon and a sprinkling of green onions. Refrigerate for at least two hours before serving.

Makes 24 finger sandwiches.

Carb counts don’t include the bread or vegetable base, so that needs to be added.

Filling Only:
   Nutrition Info per recipe:
     Calories: 587  Fat: 49.8 g  Net Carbs: 7.3 g  Protein: 30.2 g

   Nutrition Info per sandwich – 24 yield:
     Calories: 24.5  Fat: 2.1 g  Net Carbs: 0.4 g  Protein: 1.3 g

A Bit of Spice in a Chorizo and Egg Casserole

Coming from the southwest, you just know that I love Mexican food and that includes the spicy chorizo sausage that is mixed with chile.  The basque chorizo that I first found more frequently when I moved to Reno is a solid, easily cut version and it doesn’t melt in the skillet as the Mexican chorizo does.  This recipe is definitely for the Mexican variety.  These days, it’s packaged in a plastic tube and you can cut it open and squeeze it into the skillet.

Mexican style chorizo in a plastic tube. Chorizo can be pork or beef or a combination.


I made a small 2 or 4 serving (depending on how hungry you are) casserole of this, but it’s easy to double it to make a larger size.

Chorizo and Egg Casserole

4 eggs
2 oz Chorizo
1/4 cup sliced Bell Pepper
1/4 cup diced Onions
1/2 cup Mexican Cheese (Queso Fresca)
1/4 cup grated Cheddar Cheese
1 teaspoon Mexican Oregano
1/4 teaspoon Chile Powder
1/4 teaspoon Pepper
1/4 teaspoon Salt
1 teaspoon Olive Oil

Preheat oven to 350 degrees (F>)

In a skillet add the olive oil and chorizo and cook over medium high heat until the chorizo begins to melt. Add the onions and bell peppers and continue to cook until the onions are tender and the chorizo is completely melted. Turn heat to low.

In a bowl, beat together eggs and seasonings. Add most of the Mexican cheese, saving a little for topping. Pour the eggs into the pan with the chorizo and stir to mix well. The eggs will begin to cook as you stir. Remove from heat. Spray a small casserole dish with cooking spray and pour the egg and chorizo mixture into the casserole. Sprinkle the remaining Mexican cheese and shredded cheddar cheese over the top.

Bake for 30 to 35 minutes until the eggs are set and the cheese is melted. Let cool about 5 minutes before serving.

Makes 2 servings.

Nutrition Info:
Calories: 431 Fat: 32 g g Net Carbs: 3.9 g Protein: 29.5 g

*I’ve actually pictured 1/4 of the recipe serving, which is what I usually eat, so picture double the amount of that wedge in a regular serving.

A Curried Chicken Tea Time Sandwich

Curries are very popular in Britain, so it’s no surprise that there’s a lovely curried chicken tea sandwich on some menus.  Happily, it’s an easy recipe to adapt to low carb and easy to make.  I am co-hosting a birthday tea for a dear friend who is turning 90 on Valentine’s Day and I plan to bring these sandwiches along with smoked salmon and cream cheese ones. These are colorful and delicious.  They also make a great luncheon open-faced sandwich.

The bigger challenge with these is the low carb bread.  You can make your own.  I made a low carb focaccia-style bread for this and that worked perfectly.  Or you could try this flat bread with it.  You can also spread it on low carb tortillas and roll them up, then slice into a pinwheels.  Or you can ditch the bread altogether and spread it on zucchini cut lengthwise to make the base.   However you do it, if you like curry, you’re going to love it.

 Curried Chicken Tea Sandwiches

1/4  cup  Unsweetened Flaked Coconut, re-hydrated
2 tablespoons Coconut Milk or Heavy Cream
1 teaspoon Sugar Substitute
1/2  cup  chopped or slivered Almonds
1  (8-ounce) package Cream Cheese, softened
2 tablespoons  sugar-free Orange Marmalade
2  teaspoons  Curry Powder
1/8  teaspoon  Salt
1/8  teaspoon  Pepper
2 cups  diced cooked Chicken
12  (1/2-inch-thick) slices low carb Bread
1  tablespoons diced Green Onions or fresh Parsley.

To rehydrate the coconut, place in a shallow bowl, add 1 tablespoon coconut milk or heavy cream, 1 tablespoon water and sugar substitute. Stir together, then let sit for at least 15 minutes.

In a medium bowl, add the softened cream cheese and 1 tablespoon heavy cream and beat until smooth. Add the salt, pepper, curry powder and orange marmalade and mix in. Reserve 2 tablespoons of the almonds and mix the rest into the cream cheese mixture.

In your food processor, put in chunks of chicken meat and pulse a few times to chop it to small pieces. Don’t cut them too small, but it will make the mixture easier to spread on the bread if the piees are about 1/4″ . Alternately, chop the chicken finely on a cutting board. Stir the chicken into the cream cheese mixture.

For Tea:
Spread the mixture evenly on the bread slices, trim the crusts. Top with a few pieces of the reserved almonds and green onions. Cut each slice into 3 finger sandwiches. Makes 36 finger sanwiches.

For Luncheon:
Spread the mixture evenly on the bread slices and top with almonds and green onions or parsley. Makes 12 open-faced sandwiches.

Nutrition Info per finger sandwich (filling only):
Calories: 45 Fat: 3.3 g Net Carbs: 0.7 g Protein: 03.4 g

If your bread is 2.0 carbs per slice, your net carbs per finger sandwich would be about 1.4 net carbs.

Nutrition Info per luncheon sandwich (filling only):
Calories: 135 Fat: 9.9 g Net Carbs: 2.1 g Protein: 10.2 g

If your bread is 2.0 carbs per slice, your net carbs per luncheon sandwich would be about 4.1 net carbs

I’d love to hear how you like this if you try it and how you serve it.    Please send me comments.