Category Archives: Condiments and Sauces

Pursuing the Pasilla Pepper Confusion

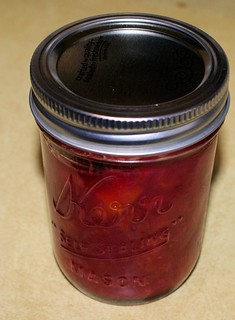
My mother didn’t cook too often, usually stepping in to make something unusual or different from the standard fare that my grandmother served. Coming from a ranch family, my grandmother focused a lot on basic ranch food, meat and potatoes, chicken and hearty food. Mother liked to bake the unusual breads, the different cultural dishes. One of the things that she did every now and then was to make from-scratch enchilada sauce. I remember her coming home from a trip across the border with a bag filled with dried, very dark chiles. She pour boiling water over these and let them sit until they were soft, then put them through a sieve using a large pestle to mash them forcing out the chile juice and pulp that formed the base for the sauce. I believe that the chiles she used were Pasilla peppers.

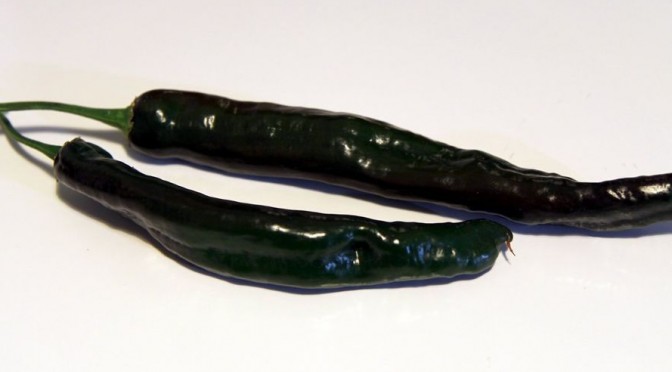
When I began looking into the background of these peppers, I found there is a bit of confusion about what exactly a pasilla pepper is. Several sites that sell them and Wikipedia are adamant that pasilla, also called chile negro, are the dried chilaca pepper. This is a long, narrow pepper in the Capsicum annum family. It is very dark, almost a chocolate brown color when dried and I am pretty sure these are the chiles that my mother used for her sauce. Like many chiles, it ranges from mild to a middle of the range hot.

However, it seems the California camp has muddied the culinary waters a bit as grocers and cooks in California call the dried form of the poblano chile a pasilla also. This creates two lines of thinking in regards to what a true pasilla is. A couple of recipes I read even include the ancho chile as pasilla, when an ancho is actually the dried form of the poblano. It’s clear that cooks aren’t certain what pasilla is. The word pasilla, pronounced pa-see-ya, translates to “little raisin”, which more properly describes the dark brown chilaca when it is dried.

348px-Capsicum_annuum_ancho_dried
Ancho chile from the poblano pepper.  Photo from Wikimedia Commons, used with permission – “Capsicum annuum ancho dried” by User:Carstor – Own work. Licensed under CC BY-SA 2.5 via Wikimedia Commons –


220px-Capsicum_annuum_pasilla_dried
Pasilla peppers from the chilaca chile. Photo from Wikimedia Commons, used with permission. “Capsicum annuum pasilla dried” by User:Carstor – Own work. Licensed under CC BY-SA 2.5 via Wikimedia Commons –


For cooking purposes, any dried chile will work to make enchilada sauce. The different chiles used will alter the taste and hotness of the sauce. Commercial chili powder uses a variety of chiles, such as ancho, jalapeno, New Mexico Hatch and pasilla. The chili powder is also excellent in making Tex-Mex Chili or any other kinds of stew chilies. One famous chef uses chili powder as the base for his enchilada sauce, so it can be a simple process to make homemade sauce or you can start from the dried peppers. One thing is pretty certain, it will be thicker and more flavorful than any canned enchilada sauce you buy.

Nutrition Information per 1 oz (28 grams) of pasilla
Calories: 97 Fat: 4.0 g Net Carbs: 6.0 g Protein: 3.0 g

Keep in mind that once pressed to get the liquid and pulp out, the nutrition value may decrease somewhat, but for calculating the recipe, it’s best to count the number of peppers rather than the finished quantity of sauce to be on the safe side.

Recipes:

So far, I haven’t tried making homemade enchilada sauce, but with Cinco de Mayo just around the corner, I am thinking I will give it a try. At least, I’ll make  one beginning with chili powder or possibly one recipe that uses chipotle peppers, which you can buy canned in their sauce. So, I will refer you to a couple of recipes from other sites.

This recipe for Irma’s Red Enchilada Sauce starts with dried pasillas and dried Ancho or New Mexico chiles. If the pasillas are very crisp, they may already be roasted and you don’t need to roast them a second time.

Here’s a picture-by-picture recipe for Homemade sauce on Instructables using California or Hatch chiles.

And this is the Chipotle sauce recipe that is a little simpler.

Coming next month, I will put up a low carb recipe for enchiladas using low carb whole wheat tortillas instead of corn tortillas and homemade enchilada sauce in time for Cinco de Mayo! (That’s the 5th of May celebration for those not familiar with Mexican customs.)

All comments relevant to my posts are welcome. SPAM is not.  If the post has nothing to do with my site content, it will not be posted.

Information for this article came from Wikipedia, Eat More Chiles, and Spices Inc

Top photo of pasillas is from Wiki Commons, used with permission- “Fresh chilaca chilies” by Jonathanischoice – Photographed on my kitchen bench. Licensed under CC BY-SA 3.0 via Wikimedia Commons –

Peachy Keen Grilled Chicken with Peach Salsa

Chicken with Peach Salsa with a side of sauteed Broccoli and Kale with Raspberry Vinaigrette.

Confession right up front here, I adore peaches.  When I started the Atkins diet again four years ago, I was dismayed to see that peach was only an acceptable food in phase 4, the maintenance phase of the program.  I eased them back into my program about a year ago as I do consider myself basically on maintenance at this point.

So image my surprise when I got a regular update from Atkins touting this wonderful recipe that included a peach salsa and it said it was ok for phases 2 to 4.  That would be any time after the two-week induction phase.  Good news for all of us, but with all things that are too good to be true, it doesn’t mean you can go crazy with it!  You still need to watch the carbs because a medium peach is 9.1 g of sugar and that registers as 9.9 net carbs of the 10.1 carbs in it.  That can be a bump in your daily allotment.   So use in moderation.

So, peachy keen.  I was anxious to try this recipe from Atkins, but I did make a couple of modifications to my version.  It is absolutely wonderful, moving into the “make often” list.  And when I served the peach salsa up, I found it was more than enough for the chicken and actually got three large servings from it.  I put the last serving away and used it for two smaller servings as a side dish with Chicken Alfredo the next night.  The salsa would also be wonderful with grilled, broiled or braised white fish and I just bet it would be great with pork chops.

Grilled Chicken with Peach Salsa

My version of the Atkins recipe is almost identical to theirs except I substitute bell pepper for the jalapeno pepper. Love jalapenos, but my stomach isn’t so crazy about them as I age. Besides, I had a Mexi-red pepper from m garden to add in.

2 chicken breasts halves (about 4 to 5 oz each)
1/2 Teaspoon ground Cumin
1/2 Teaspoons Red Chili Powder or Cayenne Pepper
1/4 Teaspoon Onion Powder
1/4 Teaspoon Salt
1/4 Teaspoon ground Black Pepper
3 Teaspoons Olive Oil, divided
1/2 Peach, firm, but ripe, about medium-sized, diced
1/4 cup Bell Pepper, diced
1/4 cup Red Onion, diced
1/2 medium Tomato, diced
1 1/2 Tablespoons fresh chopped Cilantro
1 teaspoon Sugar Substitute
1 Tablespoons fresh Lime Juice

In a small bowl, combined the chile powder, cumin, salt, pepper, and 2 teaspoons olive oil to make a paste. Rub 1/2 the paste into the top of the chicken breasts, turn them over and rub the rest onto the back. Let the chicken marinate while you prepare the salsa.

If you are using a grill that take 10 to 20 minutes to warm up, now is the time to start pre-heating.  I use a Foreman Grill for two, which is large enough for two small chicken breasts and takes about 5 minutes to do the job. It only takes a short time to warm up, so I go ahead with the salsa before warming the grill.

Chop the peaches, bell pepper, onion and tomato into bite-sized pieces. Be sure to remove the membranes on the pepper as well as any excess seeds or juices. Place in a small bowl. Add the cilantro, lime juice and sugar substitute with 1 tablespoon olive oil. Mix the oil and fruit, adding salt and pepper to season. Cover and refrigerate until the chicken is grilled. This can be prepared ahead of time and it will keep a couple of days in the refrigerator.

Grill the chicken until it is done and juices run clear. Place the chicken on serving plates and top with the peach salsa.

Makes 2 servings.

Nutrition Info per serving
Calories:272.5  Fat:13.4 g  Net Carbs: 6.5 g  Protein: 29.8 g

Peach Salsa only
Nutrition Info per serving – 4 servings per recipe
Calories:44.9  Fat: 3.6 g  Net Carbs: 3.0 g  Protein: 0.4 g


Six Hot Weather Dining Options

“Hot August Nights” is underway in Reno, Nevada and the weather is doing its best to provide the atmosphere for it.  For those who don’t know, “Hot August Nights” is a classic cars event with the highlights being on cars from the peak of Rock ‘n’ Roll, but really, lots of old cars, in excellent condition, are motoring all over town.

But when the weather is hot, the last thing you want to do is spend a lot of time in the kitchen.  This is great for grilling outdoors if you can take the heat, but it’s also a good opportunity to make salads, particularly if you pick up one of the pre-grilled chickens from the grocery store and use that rather than heating the oven up to roast it yourself.  Other options are the deli-cuts at the store, canned tuna, turkey, chicken and salmon made into a tasty chicken salad.   You can add hard boiled eggs easily, and avoid the heat in the kitchen if you purchase pre-boiled ones — also saves on peeling them.

If you do have to cook ingredients, like for a tasty turnip cauliflower salad, do it early in the morning or late at night when it’s a little cooler.  With this in mind, here some links to a few salad options that I already have posted on this site and my latest offering, which is up today.  They are all delicious and low carb, so you enjoy the summer with cool, refreshing salads.

Turkey Salad With Golden Beets – My newest addition to the Summer Salad lineup is a delightful offering.  It’s easily made with canned turkey or freshly chopped cooked turkey, so it doesn’t heat up the kitchen when the nights are barely cooler than the days.   The page includes a recipe for Low Carb French Dressing or use a low carb commercial one.

Crisp Cucumber Salsa –  This is so refreshingly delicious.  I’ve made it a few times this summer already.  You can use it as a dip or as a salad.  The lovely sweet taste of cucumber mixes wonderfully with the slight bite of chile.

Mexican Style Asparagus Salad –  So very tasty.  It has a little bit of a bite, but it isn’t detracting.  Asparagus are a little pricier at the market now, but this salad may be worth it.  Make it a main meal salad by adding grilled or roasted chicken or salmon to it.

Springtime Coleslaw – This is just as good in the Summer as it is in the Spring.  The only iffy thing, carb-wise, in this is the pineapple.  It isn’t on Phase I or Phase II of Atkins, so you might omit it.  If you decide to use it, be sure it is fresh, not sweetened pineapple.

Strawberry Chicken Salad – This is one of my favorite salads.  I love the fresh berries in it, although it does come in a bit higher in carbs than I normally like my main meal to be.  It is filling and satisfying though.  To make it a little lower, you could omit the golden beets and cut the lime juice in the dressing back to just 2 tablespoons.   You can also swap out those strawberries for raspberries to get a slightly different flavor.  Or you could use salmon or turkey in place of the chicken.  Want to try a different dressing?  Why not?  Just be aware of the carb counts on the dressing.

Texas Style Turnip Cauliflower Salad – Such a part of my childhood, this style potato salad was a staple at every picnic and many Sunday dinners.  I had to recreate it in a low carb version and this was my solution.  Since I first put this recipe out, I have added kohlrabi into the mix and even a cup of celery root.  Both of these bring even more to the flavor and I don’t really miss the potatoes at all, because the dressing and the blended flavors of the vegetables are just as good.


Peach Jam is Peachier Without the Carbs

I needed to clear some space in my freezer last week, so I took out the frozen peach slices that I’d done last summer and moved them to the ‘fridge.  By the time I got to them this week, they had gotten soft and there was about a cup of peach juice in the bag, so I decided to turn them into peach jam.  You can start with fresh ones, but they won’t have much juice, so you’ll need to add water.  But the flavor is great and sine they use sugar substitute for sweetening, they are low in carbohydrates and calories.

Easy Peach Jam

3 cup peach slices with juice, if there is any
1/4 cup water if there isn’t any juice
1 teaspoon Cert-O or other canning preservative
1 teaspoon lemon juice
1/4 cup sugar substitute
1 teaspoon ground Cinnamon
1/8 teaspoon ground Clove (optional)

Put all the ingredients in a medium-sized pot over medium heat and stir as you bring the pot to a boil. Reduce heat to simmer and cook for 20 minutes. Check a couple of time to stir and add water if needed. Check to see if the peaches are sweet enough. If not add a little more sugar substitute.

At this point you have peach compote which can be cooled a bit, then stored in a clean jar and used as topping, side condiment or even made into a peach pie.

For jam, put the cooked peaches into a food processor and pulse a few times until the jam is smooth. Put this back in the pot and simmer until the jam is thick and the consistency you like. Let the jam cool for about 15 minutes, then put into a clean jar and store in the refrigerator.

Fresh jam without preservatives will keep in the refrigerator for about two months. If you made more than you can eat in that time, put the rest in a freezer bag and freeze until you are ready to eat it.

Makes about 1 1/2 cups of jam or 24 one tablespoon servings.

Nutrition Info per recipe
Calories: 219  Fat: 1.3 g  Net Carbs: 46.4  Protein: 3.6 g

Nutrition Info per tablespoon
Calories: 9.1  Fat: .1 g  Net Carbs: 2 g  Protein: 0.1 g

Fruit of the Desert – Prickly Pear

When I was a kid, we used to travel across the southwest on vacation every other summer. Among the stop points along the way in many states was a Stuckey’s Store. They had gas, food, souvenirs, turquoise jewelry and cactus candy. In spite of having looked at it many times, I never once tried the cactus candy. So now, when presented with a few cactus pears from the volunteer cactus in my yard, I thought I would make cactus marmalade before tackling a candy.  PK had a recipe her mother used to make prickly pear orange marmalade. It sounded good.

Learn From My Mistakes

Well, the first try didn’t go too smoothly. I picked the pears carefully using tongs and a big bowl, brought them in and used tongs to hold the pear while I burned the thorns off. I even thought that prickly pears should be purple, but they felt a little soft to the touch, so I cut them up, as one preparation instruction said I could and popped them into the food processor to reduce them to pulp and juice. Except there was very little juice at the end. I put them on the stove and boiled them with water, but the result was about 1/4 cup of ugly brown liquid that had no flavor. The pears need to change color, which in turn meant getting ripe. Not one of the articles I read on the prickly pears stated that they should be completely purple or deep orange or whatever color they change to from green. Mine were on the plant so long that I thought they must not change colors. Since it was turning to winter and they still hadn’t turned but were shriveling up slightly, I thought they must not change colors. Scratch the first attempt.

Success

I started checking the markets and found one that had some of the pears in and they were half purple already. I let them sit about a week in a brown paper bag until they were completely purple and soft. The purchased ones already had the thorns burned off, but I still used precautions in handling them, in case there were tiny hair-thin stickers on them. You should use gloves when handling them or use a fork to hold them while cutting. To prepare, cut the ends off each end of the pear, then run a knife from one end to the other cutting under the skin. You can then carefully peel it back to reveal the pear inside.

This attempt came out pretty good. I thought the oranges made it bitter when I tasted the jam while cooking and I threw more sugar substitute at it. But once I tasted it after it was cooled down, using a teaspoon or so in with a cup of vanilla yogurt and whipped cream, I didn’t notice the bitterness, so perhaps the oranges need time to absorb the sweetness into the skins and pithy part. I also thought a thin skinned orange, rather than a navel orange, might be better so may try it with the little cuties oranges.

Now to the recipe. This can be used to make enough for canning, but I don’t include any canning instructions. This recipe makes about three 8 oz. jars of marmalade. You can double it to make more. You can also buy the prickly pears, peel them. reduce them to a puree, then put them in a plastic bag and freeze it to use later. Just don’t forget you have it in the freezer, as I sometimes forget things, and they end up being tossed out because they are found after three years. This recipe is adapted by me for low carb and I added a little ground clove to it. I used LC Foods Cranberry Sauce Mix to thicken it. You can just use a sugar substitute. The amount is in parentheses. If you don’t care about it being low carb, feel free to use sugar.  It will take two cups or more. One recipe suggested one cup of sugar per one cup of fruit mix. I think that’s too sweet.

Toni’s Prickly Pear Orange Marmalade

2 medium Navel Oranges, skin on
8 Cactus Fruits
Juice from 1 Orange strained
1/2 cup LC Foods Cranberry Jam mix or sugar substitute (1 cup sugar)
20 drops liquid Sucralose (1 cup sugar)
1 Lemon, juiced
1 teaspoon ground Clove

Cut off ends of the oranges, then slice very thinly, tossing away any seeds. Place in a bowl with 2 cups of cold water and allow to stand for at least 3 hours. (I soaked them overnight.) Pour orange water into a bowl, then put orange slices in a food processor to chop into smaller pieces.

Orange slices soaking in water.

Cut off ends of cactus fruit, then peel. Puree in a food processor then push through a small colander or sieve to get rid of the seeds. Combine with the orange juice and orange slices with orange water in a heavy sauce pan and bring slowly to a boil.


Prickly pear puree with froth on the top. Look at the beautiful color of this marmalade!

Turn heat to high and boil quickly for 5 minutes, skimming off any froth that rises to the surface.  Stir in the sugar, clove and lemon juice. Bring up to a boil again, lower the temperature to a medium heat and continue boiling and skimming until mixture thickens to almost a jam consistency. Taste to make sure it is sweet enough. Add more sugar if necessary. It will thicken more as it cools.

Prepare jars by and lids by running  them through your dishwasher to clean and heat the jars. Spoon marmalade into jars, leaving 1/2 inch at the top for the seal.

Prickly pear marmalade in the pot and…
… a bit of it on a scone. Yum!


Makes about three jars.

Nutrition Info per tablespoon of jam:
Calories: 13  Fat: .1 g  Net Carbs: 2.9 g  Protein: .2 g

POSTED BY RENE AVERETT AT 10/13/2013