Category Archives: Beef

Super Ground Beef Chile

This time of year just calls out “make chile” to me because nothing warms you up quite like a nice, spicy bowl of chile. Adding beans to it adds more carbs than I sometimes can allow in my daily menu, so I make an all meat chile. This version uses lean ground beef, which makes it quicker to make and bacon to add a little more flavor. The result is delicious. I’ve left the beans as optional if you want to use them.

6 slices Bacon
3 pounds lean Ground Beef
1 package Chili Seasoning
2 cans (14 1/2 ounces each) Diced Tomatoes, undrained
1/2 cup diced Onions
2 teaspoons Garlic, minced
4 oz. can chopped Green Chiles
1 Bell Pepper, chopped
1 cup Medium Hot Salsa
1/2 cup Red Beans (optional)
1 teaspoon Cayenne Pepper

Fry bacon strips in a large, deep skillet until almost crisp. Remove to paper towel to drain. Drain off fat, leaving about 1 tablespoon in the pan. Add garlic and onion and cook until the onion is almost tender. Add to the crock pot.

In the same skillet, brown the ground beef, but don’t cook all the way through. Drain fat. Add to the crock pot. Break the bacon into pieces and add to the crock pot. Add the diced tomatoes, salsa, chopped chiles, chile seasoning and cayenne pepper. Stir together to mix it well.

Cook on high for one hour, then reduce to low heat for 2 hours. Check seasonings and adjust if necessary, then cook for another 30 minutes with the lid off to thicken.

Serve with crumbled Queso Fresco and sour cream.

Makes 10 servings

Nutrition Info: (No beans) per serving
Calories: 240 Fat: 16.0 g Net Carbs: 5 g Protein: 14.4 g

Nutrition Info: (With beans) per serving
Calories: 251.4 Fat: 16.0 g Net Carbs: 6.3 g Protein: 15.1 g

Cottage Pie is Comfort Food

When winter is howling at the windows and the temperatures are dropping into the red zone of the thermometer, it’s time to look for warming, hearty food dishes that make you feel secure. One of those is the Shepherd’s Pie or Cottage Pie. The basic difference between the two is the meat used for the filling. Strictly speaking, if it’s lamb, you have a Shepherd’s Pie. Any other filling is a Cottage Pie.

This Cottage Pie is made with minced up beef or ground beef. I found a package of chopped carne asada, which is basically steak meat cut in tiny pieces, at my grocery store or you can it into small bites yourself. Instead of using potatoes, I used a combination of cauliflower, turnips, and kohlrabi to make the mashed vegetables to top off the stew-like filling. You can use all cauliflower or any combination of the vegetables that you prefer.

This dish tastes wonderful and it fills you up with a warming winter dish that won’t add unwanted pounds.

Cottage Pie

1 lb ground or minced Beef
2 slices of thick-sliced Bacon
1/2 cup Onions, chopped
1 teaspoon minced Garlic
1 cup Mushrooms, sliced
1 large Carrot, diced
1 cup Green Beans, diced, cooked
1 tablespoon Low Carb Flour
1/2 cup diced Turnips
1 cup Cauliflower, chopped
1/2 cup Kohlrabi, chopped
1 tablespoon Heavy Cream
1 cup Beef Broth
2 tablespoons Butter
Seasoning Salt & Pepper to taste
1/2 teaspoon Garlic Powder, optional
1 cup Cheddar Cheese, optional

Preheat oven to 350 degrees(F.)

Cook turnips, cauliflower and kohlrabi in a pan of water until tender. Drain well, then mash with a masher or in a food processor. Add cream, garlic powder, salt, and pepper.

Cook bacon in a heavy skillet, drain on a paper towel. Pour off most of the bacon fat, leaving about 1 tablespoon, then add the garlic and onion and lightly brown. Add the beef and stir fry until lightly browned. Stir in the mushrooms and cook a few minutes. Mix the low carb flour into the beef broth and add to the skillet and bring to a boil. Break the bacon into pieces and add to the pan along with the cooked carrots and green beans and cook until the mixture thickens.

Pour into an 8×8 baking pan. Smooth the turnip and cauliflower mixture over the top to form a top crust. Sprinkle optional cheddar cheese over the top.

Bake for 35 to 40 minutes until the top is lightly browned. Let cool about five minutes, then serve.

Makes 4 servings.

Nutrition Information per serving:
Calories:480 Fat:35.9 g Net Carbs:4.6 g Protein: 31 g

Zest for Zucchini

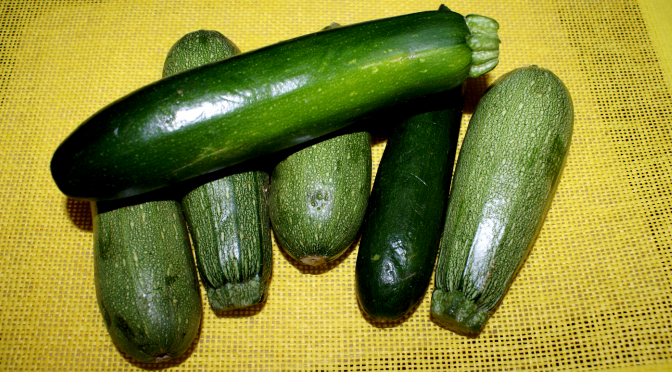
Zucchini is one of the favorite vegetables of the world and it certainly ranks high in my culinary endeavors. It is delicious almost any way you prepare it and there are countless ways to use it in your cooking from salads, to main course to appetizers to desserts and breads. However, zucchini is part of a much larger family that includes other summer squashes, winter squashes, melons and cucumbers. Yep, they are all related, some a little closer than others.

Greenhouses, importers, and various growing locations worldwide have ensured that we can find zucchini in grocery stores at any time of the year. Others in the family, like yellow, crookneck and scallop squashes don’t show up as consistently. They each have their own unique flavor and blend well together when cooked. Zucchini has a delicate flavor, an edible skin, and a creamy off-white flesh. Generally the smaller, 3 to 4-inch vegetables are the best for eating since the seeds are smaller and edible and the flavor is at its best, I think. As they get bigger, they get tougher, seeds are bigger and the flesh isn’t as sweet. If you are stuffing a zucchini, try to look for about 5” and as big around as you can find.

Besides the delicious vegetables — oh, wait, that isn’t really a vegetable, but a fruit! It is formed in the same manner as fruits, so technically it is one of them. But I will continue to count it in the vegetable column. The zucchini also produces an edible golden flower. I admit, I have never cooked one of the flowers, although they are popular fried. I did have a couple of plants one summer that did not cross-pollinate because the flowers were all I got. The male flower blooms first to attract bees and the female blossom, which has the bud of a tiny fruit under it, needs to be pollinated by the bee. If this doesn’t happen, no zucchini will form. I was once told that you need at least two plants, but that apparently, isn’t necessary so long as the plant produces a female blossom. If no bees are in the area, you can transfer some of the pollen using a Q-Tip to dip into the male flower and put it in the center of the female bloom. Doesn’t that sound romantic?

All squashes have their ancestry in the Americas, but they have spread around the world. They are easy to grow and mature quickly. It’s one of the few plants that I can actually get a decent crop from in the micro-climate of South Reno. Native Americans called squashes one of the “three sisters” in their culture. The other two were corn and beans, which are also native to the Americas. The squash blossom is a popular design motif in Native American art and jewelry.

The squash we now call zucchini was developed in Italy from the root squashes brought back from America. It was cultivated,  in the late 19th century and likely near Milan. The name came from zucca, which is the Italian word for pumpkin or squash and the suffix “ino” or “ina”, meaning little and becoming zucchini in the plural form. The French called it “Courgette” and it is known that way in much of Europe, so if you see that in a recipe, you know it is zucchini or vice versa. They are known as baby marrow in South Africa.

As little as 30 years ago, the zucchini was barely known in the United States and it was referred to as the Italian squash. It was likely brought to the country of its ancestors by Italian immigrants. But it took hold and has become  popular to eat and grow.

Going back to its roots, zucchini, like all summer squash, is delicious with its other two sisters, corn and beans, and popular in Native American and Mexican foods. While beans and corn are used sparingly in a low carb lifestyle, summer squashes are very low in carbohydrates, which makes them awesome!

Nutrition information 1 medium (196 g)
Calories: 33 Fat: 0.5g Net Carbs: 4.0 g Protein: 2.4 g

Recipes

There are several recipes on this site that feature zucchini:

Bacon & Zucchini Stuffed Sole
Zucchini Fritters
Chicken with Tomatoes & Zucchini
Zucchini and Sausages Bake

Featured Recipe

Since Cinco de Mayo is just around the corner and the squash is a Native American, which includes Mexico and South America, crop, it seems apropos that the recipe should honor that heritage. The Mexican name for squash is calabacitas and the Mexican zucchini is similar to the Italian one but more rounded and tear drop shaped. This is an original recipe I’ve developed over the years.

Calabacitas y Carne Con Queso

Mexican Squash with Meat and Cheese
Recipe by Rene Averett

3 cups Mexican Zucchini (or regular zucchini)
1 lb Beef, ground
1 can Chiles, mild or medium to your preference
1 cup Cheddar Jack Cheese, shredded
1/2 cup Mexican Cheese, Queso Fresco or similar
1/2 cup diced Onions
1 cup canned Diced Tomatoes, with juice
2 Low Carb Tortillas
1 cup Jicama, shredded or cubed or Daikon Radish, chopped
1 clove Garlic, minced
1 tablespoon Olive Oil
1/2 teaspoon ground Cumin
1 teaspoon dried Mexican Oregano
2 tablespoon fresh Cilantro
1 teaspoon Cayenne Pepper

Preheat oven to 350 degrees (F.)

Slice zucchini into 1/4″thick rounds.

In a large skillet over medium heat, add olive oil and heat a minute or so, then add garlic, jicama and onions. Stir cook the onions until they are fragrant and shiny. Add ground beef and lightly brown, then add seasonings, chiles and diced tomatoes. Stir and cook for about 10 minutes until hot and bubbly. Stir in the fresh cilantro.

Spray a round 2 qt. casserole dish with baking spray. Layer 1/3 of the zucchini on the bottom of the dish. Pour 1/3 of the meat mixture over the top, then sprinkle 1/3 cup of cheddar jack cheese over that. Put a tortilla on top and repeat with another layer of zucchini followed by the meat and cheese. Put the second tortilla on top and use the rest of the zucchini, meat and cheese on top of that.

Bake for 25 minutes until the casserole is hot and bubbly. Sprinkle the Mexican cheese over the top and return to the oven for another 5 minutes to melt the cheese.

Makes 6 servings.

Nutrition Info per serving :
Calories: 260 Fat:17.0 g Net Carbs: 8.7 g Protein: 16.3 g

And it’s Z-end of the the A to Z blog challenge! I will resume my usual Tuesday post schedule next week, but I thank everyone who stopped by to visit and comment during the A to Z Challenge. I hope you will continue to visit now and then.


Input for this article came from World’s Healthiest Foods,  Nutrition and You, Wikipedia, and The History of Zucchini.

All photos taken by R. Averett for Skinny Girl Bistro.

Iceberg is Ideal for Salads

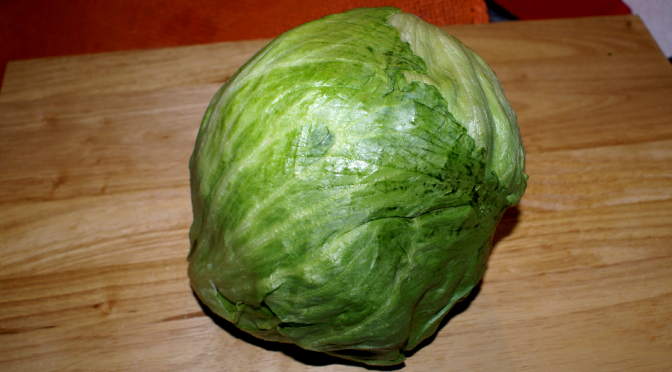
Really, it is. Oh, sure, there are those that criticize, saying that it lacks in any real nutritional value and maybe there is truth to that. But Iceberg Lettuce has a clean, refreshing taste and keeps pretty well in your refrigerator for at least a week, which some other lettuces don’t do as well. Although it’s low in nutrition, it is only a little below Romaine lettuce, which is my other favorite lettuce. The Iceberg lettuce is largely water, but it has a sweet, clean taste where some of the other, more nutritious lettuces, can be a bit bitter and not as refreshing. The ideal, in my opinion, is a mix of the lettuces for variety.

Iceberg lettuce is the one you find most frequently in restaurant salads. The lettuce is also great on sandwiches or for making lettuce wraps because of its nicely cupped, large leaves. It is the primary lettuce used in the United States.

Lettuce Origins

All lettuces trace back to the Mediterranean area where lettuce was first cultivated for its leaves in ancient Egypt, with evidence of that dating to about 2680 BC. Originally, it was grown for the oil produced from its seeds. The Egyptians considered it the sacred plant of Min, their god of reproduction. The cultivated variety appeared to be about 30 inches tall and resembled a larger version of the modern romaine lettuce. The Egyptians passed the seeds along to the Greeks, who then shared with Romans and more varieties were developed. Writings by Joachim Camerarius in 1586 described the three basic varieties of modern lettuce, which are loose leaf, romaine and head lettuce, such as iceberg and butter.

Christopher Columbus brought the lettuce to America in the late 15th century. Meanwhile, more varieties were being developed in Europe. Many of these are still grown in gardens today. I grew a mixture of lettuce a couple of years ago, but pulling leaf by leaf didn’t seem very rewarding. I grew a butter lettuce last summer and that was good, but you only get one head per plant, although after I harvested it, the plant did continue to produce leaves. In the late 19th century, documentation indicates between 65 and 140 distinct varieties.

Because lettuce has a relatively short life span once it is harvested, it didn’t expand into wide spread use until the 1900’s when packing, storage and shipping technology improved. To ship the fresh vegetable long distances,in the 1920’s, crisp head lettuce was shipped in train cars, filled with crushed ice to keep the lettuce chilled. The crisp head lettuce shipped this way came to be known as iceberg lettuce since the ice resembled icebergs. Incidentally, prior to the advent of ice-making facilities, ice used to be harvested in the Sierra Nevada mountains near Donner lake and brought down by train to Sacramento for shipping fresh produce. In the 1950’s vacuum cooling revolutionized the industry. This allowed the lettuce to be cooled and packed in the field, which kept it fresher to market.

Lettuce Uses

Around 50 AD, the Romans cooked and served lettuce with an oil and vinegar dressing, although they sometimes ate them raw. Between 81 and 96 AD, the lettuce salad prior to a meal became a tradition. In China, salads were made primarily from cooked vegetables and the lettuce was worked into all kinds of dishes from wraps to stir-frys and in other meat dishes along the way. Now days, we use lettuce in salads, wraps, sandwiches, and other ways and occasionally still cook it.

Personally, I haven’t tried cooking iceberg lettuce, although some of the loose-leaf varieties seem like they would go well in a skillet of greens. However, I did find a recipe from OceanMist for Fire Charred Iceberg Salad. This just might tempt me to try it. If you do it first, report back, please.

Nutrition Information for iceberg lettuce – 1 cup
Calories:10 Fat: 0 g Net Carbs: 1 g Protein: 1 g

Here are a couple of my quick and easy recipes for lettuce cups, which are really great for a low carb lifestyle.

Taco Lettuce Cups

4 large leaves Iceberg or Butter lettuce
1/2 lb Ground Beef
1/4 lb Chorizo
1 tablespoon Taco Seasoning
1/4 cup Pico de Gallo
1/2 cup chopped Baby Corn
2 tablespoons Black Beans
1/4 cup Butternut or Acorn Squash, cubed
1/4 cup Salsa
1/2 cup Cheddar Jack Cheese, shredded
1 small Avocado

Precook squash in the microwave or in a suacepan with a little water until it is fork tender. Cut into samller pieces.

Cook ground beef and chorizo in a skillet until lightly browned. Add taco seasoning, squash and a little water to make a moist filling. Stir in the baby corn and beans. Cook about three to five minutes to heat the corn and beans.

Put the lettuce leaf on a salad plate, spoon 1/4 of the ground meat on it, then top with Pico de Gallo and 1 tablespoon of Salsa. Add about two tablespoons of jack cheese over the top, and crown with slices of avocado. Fold the lettuce over and serve with sour cream.

Makes 4 tacos.

Nutrition Info per taco:
Calories: 424.8 Fat: 33.3 g Net Carbs:6.1 g Protein: 22.3 g

All comments relevant to my posts are welcome. SPAM is not.  If the post has nothing to do with my site content, it will not be posted.

Information for this article was helped by these pages:  Wikipedia, About Health, Livestrong.com and Oceanmist.com

All photos are by R. Averett, Copyright Skinny Girl Bistro

Chicken Fried Comfort Food

Just because you’re trying to keep your carbs in check doesn’t mean you can’t enjoy one of the classic comfort foods of the south, Chicken Fried Steak.  For those not in the know, this is not chicken prepared to taste like steak, but cubed steak prepared as you would make fried chicken.

I have tried several versions over the years from the simple crust version, which is what this recipe is like, to the complete batter-fried version that uses a thick egg and flour mix to make a thick crust around it. This is my preferred version, using just a light flour coating so you don’t have a lot of carbs in the coating.  Both a low carb flour like CarbQuick or LC Foods Flour and Coconut Flour work well with this recipe.

This recipe is inspired by Alton Brown’s recipe with only a few substitutions to make it low carb. If you want those carbs, then go to Alton’s version.

Chicken Fried Steak

1 pound Cubed Steaks (4)
1 teaspoons Salt
1/2 teaspoon Ground Black Pepper
3/4 cup Low Carb Flour
1 whole Egg, beaten
1/4 cup Coconut Oil

Gravy:
1 cup Chicken Broth
1/4 cup heavy Cream
1/2 teaspoon Thyme
Dash Cayenne Pepper

Preheat oven to 250 degrees F. You’re going to use it to keep your steaks warm while you’re preparing them and making the gravy.

Season each piece of steak on both sides with the salt and pepper. Prepare two shallow pans, one with the flour and one with the beaten egg, Lightly dredge the steaks in the flour, then pound them with a meat tenderizer to work the flour into the meat and get it to about 1/4 inch thick.

Dredge the meat again in the flour, then dip in the egg and back in the flour again. Repeat the process with each steak.

Place the meat onto a plate and allow it to rest for about 15 minutes before cooking.

Place enough of the oil to cover the bottom of a 10 inch skillet (cast iron works well) and set over medium-high heat. Once the oil begins to shimmer, add the meat two at a time. being careful not to overcrowd the pan. Cook each piece on both sides until golden brown, approximately 4 minutes per side. Remove the steaks to a wire rack set in a small sheet cake pan and place into the oven. Repeat with the remaing steaks.

Add the rest of the oil, or at least 1 tablespoon, to the pan. Whisk in 3 tablespoons of the leftover flour. Add the chicken broth and deglaze the pan with the whisk.  Continue to whisk until the gravy comes to a boil and begins to thicken. Add the milk and thyme and whisk until the gravy thickens enough to coat the spoon, approximately  10 minutes.  (Low carb flour will not thicken as quickly or possibly as thick as you would like.) Season to taste, with more salt and pepper, if needed. Serve the gravy over the steaks.

Nutrition Info per steak
Calories: 325 Fat: 20.2 g Net Carbs: 2.4 g Protein: 31.7 g