Category Archives: Main Dish

Scintillating Salmon with Orange Sauce

Photo: Salmon with Orange Basil Sauce

PK’s new doctor recently suggested she try the paleo diet to improve her health. With this pronouncement in mind, I took a look at some of the paleo recipes and chose some that I thought I could adapt to low carb that would suit both of us. As a result of this quest, I will be posting more recipes that work for both low carb like Atkins and South Beach as well as ones that work with keto and paleo.

This is a delicious recipe that I found as Orange Rosemary Salmon at PaleoLeap.com. I didn’t have any rosemary, so I substituted basil. Dried basil at that. But it worked exceptionally well, and we loved the flavor of this dish. I grilled the salmon on my new Copper Chef stove-top grill, which worked perfectly, and I cleaned it up in just a few minutes after I was done. Yay for that! I even grilled the asparagus spears along with it. The side serving that looks a bit like rice is actually riced kohlrabi, which is amazingly delicious when cooked with a bit of broth, butter, and basil.

If you were going true paleo, you would use all fresh ingredients and your chicken stock would be made from chicken bones. I, on the other hand, made mine from Better Than Bullion.

Orange Basil Salmon

Atkins, Keto, and Paleo-friendly

2 salmon fillets (about 1/2 lb)
1 garlic cloves, minced
1 teaspoon fresh Basil, minced 0r 1/2 teaspoon dried
1/2 cup fresh orange juice
1 tablespoon fresh lemon juice
1/4 cup chicken stock
1 teaspoon orange zest
1 teaspoon Olive Oil
Salt and Pepper

Use a grater or zester to scrape the orange skin until you have 1 teaspoon of orange zest. Cut the orange and squeeze out as much of the juice as you can from one large orange. I use a little of the pulp as well since I like to have it in my sauce. Combine the orange juice, lemon juice, chicken stock, and zest.

Heat the grill on high heat until hot, then turn to medium heat. Brush the salmon fillets with a little olive oil then season with salt and pepper. Place on the grill with skin side up and cook until the salmon is about half-way done, about 5 minutes. Flip so the skin side is down and continue to cook another 4 to 5 minutes. (Time will vary based on the heat and thickness of the salmon.) Add any vegetables to the grill at this point.

On another burner, heat up a saute pan and add a teaspoon of olive oil or cooking fat. Cook the garlic and fresh basil in it for a minute or so. If using dried, add it to the orange juice mixture. Pour the juice and broth into the pan and stir well. Lower the heat to medium-low and add salt and pepper to taste, about a pinch of pepper and 1/8 teaspoon of salt. Stir and cook until the mixture begins to thicken.

Meanwhile, check on the salmon as you work and turn any vegetables that need it. When the flesh looks done all the way through, use a pancake spatula and slide it between the skin and the meat. The salmon will lift off easily. Transfer it to a serving plate and spoon or pour half the orange sauce over the top.

Serve with vegetables and riced cauliflower or kohlrabi. Makes two servings.

Photo: Riced kohlrabi

Riced Kohlrabi with Basil

1 medium (4″) Kohlrabi
1/4 cup Chicken Broth or Better Than Bullion
1/2 teaspoon dried Basil
Pinch Salt
1 tablespoon Olive Oil, Coconut Oil, or Butter

Prepare this before you begin the main meal.

Peel kohlrabi, cut into cubes and put in the food processor. Pulse until the vegetable is chopped into rice-sized pieces.

In a skillet, add oil or butter, then add the kohlrabi. Stir and cook for about a minute, then add the broth, bring to a boil, then lower the heat to a simmer. Add water if it is too dry. The kohlrabi will take about 20 minutes to cook until it is tender. Add seasonings about part way through.

When done the kohlrabi should look like rice in texture. Makes about three half-cup servings.

Nutrition: Salmon with Basil Orange Sauce


Delicious Turkey Ragout feeds the soul

Photo: Turkey & Vegetables Ragout

A rainy night or two ago, I pulled a package of frozen turkey from the freezer and pondered what I could throw together with it that suited this chilly night. I had canned tomatoes, an eggplant that needed to be used, and some of the mini-peppers in my fridge. So I threw this saucy dish together. It’s not quite a ragu nor is it a ragout exactly, but it’s closer to the latter, so that’s what I decided to call it. It’s a lovely combination of meat, vegetables, and sauce with Italian seasonings.

For my seasoning salt, I used Emeril’s Essence, but any seasoning salt will work. I also used red onion, which brings a bit more sweetness than a white or yellow onion, but any of them will work. In fact, this is a versatile recipe, so if you don’t care for eggplant, substitute in another vegetable, such as summer squash or mushrooms. Of course, you can also use ground beef in place of the turkey. For a vegetarian option, omit the meat and add in more vegetables, like the aforementioned mushrooms or chopped kohlrabi. Be aware that replacing the turkey with additional vegetables will increase the carb count a little.

Turkey and Vegetable Ragout

1 lb. Ground Turkey
1 15-oz. can Diced Tomatoes
1 tablespoon Garlic, minced
1/4 cup Onion, chopped
1 cup Eggplant, cubed
3 Mini-Peppers, sliced
1 teaspoon Italian Seasoning
1/4 cup Water or White Wine
1 teaspoon Oregano
1/2 teaspoon Cayenne Pepper
1/2 teaspoon seasoning salt
1/2 teaspoon Salt
1/4 teaspoon ground Pepper

In a large saucepan, brown the ground turkey, chopping into small pieces as it cooks. Add the onions and garlic and sauté until the onions are translucent.

Add the eggplant and peppers and continue to cook another few minutes, stirring a few times, then add the canned tomatoes and 1/4 cup of water (or white wine). Add all the seasonings and stir the whole pan together.

Bring to a boil, then reduce heat to a simmer and let cook for about 20 to 30 minutes until the liquid is reduced to a delicious sauce and the vegetables are tender. Taste the sauce and adjust any seasonings.

Serve with cooked zucchini noodles. You can either buy these in the frozen food section or make your own with a spiralizer or a vegetable peeler. Or you can do a wide shred with a food grater.

Makes 4 servings.

Nutrition Info for Turkey Vegetable Ragout

Warm Up with Bean and Ham Soup

Photo: White Bean & Ham Soup

As a child, I grew up eating beans a lot. My grandmother would make a huge pot of pinto beans. We’d get bolillo (oval long bread rolls) from Mexico, and I loved to hollow the bread out and fill it with beans cooked with hamburger. But since I am trying to stay low carb these days, beans aren’t something I eat very often. Nonetheless, I’ll share this recipe for white beans with ham soup. This isn’t as low as I like most of my recipes to be, but it is still within reason for most people to enjoy on a low carb plan. The real trick is to add more ingredients to the pot to spread out the beans, so you don’t eat as many in one sitting. With that in mind, I added onions, carrots, and turnips to the pot with the ham and bean.

Generally, I use a ham hock to flavor the pot and add seasonings to round out the flavor. I also use a little of Better Than Bullion Chicken in it to add more flavor. If you want a heartier dinner, then cook up a sausage or a chicken breast to eat alongside the soup. These won’t add extra carbs and will help to fill you up with the smaller serving of soup.

White Beans and Ham Soup

1-1/4 cup Small White Beans (dry)
1 cup, diced Ham
1/4 cup Onions, chopped
1/2 cup Carrots, sliced
3/4 teaspoon Mrs. Dash Tomato Basil Garlic Seasoning
3/4 cup Red Ripe Tomatoes, chopped or sliced or peeled and canned tomatoes
1 cup Turnips, cubed
1/2 teaspoon Better Than Bullion Chicken

In a large pot, pre-cook beans as directed on the package. Rinse, then add fresh water, salt, and pepper. Cook the beans from 2-3 hours until they are done. I usually put a ham hock or bacon in them to add flavor as they cook. Once they are done, add about 2 cups of water to the pot, then add the rest of the ingredients and cook until the carrots and turnips are tender. Add water as needed to keep the soup consistency. When done, you should have about 3 to 4 cups of delicious soup.

Makes about eight 2/3 cup servings.

Nutrition Information

Sausage, Turnips, & Eggs Frittata

Photo: Sausage & Turnip Frittata

Here’s a yummy egg dish that works well for a family brunch or a special occasion, like Christmas morning or New Year’s mid-day. It works best if you have a cast iron or copper skillet that can go from the burner to the oven. Failing that, you can cook it in a deep skillet, then slide it into a casserole dish to go to the oven for the final step.

Double the recipe and bake it in a large pan once the vegetables are sauteed to make a large family-sized casserole that will easily feed 8 to 10 people. Simply add the vegetables to the baking pan (a rectangular cake pan works well for this), then beat the eggs and seasonings and add to the pan. Bake at 365 degrees for about 45 minutes and check to see if the eggs are set. Add the cheese on top and bake another 8 minutes to melt it.

Sausage, Turnip and Egg Frittata

6 large Eggs
1/2 pound (8 oz.) Pork Sausage
1 cup Turnips, cut in 1/2″ cubes
1/2 cup Kohlrabi, cut in 1/2″ cubes
3 Sweets-mini peppers, chopped
1/2 cup Onions, chopped
1 cup Cheddar Jack Cheese, shredded
1 teaspoon Italian or Mexican Seasoning
Salt & Pepper to preference

Preheat oven to 375 degrees (F.)

To easily cut the turnips and kohlrabi, peel the vegetables, then cook them in the microwave for about 2 minutes to soften. Run under cold water and let sit for about 5 minutes to cool down. Your knife will cut through them easily. This little pre-cook also ensures they will get tender when cooked in the skillet.

In a medium bowl, add the eggs and the seasonings of choice. Whisk to mix well so the whites are worked in. (You can also use a blender for this part to get a smooth mix.) Set aside.

In a deep stove-to-oven skillet, such as a cast iron or copper one, heat to medium and cook the sausage, crumbling it into small pieces as it cooks to a lightly browned stage. Set aside on a paper towel covered plate to drain. Add the onion and the peppers to the skillet and sauté until the onion is softened. Remove to the plate to wait. Add the turnips and kohlrabi to the skillet and continue to sauté until they start to brown a little. Add the sausage and vegetables back to the pan and pour the egg mixture into the pan.

Cook and stir with a spatula, lifting the eggs and the vegetables to cook them until the eggs are set. Sprinkle the rest of the cheese over the top and place in the oven for about 8 minutes to melt the cheese and lightly brown it.

Makes 4 to 6 servings.

Notes: If you don’t like turnips or kohlrabi, you can substitute in zucchini or crookneck squash for either of them. The squash doesn’t need to pre-cook in the microwave. Just chop, sauté, and add to the casserole dish. You can also use liquid eggs for the eggs saving the whisking time.

Photo: Nutrition Info


Thai Chicken with Peanut Sauce and Broccoli

Photo: Thai Peanut Chicken with Broccoli

This is my take on a recipe for Thai-style broccoli and spaghetti squash. I like to make it a meaty main dish, so I added chicken and changed out a couple of ingredients to make it low carb. If you’d like to make it a vegetarian dish, then omit the chicken.

Thai Peanut Chicken and Broccoli Over Spaghetti Squash

1 small spaghetti squash, about 2 pounds
2 Chicken breasts, cut into cubes

For the Roasted Broccoli
1 small broccoli crown, broken into florets (2 cups)
1-2 tsp. sesame oil, can sub another vegetable oil
1 garlic clove, minced
salt and pepper to taste

For the Peanut Sauce
3 tbsp. creamy peanut butter
1 tbsp. soy sauce
1 tbsp. sugar-free maple syrup
1 tbsp. lime juice
1-2 tbsp. water, as needed
1 tablespoon Thai Chili Sauce

Garnishes:
1-2 scallions, chopped
2 tbsp. roasted peanuts, chopped

Preheat oven to 375°.

Prepare the squash by cutting in half length-wise with a sharp kitchen knife. Scoop out the seeds, but don’t dig into the inner pulp. Oil the insides of the squash and place face down on a foil-covered baking sheet. Roast until tender, about 40 to 45 minutes. Remove to a plate to cool until you can handle them.

About mid-way through the roasting time for the squash, begin preparing the broccoli. Place broccoli, oil, and garlic into an oven-safe pan or baking dish and toss until broccoli is coated. Put in the oven with the squash and roast until it is fork tender but still crisp. This should be about 15 minutes.

In a large skillet, heat 1 tablespoon oil then add the chicken cubes. Cook until lightly browned, but not overdone, then remove to a plate to rest.

In the same skillet, add the ingredients for the peanut sauce and stir together with a wooden spoon. Add as much water as needed to keep it a smooth, pourable sauce. Do not cook at this point.

Using a fork, rake the insides of the squash to loosen the noodles. It will shred easily and yield about two cups of noodles.

When the broccoli comes out of the oven, add the chicken to the peanut sauce and warm over low heat. Stir in the broccoli with salt and pepper and coat the chicken and broccoli.

Serve over the spaghetti squash and garnish with chopped green onions and roasted peanuts. Makes four servings.

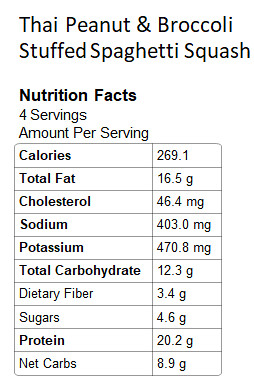
Beginning with this recipe, I am posting more nutrition information for those who need a little more detail. For those who just want the nitty-gritty net carb total, this dish is 8.9 net carbs per serving.

Nutrition Thai Chicken