
When is a tomato not a tomato? When it’s a tomatillo, of course. Adding to the confusion, you have this fruit/vegetable that looks like a small green tomato, tastes a bit like one, but isn’t really one, yet is called “little tomato” in Spanish. It actually does come from the same family as the tomato, but is a completely separate genus. Its closest relative may be the cape gooseberry. Isn’t the family of fruits and vegetables amazing? So many are related but not the same. Kind of like people, huh?
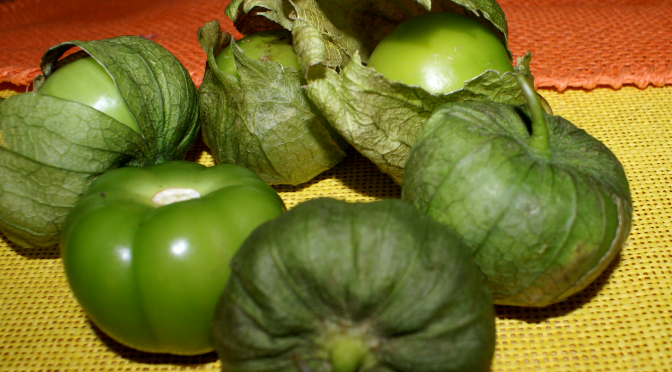
Tomatillos are also known as a husk tomato, Mexican husk tomato or tomates verdes and are a part of the nightshade family. The flowers of the plant form a calyx, or paper husk, that surrounds the fruit while it is growing. When you buy them at the grocery, this husk is usually still on the fruit. While we generally see them when they are green, they may turn colors to yellow, red or even purple when fully ripened, depending on the variety of the plant.
Hailing from Mexico, the tomatillo is used quite often in Mexican cuisine and most of the recipes I’ve found that use it are in that category. It is a prime ingredient in one of my favorite Mexican dishes, Chile Verde, a spicy pork and chile stew. It is also used in Green Chile Salsa and in several other dishes. It has a tart taste as opposed to the sweet taste of tomatoes.
Nutrition information for 1 medium fruit (34 grams)
Calories: 11, Fat: 0 g, Net Carbs: 1 g, Protein: 0 g
Featured Recipe:
Being the adventurous sort in the kitchen, I wondered if tomatillos would be as tasty as green tomatoes in Fried Green Tomatoes, so I tried them. First, I will say that they get more tart as they cook, so there is a definite acidity to them. They benefit from a dipping sauce like Chipotle Ranch dressing or just some mayonnaise or Miracle Whip. If you give them a try, let me know what you think.
While they are not too high in carbohydrates, keep the servings small, only two per serving.

Fried Tomatillos
Although not a tomato, a tomatillo is similar but smaller and does not turn red. This uses a basic batter recipe to cook the tomatillo as you would a green tomato.
1 Egg, beaten
1/4 cup Buttermilk
2 tablespoons Low Carb Flour (Almond flour)
2 tablespoons Cornmeal or Golden Flax
2 tablespoons Coconut Flour or Carbquick
1/2 teaspoon Salt
1/4 teaspoon Cayenne Pepper
2 tablespoons Parmesan Cheese
2 Tomatillos, cleaned and cut into 1/3 inch slices
Vegetable oil
Mix the egg and buttermilk together in a small bowl. Mix the 2 tablespoons of the low carb flour, corn or flax meal and seasonings together in a shallow pan or bowl. Put the Coconut flour in a small bowl. Pull a slice of tomatillo though the coconut flour to lightly coat, then dip in the egg mixture and shake off excess egg. Put in the cornmeal or flax mixture and gently press to coat the slice on both sides. Repeat with the rest of the tomatillo slices.
In a small skillet, pour enough oil to come about 1/4 inch up the pan and heat until about 375 degrees (F.) or very hot, reduce to medium high heat to prevent overheating. Drop just a tiny bit of the batter in to see how quickly it cooks. Carefully put in the tomatillo slices, two or three at a time and cook for about 2 minutes on each side or until golden brown.
Drain on a paper towel and sprinkle with a little seasoning salt, if you wish. A little tart, but delicious just as they are or dip in low carb Chipotle Ranch dressing.
Makes three servings
Nutrition Info per serving made with cornmeal
Calories: 133.4 Fat: 6.8 g Net Carbs: 7.8 g Protein: 7.0 g
Made with flax meal and Almond Flour
Calories: 122.5 Fat: 8.1 g Net Carbs: 3.4 g Protein: 7.4 g
Information for this article was pulled from Specialty Produce, Nature’s Pride and Wikipedia
All photos by Rene Averett for Skinny Girl Bistro. Copyright 2015.


