Tag Archives: appetizers

Greek Festival Tiropitas

Photo of Tiropitas

Tiropitas are a delightful combination of phyllo dough and feta cheese. They make a great snack or appetizer for parties. In Greek, the word means cheese pie. While their carb count is a little high for snacking on many of them, at 3.2 net carbs each, you can indulge in two or three depending on your total carb allotment for the day.

I’ve made tiropitas many times over the past decades, but I have to admit this last time really caused headaches. My preferred brand of Phyllo dough (Athena) wasn’t stocked by the market I usually buy it from, and the one they had turned out to be problematic. It broke when I unfolded the sheets and continued to break while I folded the dough into packets. The dough tends to dry out while you’re using it, so it becomes more difficult to work.

Ultimately, I developed plan B, which was to use phyllo cups instead. Not only did his work better, but the cups come out lower in carbs, but they also hold more of the cheese mixture. I have dubbed these tiropita cups, although they could be described as a mini Greek quiche.

Photo: Tiropita Cups

Tiropitas

1 pound feta cheese
2 eggs, slightly beaten
1/4 cup finely chopped fresh or 1 tablespoon dried basil leaves
1/4 teaspoon white pepper
1 package (16 ounces) frozen phyllo sheets (18×14 inches), thawed
1/3 cup margarine or butter, melted

Heat oven to 400°F. Prepare a cookie sheet by placing a sheet of parchments paper on it and spraying it with cooking spray.

In a medium bowl, crumble the cheese and mash with a fork. Stir in eggs, basil, and white pepper until well mixed. Alternately, you can put the cheese into the food processor and pulse it a few times to break it into small bits, then add the eggs, basil, and pepper and pulse to mix together. You want it to be coarse rather than a paste.

On your large work surface, unroll the phyllo sheets carefully and cut them lengthwise into 2-inch strips. Cover with plastic wrap or wax paper, then with a damp towel to keep them from drying out.

Take one strip, and place 1 level teaspoon of the cheese mixture on the end. Fold the strip over the cheese, turn it, and bring the right side to the left edge to form a triangle. Turn the triangle up, then fold it from the left edge to the right side. This makes a triangular fold, like folding a flag. Repeat until you come to the end of the strip. Tuck the dough under and place on the cookie sheet. Repeat with each dough strip.

Once all the strips are done, brush the triangles lightly with butter.

Bake 12 to 15 minutes or until puffed and golden brown. Serve warm.

To make them in cups, place the cups on a parchment-covered sheet pan and fill each cup with a rounded teaspoon of the cheese mixture.

Once all the cups are filled, lightly brush with butter if you wish. Bake for 12 to 15 minutes.

These are best when baked just before serving. You can prepare them earlier and bake when needed or refrigerate or freeze them until you’re ready. If you freeze the packets, let them thaw before baking or add a little extra baking time.

The folded tiropitas make about 72 triangular cookies. Most packages have 18 to 20 sheets of dough.

The cups make about 60 appetizers. Each package has 15 cups in it.

Delightful Bacon, Cheese, and Turnip Puffs

Photo: Turnip Puffs

Looking for a different way to prepare turnips or even potatoes? How making them into a puffed cake that is a nicely controlled serving as well as a delicious alternative to mashed or boiled vegetables.

This recipe originally used mashed potatoes, and you can still go that route if you don’t mind the higher carb count. Or you can swap them out for turnips for something a little different. Fresh turnips have a slightly sweet taste, so they bring a touch of sweet to the dish that marries well with the onions. For my version of the recipe, I use a tablespoon of low carb flour to help absorb some of the moisture from the turnips. I also added bacon because everything goes better with bacon, right? Also, if you don’t care for turnips, but want to keep the calories low, this works with mashed cauliflower.

As you’re preparing your New Year’s Eve party, or any other gathering of friends, keep these in mind. You can make them as tasty bite-sized appetizers by putting them in mini-cupcake molds. A simple topping on each adds a nice decorative touch.

Photo: Close up of Turnip Puffs

Bacon Turnip Cheese Puffs

1 cup Turnips, cooked and mashed (2 medium)
1 Egg, beaten (can use liquid eggs)
2 tablespoons Ricotta Cheese, whole milk
1/3 cup Cheddar Cheese
2 tablespoons Parmesan Cheese (Grated)
2 tablespoons Onions, chopped
2 slices Thick-cut Bacon, cooked and broken into pieces
1/4 teaspoon Lawry Seasoned Salt or to taste
1 tablespoon Low Carb Flour
2 tablespoons Butter (for coating the muffin cups)

Cut turnips into 2 to 3-inch cubes and cook in boiling water until fork tender. Drain well and mash or put in the food processor to mash until smooth.

Cook bacon until done, then break into small pieces.

Preheat the oven to 4oo degrees (F.) Butter six 1/3 cup cupcake molds. I used silicone molds, but standard ones will work fine.

Put the turnips in a medium-sized bowl. In a small bowl, beat egg until mixed or use prepackaged mixed eggs. Add all the remaining ingredients and egg to the turnips and mix together until well-distributed and smooth.

Using a tablespoon, distribute the turnip mixture evenly to the muffin cups. It should come almost to the top of the cup.

Bake for 25 to 35 minutes until the tops are golden brown and the mixture pulls away from the side of the cup. Let cool for about 5 minutes, then gently remove the pan.

Top with a bit of sour cream, a sprinkle of cheese, a few slices of olives, a few chopped chives, or a tablespoon of salsa if you wish.

Makes six 1/2 cup servings.

Note: To make these as appetizers, use mini-cupcake pans or molds and put about one tablespoon in each cup. Makes 18 appetizer-sized puffs.

Photo: Nutrition Information

Tastes of the Season: Holiday Cheeseball

If you’re like me, you can be sorely tempted at a holiday party this time of year.  When you have several to attend and you can bring a side dish or appetizer, you can at least make sure something you bring is low in carbohydrates. This past weekend, I had two parties to contribute a dish and I made two easy to make options that didn’t stress my low carb allotment, although a couple of the other goodies at them did make it tough. I’m posting the recipe for one of them today and I’ll put the other one up later in the week.

This one is based on a recipe from All Recipes with a couple of changes to suit my tastes, such as adding taco seasoning to give it a bit of spice.  It looks really cute on the table and is as delicious as it is attractive.

Seasoned Yule Tree Cheeseball

2 (8 ounce) packages cream cheese, softened
1 cup shredded Cheddar cheese
1 tablespoon dehydrated minced onion or 3 tablespoons fresh minced onion
2 tablespoons Taco Seasoning
1 teaspoon Garlic Pepper, freshly ground

1/2 red bell pepper
1 bunch fresh parsley, chopped
2 tablespoons Sliced Almonds (optional)

If using dehydrated onions, add the minced onion to about 2 tablespoons of water in a small bowl and let sit until most of the water is absorbed. If you use three tablespoons of fresh minced onion, omit this step.

In a large bowl, add cream cheese and use a mixer to whip until creamy. Add cheese, minced onions, taco seasoning and garlic pepper and mix until completely combined. Use a wooden spoon or paddle to pull the cream cheese together into a ball.

Cover a plate with plastic wrap, then form the ball into a cone-shaped tree. Put in the refridgerator to chill until firm, about 1 to 2 hours.

When ready to decorate, cut the bell pepper into short strips and cut out a top decoration, such as a star or a circle, or whatever you would like. Chop the parsley sprigs or pull them off for longer greenery.

Press the parsley into the cheeseball tree to give it a lush green tree look. Add pieces of the bell pepper to form decorations or garlands on the tree. Top with the your topper choice. Add a few sliced almonds to make additional decorations.

Chill until ready to serve, then carefully use a wide spatula to slide under the cheeseball and move to a serving platter. Serve with low carb crackers or vegetables to keep the treat low carb.

Makes about 20 servings.

Nutrition Information per 1 serving:
Calories:106.2 Fat: 10.0 g Net Carbs: 1.7 g Protein: 3.1 g

Tip: If you’re having a small party or a family dinner, this recipe can be halved easily to serve 8 to 10 people.  Or make a full recipe, split it in half and make two trees for different parties. 

Other appetizer recipes for the holidays – click on the images:

Wrapped Water Chestnuts
Tomato Spinach Cheese Puffs


Tamale Pie ‘Shrooms


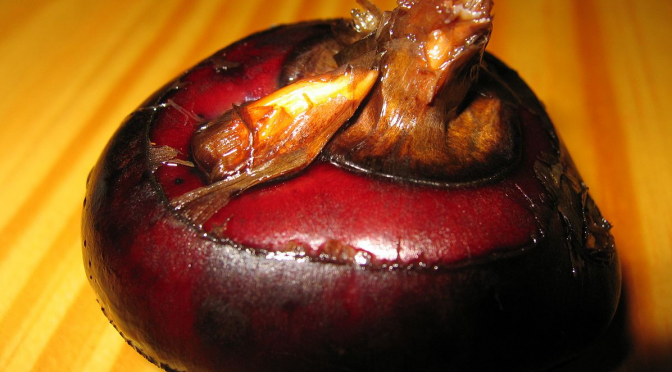
Wade into Water Chestnuts

Quite literally. It’s called a water chestnut because that’s where this vegetable is grown — in a watery bed. In fact, it is often a rotating crop in rice paddy fields in many Asian countries and Australia, particularly because it is a popular ingredient in Asian cuisine. It has been cultivated in China since ancient times. Most likely, you’ve tasted it if you noticed a crunchy tan-looking nut thing in your Chinese food. It’s used in many recipes for the crunch and mild, fresh taste so it blends well with the other flavors.

The water chestnut isn’t actually a nut, but the root corm of a marsh grass in the sedge family. When they are fresh, they do resemble the actual tree-grown chestnuts and have what is described as a “mildly sweet apple-coconut flavor”.  Most of us obtain our water chestnuts from cans and some of this flavor has dissipated.

Like jicama, water chestnuts don’t get soft when they’re cooked, so they maintain that crisp crunch that works so well with stir-fried recipes. I love them in my broccoli beef or chicken stir-fries, but there are other ways to use them. The are a key ingredient in a Thai dessert dish called Rubies in Coconut Milk and in a Water Chestnut Cake that uses water chestnut flour, also called singoda flour. While I’d love to try this, the flour is entirely too high in carbohydrates to be effective in my meal plan, but if you’d like to give it a try, you can order it on-line from Amazon. Fortunately, I use the canned water chestnuts sparingly and a little goes a long way in a recipe.

Nutrition information for Water Chestnut 1/2 cup (62 grams)
Calories: 60 Fat: 0.0 Net Carbs: 13.0 g Protein: 1.0 g

Recipes:

Here are a couple of recipes from Skinny Girl that use water chestnuts:

Egg Foo Yung
Teriyaki Stuffed Mushrooms

My featured recipe is this simple to make and delicious appetizer. How can you go wrong with bacon and water chestnuts? The only caution is to not eat too many of them!

Bacon Wrapped Water Chestnuts

Bacon Wrapped Water Chestnuts

8 fresh Water Chestnuts
3 tablespoon Soy Sauce
2 tablespoons Brown Sugar Substitute
4 slices regular Bacon, cut in half
8 Toothpicks, use sturdy ones

Use warm water to rinse and drain the water chestnuts.

Put the soy sauce into a shallow dish and add the water chestnuts. Cover with plastic wrap and let marinate in the refrigerator for about 3 hours.

When ready to cook, preheat the oven to 350 degrees (F.)

Put brown sugar substitute on a saucer. Roll each water chestnut in the brown sugar, then wrap 1/2 slice of bacon around it and secure with a toothpick.  Roll each appetizer in the brown sugar mixture.

Put the wrapped chestnuts on a rack in a baking pan, then bake for 15 minutes, turn them over, then bake another 15 minutes, Baking them allows the bacon to cook thoroughly.

Makes 8 appetizers.

Nutrition Info per appetizer
Calories: 41.7 Fat: 2.8 g Net Carbs: 1.1 g Protein: 2.4 g

Tip: You can make these appetizers ahead of time and freeze until you are ready to cook them. Place them in a freezer bag and freeze for up to 3 months.

Information for this article was taken from Food Facts, Wikipedia,  About Food

Top photo is from Wikimedia Commons and is used with permission – “Wasserkastanie 2”. Licensed under Public Domain via Wikimedia Commons