Tag Archives: jicama recipes

Join In on Jicama

Oddly, even though I grew up adjacent to Mexico and thrived on Mexican food, jicama was something I really didn’t encounter. Not even when I moved to Southern California.  I didn’t “discover” it until about ten years ago when I spotted the odd-looking root in the grocery and decided to try it. What I found was an unusual vegetable that has a crisp, clean flavor and a bit of sweetness. It reminded me of an apple in texture and in crunch.

Most frequently, jicama seems to be cut into small sticks or grated and put into salads and slaws, where it does an admirable job. It can also be cooked, baked, boiled or fried. One of the interesting characteristics is that it doesn’t get soft. It keeps the crispness, which makes it great for a dipping chip, even if you fry it. It adds a bit of crunch to a stew while substituting for a higher carb’d vegetable.

Cultivated South of the Border

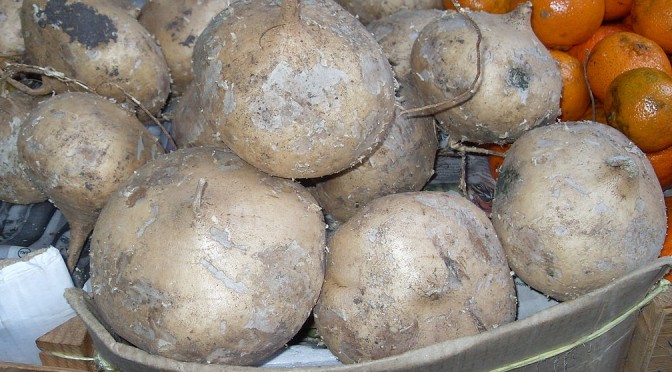
Pronounced hee-ca-ma, it is also called yambean, although it is not a yam. Jicama is native to Mexico and South America. It is part of the legume family and grows a vine in tropical and semi-tropical climates. The edible jicama root is a globular shape and has been referred to as Mexican turnip, although the flavor is nothing like a turnip, or Mexican water chestnut, which it resembles in crunch. Other names for it are bengkoang, sengkwang and yacon. The flavor suggest that it would also be good in Asian food as a water chestnut substitute. It is grown in Asia and in other tropical and semi-tropical areas, including Florida, Hawaii and Puerto Rico.

Nutrition Info per 100g (about3.5 oz)
Calories: 38 Fat: 0.19 g Net Carbs: 3.8 g Protein: 0.72 g

Jicama, how do I love thee?

Let me count the ways:

  • Peeled and cut into sticks as a snack.
  • Cut into rounds and fried as a dipper instead of potato chips.
  • Chopped and added to stir-fry.
  • Shredded and added to salad.
  • Cut into sticks and Tampura battered and fried.
  • Sliced and spread with peanut butter and sugar free jam.
  • Sliced and sprinkled with cinnamon and sugar substitute.
  • Sliced and roasted, then topped with cheese and bacon.
  • Sliced and sprinkled with lime juice and a bit of chili powder.
  • Cut into cubes and mixed with strawberries and blueberries in a fruit salad.
  • Or mixed with cantaloupe and honeydew melon in a fruit salad.

There are more ways than I can count to use this versatile vegetable.   If you have other ways you’d like to share, let me know.

Here are two ways to use jicama from this site:

Root Vegetable Fries (on the Celeraic page, go to the bottom)
Sizzlin’ Hot Snacks (toward the bottom, snack options with  beets, daikon and jicama)

And here’s a new recipe for jicama for this entry:

Cinnamon Battered Jicama Sticks

12 Jicama sticks, about 3 to 4” long, 1/2 inch cubed
1/4 cup Low Carb Flour
1 Egg
1/4 teaspoon Baking Powder
1 teaspoon ground Cinnamon
1/2 teaspoon ground Cardamom
2 tablespoons Sugar Substitute
1/4 cup sugar free Raspberry Jam or preferred flavor
Coconut Oil

Mix the flour, egg, baking powder, sugar substitute and spices together to make a batter.

Heat enough coconut oil in a small pan to bring it to about 1/2 inch. Reduce to a medium heat.

Dip a jicama sticks into the batter, then carefully slide into the pan of oil. Cook about three at a time until golden brown, then turn over to cook the other side to golden brown or spoon the oil over the top while cooking to brown the top. This only takes a couple of minutes. Remove to paper towels to drain. Spread with sugar free raspberry or other jam of choice.

Makes 12 snacks.

Nutrition info per snack
   Calories:16 Fat: 0.7 g Net Carbs: 2.0 g Protein: 0.8 g

All comments relevant to my posts are welcome. SPAM is not.  If the post has nothing to do with my site content, it will not be posted.

This article used the following for reference: Specialty ProduceNutrition and You,  Natural Society Newsletter

Top photo from WikiCommons, used with permission – By Wicki (Own work) [Public domain], via Wikimedia Commons

Celeraic: Bargain Shopping & Root Fries

I only discovered the marvelous taste of Celery Root (Celeraic) in the past year and I wish I had known about it longer. It looks sort of like Pigpen in the Charlie Brown comic strip and like Pigpen, it does clean up nicely. Like many, I just looked at this dirty, gnarly vegetable at the market and moved on until one fateful day I decided to experiment. My first taste test was to fry a little piece and to my surprise and delight, it had a wonderful taste, a little of the celery taste to it, but a similar taste to potatoes and the texture was like a potato french fry! This is a rare thing when making root fries. The texture varies quite a bit from turnip to daikon to jicama with each making a serviceable fry, but not having that creaminess of a potato fry. Let me say here that if you don’t like the taste of celery, then stop reading now.

Of course, the celery root is also a versatile root and can be used raw or cooked in many ways, so it’s a good thing to have in the pantry, or the root cellar. And speaking of that, I need to figure out a way to do a root cellar. I may have to designate a section of my storage unit or possibly under the house for a tub of dirt that root vegetables can snuggle in. But that’s another story. What I’m talking about now is bargain shopping for some vegetables. I noticed that the price of celery root didn’t vary throughout the months at my local grocery stores, which may sound like a good thing, except they sell the vegetable by the unit, not the weight. In the early winter and fall, the celery roots are big and heavy. In the spring and summer, they are small so it is quite a bit higher to get enough celery root for a whole dish. What would cost $2.69 in the winter to make can cost over $10 in the summer.

I was excited when I saw the bigger celery roots in the store and immediately snatched up a couple. Then the roots were even bigger, so I snatched up two more. And so on. Now I have about six celery roots in the kitchen that are really big. These bad boys are about 6 to 8 inches long and 3 to 4 inches wide. My ‘fridge doesn’t hold ’em. So what to do? Something that I needed to address as the tops of the roots were starting to get a bit soft. I decided to freeze them. My first stop was to search the Internet for freezing information and then it was to work.

Celery root does freeze well so long as you prepare them properly or cook them into the dish of choice and freeze that. Preparing them for future use seemed the best route. The biggest celery root in the photo at the top is just under 2 pounds and yielded three bags of frozen cubes.

Cleaning and peeling

First, you need to wash the celery root off, using a scrub brush or plastic scrubber to get as much of the dirt off the root as possible. Then cut the top and bottom off.If your root is huge, you might want to try to work around the knobs of root to clean them out on the bottom. Otherwise, just slice them off.

Cut off the skin using a sharp peeling knife.  If you have big knobs, it might be easier to cut the knobs off and peel them separately rather than to try to peel around them.   Put all the cuttings in your compost tub if you have one. I usually just bag mine and take them out to the compost bin.

Cut to size for use

When you’re done, you have a large, creamy white vegetable that just needs to be cut into smaller sections, cubes, planks or shreds, depending on how you want to use them. I cut most of my first one into cubes. Meanwhile put a pot of water on to boil. When you’ve got your cubes, drop them in the boiling water for four minutes to parboil.

Remove them to a colander after four minutes and let them drain well and run cold water over them to stop the cooking. Then spread them on a double layer of paper towels to dry.

Bag and freeze

When they are completely dry, put the prepared vegetables in plastic freezer bags in recipe sizes, pushing out as much of the air as possible. One suggestion was to put plastic wrap over the top of the vegetable, then roll the bag to get the air out and quickly seal. If you have one of the sealing units, it’s easy to do this and gives you an airtight seal.

Next, label with item and date, then just pop them in the freezer to let them freeze.  Defrost when you’re wanting to use them and you can take advantage of the bargain price when the roots are big and still have some come summer. They will keep about six months, so do the roots for late spring and summer in February or March. I think this technique will work with any root vegetables as well as the winter squash, although I can get those fresh at the market pretty much year round at reasonable prices.

Root Vegetable Fries

If you look at this plate of French fries, you wouldn’t know that they weren’t made from potatoes. In fact this combination fry plate is celery root, daikon radish and jicama. The jicama is shorter and darker when cooked and also stays crisper. The jicama is very neutral in flavor, so it will taste most like the seasonings. Daikon has a slight peppery taste and is a dry texture when cooked. The celery root has a celery flavor, tasting like fries with celery salt on them, and the creamy, potato-like texture.

1 1/2 cups Celery root, cleaned and peeled
1 cup jicama
3 1/2 inches daikon
1/2 cup Canola oil for frying
1/2 teaspoon seasoning salt

Prepare root vegetables by cleaning and peeling. Cut into 1/2″ wide x 1/4 inch thick planks. The length will vary by the size of the vegetables. Put a pan of water on the stove to boil while you are cutting the vegetables. Add the vegetables to the boiling water and let boil for 5 minutes. Remove vegetables to a colander to drain. Let them dry for about 10 minutes, then spread on a paper towel and dry as much as possible. (If you’re using frozen ones as prepared in the instructions above, this step is already done.)

In a heavy 8″ skillet, pour the oil in and heat it to a fry point. (A small piece of vegetable will sizzle when you add it.) Use a smaller skillet so you don’t need to put in as much oil as you would with a larger one. You need about 1/2 inch of oil in the skillet. Only a tablespoon or two actually remains on the food when you drain it. Add the vegetables to the oil and cook about 3 to 4 minutes per side until they are just golden fries. Remove to a double layer of paper towels on a plate to drain and dry out. Cook the next batch and do the same thing.

Let the fries cool down for a few minutes. When the fries are cool to the touch, you can pop them into a baggie and put that in the ‘fridge or the freezer, squeezing the excess air out, for use later.

When the fries have cooled and dried a bit or when you’ve gotten them out of the freezer or ‘fridge to finish, then reheat the oil to the fry point, then add the fries, a group at a time, back to the oil and cook for a few more minutes on each side until they are golden brown. Drain on paper towels and sprinkle with seasoning salt. Repeat with the next group, until all are done.

This will give you nice, crisp fries that are absolutely delicious and fairly low in carbs. Each serving is about 6.7 net carbs as opposed to about 14 net carbs for potato fries. Makes four servings.

Nutrition Info per serving:
Calories: 103.4 Fat: 7 g Net Carbs: 6.7 g Protein: 1.2 g

Posted on 10/23/2013