Category Archives: Recipes

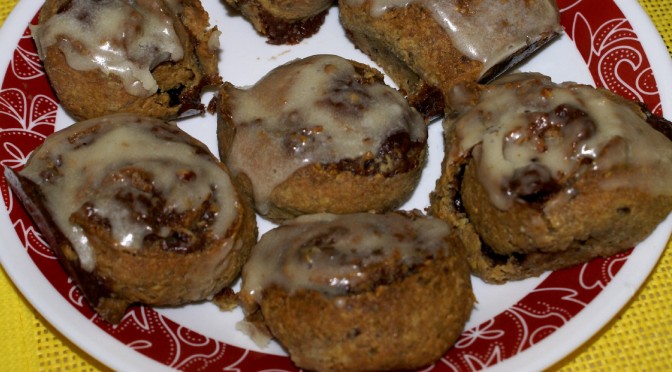
Product Review: LC-Cinnamon Buns

Cinnamon Buns

Mix From LC Foods – Cost $8.98 Makes 9 cinnamon rolls

Package contains about 1 1/2 cups of mix to make the cinnamon buns plus a packet of cinnamon filling mix. You need to add heavy cream, butter, seltzer water, and yeast.  You also need butter and walnuts (or pecans) for the filling.

I mixed according to the directions and used 2 tablespoons of Diet 7-Up for the carbonated water.  The dough was extremely sticky.  The directions say the dough needs to be stiff to roll and to add extra carbonated water if it isn’t.  It didn’t say what to do if the dough was too soft.  I add 2 tablespoons of protein powder and mixed it in and it was still too soft and sticky.  I added 1 tablespoon of carbolose low carb flour and it was finally not too sticky to handle although still too sticky to roll out.  Next, I separated the dough into three equal-sized balls.

I made the cinnamon filling according to directions using 2 tablespoons of water and 1 tablespoon melted butter.  Very thick filling.  I put 1 tablespoon of carbolose on the bread  board, took the first ball and shaped it into a cylinder about 5 to 6 inches long, then put it on the board and pressed it into a 3 inch wide by about 9 inch long strip.  It was too thin to press to 12” long without it tearing.  I turned it a couple of times during the shaping to keep it from sticking to the board and shifted the flour under it.

Then I spread the cinnamon mix onto the strip, which was not too easy as the cinnamon mix wanted to stick to the fork I was using and pulled the dough a couple of times.  I spread chopped pecans on top since we don’t use walnuts at our house.  Then I cut the strip into three one inch wide strips and rolled them from one end to the other to make the roll.

Once they were all done and in the baking pan, the instructions say to put in a warm 70-85 degree oven to rise.  I don’t know about you, but my oven, which I bought about 5 years ago, doesn’t go down below 250 degrees.  It’s electronic ignition, so it doesn’t even have a pilot light to give off heat.  I used my toaster oven, set to the unmarked area below 150 degrees and hoped it wouldn’t destroy the yeast before its time.

It took about twice as long as recommended for the rolls to almost double in size, so that was about 1 hour 15 minutes to rise.  This might be because I live in a high altitude location and that does affect the rise.  Then I brought the oven up to 400 degrees and allowed it to heat for about 5 minutes, then put the rolls in for 15 minutes to bake.  At this point, they look like they will be very tasty although the dough itself is brown rather than white bread type dough.  The mix contains flax meal, wheat isolate, wheat starches, wheat gluten, inulin, and other products that substitute for wheat and sugar.

The mix does not include icing, so you need powdered sugar substitute if you want to ice the rolls.  You can purchase LC Foods powdered sugar or you can make your own by putting sugar substitute in a blender or food processor and running it until it turns to a fine powder.   You’ll need about 2 tablespoons of sugar-free powdered sugar to make a simple icing.  I put 1 tablespoon butter in with the powdered sugar and add enough water to make either a spreadable frosting or a drip frosting, whichever you prefer.

So, making the rolls didn’t go as smoothly as I’d hoped and if you’re trying it, I would suggest not adding the carbonated soda until you have all the other ingredients mixed to see how thick your dough is, then adding it a little at a time.  I still think you will need a low carb flour, possibly coconut flour or almond flour to roll or pat the dough out on in order to prevent it from sticking to the board.

How about taste?  This is the bottom line.  Is the taste worth the expense and effort to make these?  My taste test panel was only two people and we thought that the rolls had a very good flavor, lots of cinnamon taste and were slightly crispy outside with a soft center.  I pour two tablespoons of melted butter over the rolls when they came out of the oven and that added a buttery taste to the rolls that is very nice.  I made a powdered sugar icing and spread it over the top, which added a sweeter taste to it.  We did notice a slight bitter aftertaste, which I think came from the stevia used in the mix or from the inulin.

Overall, I would say it is a very good cinnamon roll and not too difficult to make.  It is almost $1 per cinnamon roll and they aren’t very big ones, about 3 inches in diameter.  My rolls are uneven in size, but that is likely the baker’s fault and I didn’t cut them evenly.  I might buy these again and try them, but it wouldn’t be too often at the price for the mix.  I have a couple of other options to try, including cinnamon bread from Dixie Carb Counters.  I will do that over the next few weeks and post a review.

I give these cinnamon rolls  4 out of 5 tasty spoons.

4-spoons

Disclaimer:  I have not received any promotional items to review and no one from any of the companies whose products I review has asked me to do so. I have purchased the product and am giving my honest opinion about it. Should any company send me a product to try, I will state it up front and will still give my honest opinion.

Riffing the BLT Salad

Just about anything with bacon is a winner for me. I love it and I love the over 100 years-old woman who claimed her longevity came from eating bacon every day. I’m in for that! A BLT sandwich is really great also and I have finagled a couple of ways to eat one on a low carb diet with low carb breads that are very tasty. But when I saw a recipe come across on Facebook for a BLT Pasta salad, I knew I had to figure an adaptation for low carb. Pasta is one of those things that you don’t eat or eat very sparingly when trying to maintain the lc lifestyle, so I turned to my favorite substitute item for pasta, potatoes, and rice — cauliflower.

So with just a few adjustments and a little enhancement, I present the low carb version of the …

BLT Plus C Salad

2 cups Chopped Cauliflower
8 ounces lean Bacon
2 medium ripe Tomatoes
1 teaspoon chopped fresh Thyme
1 teaspoon Garlic, minced
Kosher salt and freshly ground pepper
3 tablespoons Mayonnaise
3 tablespoons Greek Yogurt
3 tablespoons Sour Cream
1/4 teaspoon Cumin, ground
2 tablespoons chopped Chives
4 cups chopped Hearts of Romaine lettuce
1 cups shredded Cheddar Cheese

Bring a pan of water to a boil and add the cauliflower. Let cook for about 10 minutes until it is tender. Cut into bite-sized pieces if it is too big. Drain. Put into a large mixing bowl and set aside.

Chop the tomatoes into bite-sized pieces.

Pan fry the bacon or cook in the oven until it is completely done. Remove to a paper towel to drain. Put 2 tablespoons of bacon grease into a skillet and add the garlic, then add the tomatoes and thyme. Cook for about five minutes until the tomatoes are warmed, but not cooked. Crumble the bacon into pieces. Reserve 1/4 cup for garnish.

Add the tomatoes and bacon to the cauliflower and toss together. Add the shredded cheese and lettuce and toss again.

Mix together the mayonnaise, sour cream, and yogurt and add the cumin, chives. salt, and pepper. Pour over the salad and toss to mix it in and coat it. Garnish with reserved bacon and chives. Serve warm. You can add slices of avocado or a tablespoon or two of guacamole if you wish. (Not included in the nutrition info.)

Refrigerate leftovers.

Makes 4 servings.

Nutrition info per serving:
Calories: 330.5 Fat: 24.1 g Net Carbs:5.6 g Protein: 21.4 g

If you’d like you can add more lettuce to the salad with only a little more in the carb count.

TIP: This can be a very versatile base salad. Instead of bacon (or in addition for real bacon lovers), substitute in tuna, ham, chicken, or taco meat. The possibilities abound.

Let me know how you like this salad in the comments.

Baking with Protein Powder

It may surprise some low carb eaters that you can add whey protein powder to your baking with really good results. I have often added a tablespoon or two to my muffins and breads to give them both more flavor and texture. I have seen a recipe now and then that uses only whey protein powder to make a pancake or a waffle. I haven’t tried these yet, but I did make a waffle this morning made with Vanilla Whey Protein Powder and Almond Flour and got a really good result. I’ll share that recipe below.

When using protein powders in baking, I usually use it as a small percent of the total flour in the recipe, but you can add more if you wish to experiment. The most I have substituted in is 2/3rds of the flour with the remainder being a low carb baking mix or almond flour. One big consideration in doing this is the number of net carbs in the protein powder that you’re using. My preferred brand comes from a health food store and is called Nu-Tek Pro 5. It is not inexpensive, but the main reason I buy it is that there is only 1 net carb in a 40-gram scoop. That makes it lower in net carbs than most of the other brands I have checked. It comes in vanilla, chocolate, and strawberry flavors. I use the vanilla more frequently than the other two. There are 145 calories per scoop. If you compare this with a few other brands, you can see that it can make a significant difference in the carb count.

One big consideration in doing this is the number of net carbs in the protein powder that you’re using. My preferred brand comes from a health food store and is called Nu-Tek Pro 5. It is not inexpensive, but the main reason I buy it is that there is only 1 net carb in a 40-gram scoop. That makes it lower in net carbs than most of the other brands I have checked. It comes in vanilla, chocolate, and strawberry flavors. I use the vanilla more frequently than the other two. There are 145 calories per scoop. If you compare this with a few other brands, you can see that it can make a significant difference in the carb count.

protein-compare2
I’m not advocating any particular brand of protein powder and if you check around, you might find others that are equally low carb’d, but take into consideration the size of the scoop and the net carbs when choosing the powder. If you need more powder to make 1/4 cup, then it may increase the carb count. Therefore, the carb count that I get on my recipes is often based on EAS whey protein powder, which is 2 net carbs per 30 g scoop. 1/4 cup is about 3 scoops or 6 net carbs. With my preferred powder, this is reduced to 3 net carbs or less because the scoop is larger and the net carbs are lower. This gives you a starting point to adjust the net carbs up or down, depending on which brand you use.

Vanilla Whey Protein Powder Waffles

I made this in a Belgian waffle maker that has deep holes and requries a little more batter to make a full waffle. I was a little short, but I have adjusted the recipe to accommodate. It will make 4 waffle sections in the round Belgian waffle maker and 2 of them make one serving. If you are using a different waffle maker, it may make 2 waffles.

1/2 cup Vanilla Whey Protein Powder (about 3 to 4 scoops)
2 tablespoon Almond Flour
1 large Egg
1 teaspoon Coconut Oil or Canola Oil
1/4 teaspoon Baking Powder
1/4 teaspoon Vanilla Extract
1 teaspoon Sugar Substitute
2 tablespoons Water

Pre-heat the waffle maker while you mix the batter.

In a small bowl, mix all the ingredients together and stir until completely mixed. You can use a mixer, an immersion mixer, a blender or a whisk. Just make sure the egg is mixed in well.

Spray the waffle maker with cooking spray, then pour the batter equally into each section. Close the lid and cook until the steam stops coming out. This is usually three to four minutes, but it varies. Gently lift the handle and if it opens easily, the waffle is done. If there is resistance, let it cook a little longer.

Carefully lift the waffle from the iron and put on plates, spread with soft butter and serve with sugar-free syrup or fresh fruit, if you wish.

Makes 2 servings

Nutrition Information per serving:
Calories: 214.5 Fat: 9.1 g Net Carbs: 3.2 g Protein: 27.7 g

Grilled Chicken with Asparagus

I’m still working my way through the two pounds of asparagus my friends left for me while they ran off to France.  So many ways to prepare asparagus and I’ve stir-fried a little, mixed it with cabbage and turnips and made a quiche.  But this simple recipe for chicken and asparagus wrapped in bacon is one of the best.  It is quick to prepare and cook, so dinner can be on the table in less than 30 minutes.

A key to making sure the bacon is done is to pre-cook the bacon about halfway, so that it is still flexible, but not raw.  I used a George Foreman grill, but any tabletop grill, outdoor grill or broiler will work. It is so low in carbs that you can indulge with a salad and a few vegetable fries.  I used turnips and cauliflower fries with my dinner.

Grilled Chicken with Bacon and Asparagus

For a quick, elegant entrée, this goes together in four steps and cooks on the grill, in the broiler, or in something like a George Foreman grill in just a few minutes. It tastes wonderful! Chicken, asparagus, and bacon — how can you go wrong?

2 (8 oz) Chicken breast filets (about 1/2 inch thick), pounded to square if you wish
4 to 6 Asparagus Spears, trimmed – small or medium
2 slices thick Bacon
1/2 teaspoon Herb Seasoning of choice
Sprinkle of Lemon juice (optional)
Salt and Pepper to preference

Partially cook the bacon so that it is about half way done. This ensures that it will get done while grilling. Drain the bacon.

Partially cooked bacon is drained on paper towels.

Pound or press the chicken to tenderize and flatten to a square. (You can use the side a plate for this or the end of table knife.)

Put 2 to 3 asparagus spears in the middle of each chicken breast, season and sprinkle a little lemon juice on it. Roll up and wrap a slice of bacon around it. Use a toothpick to secure the bacon.

Chicken is wrapped with bacon and ready to grill.

Grill on each side until the chicken is done and juices run clear. If you’re using a Foreman or similar grill, it will grill both sides at one time, so just make sure the chicken is done.  The time to cook varies with the method used.

Let rest a couple of minutes, then serve.

Serves 2

Nutrition info per servings:
   Calories: 180.6 Fat: 6.1 g Net Carbs: 0.8 g Protein: 28.0 g

Easy Popover Muffin French Toast Rounds

Not everything works well with low carb flours or natural flours and it takes some experimenting to get it right.  One of those experiments was this failed popover recipe that actually made a very tasty, simple egg bread muffin that I am calling a popover muffin.  Where a popover would rise and collapse in on itself while creating a well in the middle, this muffin rose, but simply deflated, leaving a nice rounded surface.  But the flavor is great and it makes a fabulous low carb bread to go with almost anything.

The bread is also sturdy enough to hold up to being turned into French Toast Rounds.  So this is a two-fer-recipe day as it includes the recipe for the popover muffins and the French toast rounds.

If you give either one of these recipes a try or both, let me know what you think and if you have other ideas how to use them.

Popover Muffins

Popover Muffin

This recipe makes 6 popover muffins, which are delicious with almost anything — butter, jam, soup, a salad, but it isn’t hollow like a popover normally is. So I am calling them popover muffins. A popover pan will give you depth and make tall and nicely browned muffins, but you can also use a standard muffin pan.

This recipe is the very basic version without any kind of flavoring or seasoning. You can add a little sugar substitute to make them sweet or you can add grated cheese to make a cheese version that would complement a bowl of chile nicely. Add a tablespoon or two of chopped chiles to the batter along with the cheese and really enhance the flavor.

3/4 cup Low Carb Flour*
1/4 cup Almond Flour
2 Eggs
1/4 cup Heavy Cream mixed with 1/4 cup water
Pinch Salt

* I used CarbQuick, but Bob’s Red Mill Baking Mix, LC Flour, Carbolose or any other low carb mix will work.  I have not tried Coconut Flour, but I would guess it might not work as well.

Preheat oven to 425 degrees (F.) Make sure the oven rack is on the lower level to allow room for the batter to rise and to keep them from browning too quickly.

Prepare a 6 well popover pan by spraying with cooking spray or buttering the wells. Deep muffin cups will also work.

Put the eggs into a bowl of warm water to bring them to room temperature, about 10 minutes.

When the oven is fully heated, begin preparing the batter. Whisk the eggs, milk and salt together in a medium bowl. Make sure the ingredients are mixed well, then add the flours at one time and continue to whisk until the flours are and it looks frothy. You can use a mixer with a whisk attachment to do this. Or you can mix it in your blender following the same sequence. Wet ingredients first, then add the flours. Add the melted butter after everything is mixed.

Pour the batter into the popover wells equally. They should be between 2/3 and 3/4 filled.

Bake for 20 minutes, then lower the temperature to 350 degrees and bake an additional 10 minutes. Do not open the oven door while baking, especially during the first 20 minutes. They should be a deep, golden brown.

Nutrition Info per muffin
Calories: 153.2 Fat: 13.5 g Net Carbs: 1.9 g Protein: 5.8 g

Popover Muffin French Toast Rounds

This simple recipe uses an egg bread “popover” muffin as the base for a basic French toast for one. Add pumpkin butter or syrup to serve. A little bacon or sausage helps to round it out.

1 Egg bread “Popover” Muffin
1 Egg
1/2 teaspoon Vanilla
1/2 teaspoon Pumpkin Spice or Cinnamon
1/2 tablespoon Cream
1/2 packet Sugar Substitute
1 tablespoon Butter
1 tablespoon Pumpkin Butter

Slice the muffin across the middle, then slice each half across the middle again to make four rounds.. In a bowl or shallow pan, beat the egg, then add the cream, vanilla and pumpkin spice or cinnamon. Beat with a fork until well mixed. Dip the muffin slices into the egg mixture, turning them to completely coat both sides. Let them sit in the mixture while you warm up a small skillet.

Add the butter and set to medium heat. When the butter melts and is just getting to sizzle, add the muffin rounds. Cook for about 2 minutes on one side, then flip to cook the other side. They should be golden brown. If they aren’t, cook just a little longer. Remove to serving plate and top each with 1/4 of the pumpkin butter or butter the tops and cover with sugar free syrup.

Makes one delicious serving.

Nutrition info per recipe:
Calories: 362.7 Fat: 31.6 g Net Carbs: 4.8 g Protein: 12.8 g