Category Archives: Recipes

Easy Popover Muffin French Toast Rounds

Not everything works well with low carb flours or natural flours and it takes some experimenting to get it right.  One of those experiments was this failed popover recipe that actually made a very tasty, simple egg bread muffin that I am calling a popover muffin.  Where a popover would rise and collapse in on itself while creating a well in the middle, this muffin rose, but simply deflated, leaving a nice rounded surface.  But the flavor is great and it makes a fabulous low carb bread to go with almost anything.

The bread is also sturdy enough to hold up to being turned into French Toast Rounds.  So this is a two-fer-recipe day as it includes the recipe for the popover muffins and the French toast rounds.

If you give either one of these recipes a try or both, let me know what you think and if you have other ideas how to use them.

Popover Muffins

Popover Muffin

This recipe makes 6 popover muffins, which are delicious with almost anything — butter, jam, soup, a salad, but it isn’t hollow like a popover normally is. So I am calling them popover muffins. A popover pan will give you depth and make tall and nicely browned muffins, but you can also use a standard muffin pan.

This recipe is the very basic version without any kind of flavoring or seasoning. You can add a little sugar substitute to make them sweet or you can add grated cheese to make a cheese version that would complement a bowl of chile nicely. Add a tablespoon or two of chopped chiles to the batter along with the cheese and really enhance the flavor.

3/4 cup Low Carb Flour*
1/4 cup Almond Flour
2 Eggs
1/4 cup Heavy Cream mixed with 1/4 cup water
Pinch Salt

* I used CarbQuick, but Bob’s Red Mill Baking Mix, LC Flour, Carbolose or any other low carb mix will work.  I have not tried Coconut Flour, but I would guess it might not work as well.

Preheat oven to 425 degrees (F.) Make sure the oven rack is on the lower level to allow room for the batter to rise and to keep them from browning too quickly.

Prepare a 6 well popover pan by spraying with cooking spray or buttering the wells. Deep muffin cups will also work.

Put the eggs into a bowl of warm water to bring them to room temperature, about 10 minutes.

When the oven is fully heated, begin preparing the batter. Whisk the eggs, milk and salt together in a medium bowl. Make sure the ingredients are mixed well, then add the flours at one time and continue to whisk until the flours are and it looks frothy. You can use a mixer with a whisk attachment to do this. Or you can mix it in your blender following the same sequence. Wet ingredients first, then add the flours. Add the melted butter after everything is mixed.

Pour the batter into the popover wells equally. They should be between 2/3 and 3/4 filled.

Bake for 20 minutes, then lower the temperature to 350 degrees and bake an additional 10 minutes. Do not open the oven door while baking, especially during the first 20 minutes. They should be a deep, golden brown.

Nutrition Info per muffin
Calories: 153.2 Fat: 13.5 g Net Carbs: 1.9 g Protein: 5.8 g

Popover Muffin French Toast Rounds

This simple recipe uses an egg bread “popover” muffin as the base for a basic French toast for one. Add pumpkin butter or syrup to serve. A little bacon or sausage helps to round it out.

1 Egg bread “Popover” Muffin
1 Egg
1/2 teaspoon Vanilla
1/2 teaspoon Pumpkin Spice or Cinnamon
1/2 tablespoon Cream
1/2 packet Sugar Substitute
1 tablespoon Butter
1 tablespoon Pumpkin Butter

Slice the muffin across the middle, then slice each half across the middle again to make four rounds.. In a bowl or shallow pan, beat the egg, then add the cream, vanilla and pumpkin spice or cinnamon. Beat with a fork until well mixed. Dip the muffin slices into the egg mixture, turning them to completely coat both sides. Let them sit in the mixture while you warm up a small skillet.

Add the butter and set to medium heat. When the butter melts and is just getting to sizzle, add the muffin rounds. Cook for about 2 minutes on one side, then flip to cook the other side. They should be golden brown. If they aren’t, cook just a little longer. Remove to serving plate and top each with 1/4 of the pumpkin butter or butter the tops and cover with sugar free syrup.

Makes one delicious serving.

Nutrition info per recipe:
Calories: 362.7 Fat: 31.6 g Net Carbs: 4.8 g Protein: 12.8 g

Asparagus, Ricotta & Bacon Cheese Pie Is Versatile

Asparagus is figuring prominently in my recipes at the moment since a friend of mine just brought over about three pounds and left them with me.  So, I need to eat a lot of it over the next week or so!  I whipped up this yummy cheese pie featuring asparagus and bacon, two of my favorite things.   I often add ricotta cheese to my quiches and breakfast omelets, so it goes in great with this crustless pie.  It’s great for brunch, lunch or add a salad and make it dinner.

Incidently, if you missed it, I did a guest post earlier this week for The Chinese Quest with a great recipe for Asparagus Shrimp Stir Fry.  

Just want to mention that the print copy of my cookbook is on sale at Amazon for $5,85 versus $6.50.  Not sure how long this price will last, but it’s a good time to buy it if you haven’t already.  Many recipes in it are not on this website, so you won’t find them here, but you will find the color images of the photos in the book, which are black and white, beginning on this page with links to the rest of the pages.  The link to the book page at Amazon is on the right.

Asparagus Bacon Pie with salad topped with fried pork rinds.

Asparagus, Bacon & Ricotta Cheese Pie

A crustless pie made with ricotta cheese, bacon, asparagus and cheddar jack cheese. It’s garnished with more asparagus and tomatoes.

14 stalks Asparagus, 5″ trimmed
4 Eggs
1/2 cup Ricotta Cheese
1 cup Cheddar Jack Cheese, shredded
1/4 cup Onions, diced
4 slices thick Bacon,
4 large grape tomatoes (optional)
Salt & Pepper to taste
1/2 teaspoon Garlic Powder
1 oz. Heavy Cream
1/2 teaspoon Seasoning Salt

Preheat oven to 375 degrees (F.) Spray an 8″ pie dish with baking spray.

Hold back 6 asparagus spears, then slice the rest into 1 inch pieces and distribute evenly over the bottom of the pie pan.

Cook bacon until crisp and let drain and cool on paper towels while you cook the onions. Add a little bacon grease to a small pan and sauté the onions until they are just tender. Sprinkle the onions over the top of the asparagus. Break the bacon into pieces and distribute over the top of the asparagus, then sprinkle 3/4 cup of the shredded cheese over the top.

In a medium bowl, break the eggs and beat until blended, then add the ricotta cheese, heavy cream, and seasonings. Beat to mix the ingredients together. Pour over the asparagus and cheese in the pan, spreading as evenly as possible. It will settle in.

Trim the asparagus to the 4″ lengths and cut the extra trimmed off into two pieces. Position the asparagus spears on the top to form six divisions. Cut grape tomatoes and use to decorate the pie as shown.

Bake for 35 to 45 minutes until golden brown and a knife inserted in the center comes out fairly clean, It will firm up more as it cools. Let sit about 10 minutes, then cut and serve.

Makes 6 servings.

Nutrition info per serving:
Calories: 190.4 Fat: 14.3 g Net Carbs: 3.0 g Protein: 12.9 g

Tip:  This can be made with zucchini or chopped broccoli (par-boil first).  Substitute in turkey bacon if you prefer or to make it vegetarian, use a soy bacon or other vegetarian bacon.  This will affect the carb count by about .5 net carbs more per serving.

A to Z Blogs

survivor-atoz 2015 - sm_zpsmfnq4uov

I made it!  I completed the A to Z Blog Challenge!  

Over the month of April, 2015, I participated in the A to Z Blog Challenge, writing 26 blogs during the month, one each day from Monday through Saturday, to correspond with the 26 letters of the alphabet.  My theme was about food, mostly vegetables with a few fruits thrown in and covered a little history about the food and how it was used.  Many had original recipes and all had links to recipes either on Skinny Girl Bistro or on other blogs.

To make it easier to find and read any of these articles,  here are the links to each of them:

 A to Z Blog Reveal
Awesome Artichokes – an Ancient and Strange Vegetable
Bountiful Beets
Championing Celeriac
Diversify with Daikon Radish
Eggplant is an Egg-cellent Choice
Fantastic Figs – A Good and Versatile Fruit
Glorifying Green Beans
Horseradish Is Hot!
Iceberg is Ideal for Salads
Join In on Jicama
Kooky Kohlrabi is Great!
Love My Leeks
Munching on Mung Beans
Nurture with Nopal
Olives or Olive Oil, the Opportunities Abound
Pursuing the Pasilla Pepper Confusion
Is Quince a Quasi-apple?
Rutabaga is a Delicious Root
Simply Yummy Snow Peas
Tart and Tangy Tomatillos
Unveiling Ulluku
Victorious Vidalia Onions
Wade into Water Chestnuts
Xigua is not Xeric
Yams are Yummy
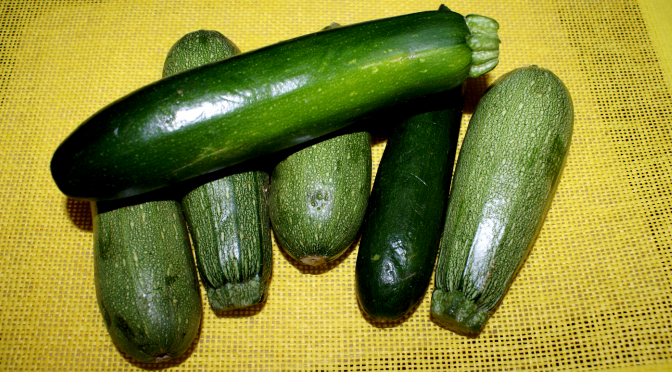
Zest for Zucchini

Zest for Zucchini

Zucchini is one of the favorite vegetables of the world and it certainly ranks high in my culinary endeavors. It is delicious almost any way you prepare it and there are countless ways to use it in your cooking from salads, to main course to appetizers to desserts and breads. However, zucchini is part of a much larger family that includes other summer squashes, winter squashes, melons and cucumbers. Yep, they are all related, some a little closer than others.

Greenhouses, importers, and various growing locations worldwide have ensured that we can find zucchini in grocery stores at any time of the year. Others in the family, like yellow, crookneck and scallop squashes don’t show up as consistently. They each have their own unique flavor and blend well together when cooked. Zucchini has a delicate flavor, an edible skin, and a creamy off-white flesh. Generally the smaller, 3 to 4-inch vegetables are the best for eating since the seeds are smaller and edible and the flavor is at its best, I think. As they get bigger, they get tougher, seeds are bigger and the flesh isn’t as sweet. If you are stuffing a zucchini, try to look for about 5” and as big around as you can find.

Besides the delicious vegetables — oh, wait, that isn’t really a vegetable, but a fruit! It is formed in the same manner as fruits, so technically it is one of them. But I will continue to count it in the vegetable column. The zucchini also produces an edible golden flower. I admit, I have never cooked one of the flowers, although they are popular fried. I did have a couple of plants one summer that did not cross-pollinate because the flowers were all I got. The male flower blooms first to attract bees and the female blossom, which has the bud of a tiny fruit under it, needs to be pollinated by the bee. If this doesn’t happen, no zucchini will form. I was once told that you need at least two plants, but that apparently, isn’t necessary so long as the plant produces a female blossom. If no bees are in the area, you can transfer some of the pollen using a Q-Tip to dip into the male flower and put it in the center of the female bloom. Doesn’t that sound romantic?

All squashes have their ancestry in the Americas, but they have spread around the world. They are easy to grow and mature quickly. It’s one of the few plants that I can actually get a decent crop from in the micro-climate of South Reno. Native Americans called squashes one of the “three sisters” in their culture. The other two were corn and beans, which are also native to the Americas. The squash blossom is a popular design motif in Native American art and jewelry.

The squash we now call zucchini was developed in Italy from the root squashes brought back from America. It was cultivated,  in the late 19th century and likely near Milan. The name came from zucca, which is the Italian word for pumpkin or squash and the suffix “ino” or “ina”, meaning little and becoming zucchini in the plural form. The French called it “Courgette” and it is known that way in much of Europe, so if you see that in a recipe, you know it is zucchini or vice versa. They are known as baby marrow in South Africa.

As little as 30 years ago, the zucchini was barely known in the United States and it was referred to as the Italian squash. It was likely brought to the country of its ancestors by Italian immigrants. But it took hold and has become  popular to eat and grow.

Going back to its roots, zucchini, like all summer squash, is delicious with its other two sisters, corn and beans, and popular in Native American and Mexican foods. While beans and corn are used sparingly in a low carb lifestyle, summer squashes are very low in carbohydrates, which makes them awesome!

Nutrition information 1 medium (196 g)
Calories: 33 Fat: 0.5g Net Carbs: 4.0 g Protein: 2.4 g

Recipes

There are several recipes on this site that feature zucchini:

Bacon & Zucchini Stuffed Sole
Zucchini Fritters
Chicken with Tomatoes & Zucchini
Zucchini and Sausages Bake

Featured Recipe

Since Cinco de Mayo is just around the corner and the squash is a Native American, which includes Mexico and South America, crop, it seems apropos that the recipe should honor that heritage. The Mexican name for squash is calabacitas and the Mexican zucchini is similar to the Italian one but more rounded and tear drop shaped. This is an original recipe I’ve developed over the years.

Calabacitas y Carne Con Queso

Mexican Squash with Meat and Cheese
Recipe by Rene Averett

3 cups Mexican Zucchini (or regular zucchini)
1 lb Beef, ground
1 can Chiles, mild or medium to your preference
1 cup Cheddar Jack Cheese, shredded
1/2 cup Mexican Cheese, Queso Fresco or similar
1/2 cup diced Onions
1 cup canned Diced Tomatoes, with juice
2 Low Carb Tortillas
1 cup Jicama, shredded or cubed or Daikon Radish, chopped
1 clove Garlic, minced
1 tablespoon Olive Oil
1/2 teaspoon ground Cumin
1 teaspoon dried Mexican Oregano
2 tablespoon fresh Cilantro
1 teaspoon Cayenne Pepper

Preheat oven to 350 degrees (F.)

Slice zucchini into 1/4″thick rounds.

In a large skillet over medium heat, add olive oil and heat a minute or so, then add garlic, jicama and onions. Stir cook the onions until they are fragrant and shiny. Add ground beef and lightly brown, then add seasonings, chiles and diced tomatoes. Stir and cook for about 10 minutes until hot and bubbly. Stir in the fresh cilantro.

Spray a round 2 qt. casserole dish with baking spray. Layer 1/3 of the zucchini on the bottom of the dish. Pour 1/3 of the meat mixture over the top, then sprinkle 1/3 cup of cheddar jack cheese over that. Put a tortilla on top and repeat with another layer of zucchini followed by the meat and cheese. Put the second tortilla on top and use the rest of the zucchini, meat and cheese on top of that.

Bake for 25 minutes until the casserole is hot and bubbly. Sprinkle the Mexican cheese over the top and return to the oven for another 5 minutes to melt the cheese.

Makes 6 servings.

Nutrition Info per serving :
Calories: 260 Fat:17.0 g Net Carbs: 8.7 g Protein: 16.3 g

And it’s Z-end of the the A to Z blog challenge! I will resume my usual Tuesday post schedule next week, but I thank everyone who stopped by to visit and comment during the A to Z Challenge. I hope you will continue to visit now and then.


Input for this article came from World’s Healthiest Foods,  Nutrition and You, Wikipedia, and The History of Zucchini.

All photos taken by R. Averett for Skinny Girl Bistro.

Xigua is not Xeric

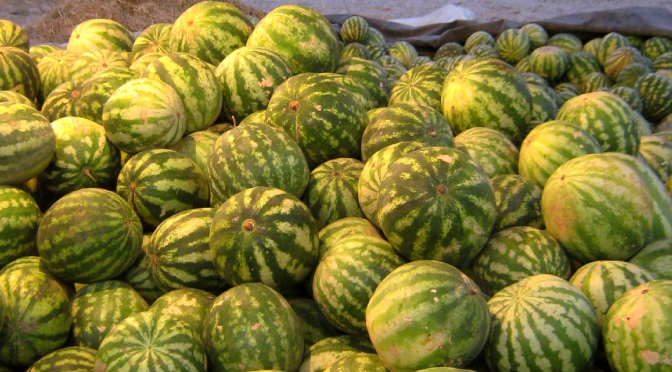
Yes, I am truly reaching for the “X” in this and I have settled on using the Mandarin Chinese name of a commonly known melon… the watermelon. It actually is a specific kind of melon that is grown in China, but essentially, the same as watermelons around the world. The xigua, pronounced shee-gwa, is a small roundish melon with deep green stripes on a lighter green skin.

The watermelon itself is believed to have originated in south Africa and records from Egypt showed it was cultivated in the Nile Valley as far back as 2000 BC. Eventually, it began to spread across Europe and toward the east. Moorish traders carried the fruit to Spain where it was grown in Cordoba and Seville. By the 7th century, it was being cultivated in India and by the 10th century it had reached China, where it really took hold. Today, China is the world’s largest watermelon producer. It came to the Americas with European colonists and their African slaves. Spanish settlers brought it to Florida in 1576. By 1650, it was grown in Peru, Brazil and Panama and other settlers brought it to the British and Dutch colonies while Native Americans in the Mississippi Valley and Florida had begun growing the crop as well. Explorers took the seeds to the South Pacific where they were quickly adopted in Hawaii and other Pacific Islands. Who doesn’t love watermelons, after all? They are colorful, refreshing and delicious.

While I grew up with watermelons used as a dessert, basically a big slice or wedge of watermelon on a plate, I have had to cut back severely on them with a low carb lifestyle. Yes, they are primarily water, but they do have a lot of natural, although flavorful, sugar in them. I remember we used to sprinkle a little salt on the fruit and it would make it taste even sweeter. Mostly, I eat watermelon raw, just chilled and sliced is perfect, or I have actually processed them for a glass of watermelon juice. They also are a great recipe ingredient in salads and salsas.

Of course, it’s easy to make a basic fruit salad with cubed watermelon, cantaloupe, honeydew melon, sliced strawberries, and grapes, but the watermelon has a much larger range than that. It combines well in green salads, goes with avocados, olives, and beets or other vegetables to create different salads. You can even make a watermelon jelly – go ahead, Google it — watermelon lemonade and watermelon sorbet. In fact, I am inspired and when watermelon season comes into full swing this summer, I’m going to try to make a low carb version of a few of these recipes. That’s your cue to come back to see if I can meet this challenge.

WatPasantidhammaCarvedWatermelon

Another popular use for the xigua and other watermelons is carving. They are a wonderful artistic medium for food artists and are carved into flowers, animals, and whole scenes. To some artists, they can carve a watermelon the same way you’d carve jade. There are carved melon festivals around the world. Here are a few links to some of these:

Watermelon Festival of Italy 
Monticello Florida Watermelon Festival 
Pardeeville, Wisconsin Watermelon Festival
Beijing Watermelon Festival

For my dragon-loving friends, there’s this:

And there’s this peculiar use of watermelons from those fun-loving Aussies: Watermelon Skiing 

Nutrition Info for xigua (watermelon) 1 cup diced
Calories: 48.7 Fat: 0.7 Net Carbs: 10.2 g Protein: 1.0 g

Recipes

Recipes using Xigua or watermelons from Watermelon.org

Did you know you could use the watermelon rind as well as the fruit? Try this Watermelon Rind Slaw
Water Melon Glazed Meatballs 
Stacked Jicama Chicken Salad 

Information to help write this article came from Melons for Vegetables,  The Hungry Kitchen, Ask.com, and Wikipedia

Photos are from Wikipedia media Commons and used under public-use agreement. Top photo “Watermelon – Fruit Bazaar – near Besat sq – Nishapur 08” by Sonia Sevilla – Own work. Licensed under CC0 via Wikimedia Commons –

Food Carving photo by Rlevse  via Wikimedia Commons