They have a nice snap and a sweet taste and make a wonderful addition to Chinese food, curries, and other vegetable combinations. Best of all, as far as peas go, they are reasonably low in carbohydrates. I most associate snow peas with Chinese food, but they can be used in any way you would use other peas. Experiment with them.
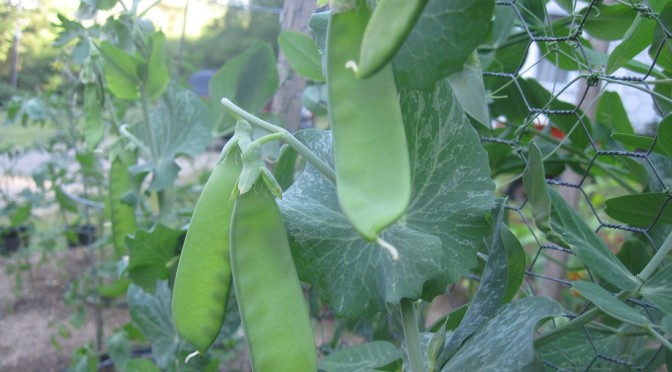
Although the snow pea originated in the Mediterranean region and were a popular variety of pea in the 19th century, they migrated to China where they quickly became the preferred pea and a key ingredient in Oriental cuisine. They thrive in a cool climate and should be picked five to seven days after flowering when they are at their peak flavor.
The French call the snow pea the mange-tout, meaning “eat it all” as it is one of only two pea varieties that you can eat the pod. The other pea with an edible pod is the sugar snap pea, although the snow pea has the more delicate pod. Easily recognized, snow peas have pale green pods that hold the small, flattened peas and are about two to three inches in length.
You can buy snow peas either fresh or frozen year round. Add them to stews in the winter or to salads in the summer. Delicious either way.
Nutrition information for 1 cup (98 g)
Calories: 41 Fat: 0 Net Carbs: 4 Protein: 3
Recipes:
Here’s a couple of recipes from Skinny Girl Bistro that feature snowpeas.
Back quite a few years ago, PK and I put on a Scandinavian feast for the local SCA group. For the uninitiated, that’s the Society for Creative Anachronisms, a medieval recreation group. We tried to find recipes that would go back to the Middle Ages for the feast and it included many interesting and diverse foods from Scandinavia. One of the dishes we made was Lanttulaatikko, which is a rutabaga baked casserole from Finland. It was the first time I used rutabagas and I was pleasantly surprised by their taste. I have only used them rarely since then and now find myself wondering why? They are fairly low carb, although most of the carbs are sugar, and can be used in much the same way as a potato, so I plan to enjoy them more often in my cooking.
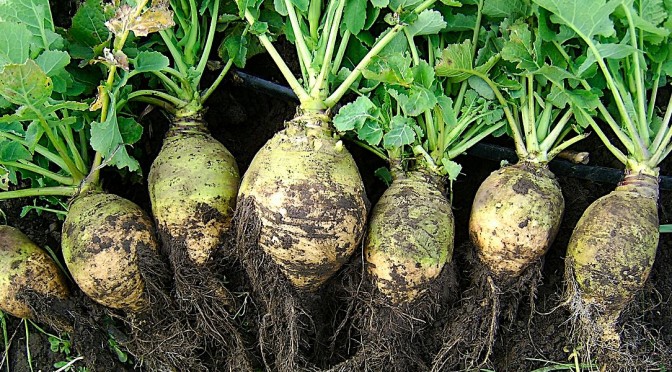
Rutabagas have a bit of a confused history, largely because of a mix of names used for them. They are only called rutabagas in the United States and possibly, Canada. Most of the rest of the world calls them swedes, reflecting back to their abundance in Sweden. The name itself is of Swedish origin, coming from rotabagge, meaning “round root”.
Other names for them are Swedish turnips and Russian turnips. In Ireland, they are the “neeps” in “tatties and neeps”, confusing matters further. I mentioned turnips to a friend who had lived in Ireland and she thought I was referring to a rutabaga. While they are believed to be a hybrid between a turnip and a wild cabbage, they have developed a different look and a different taste from a turnip. The vegetable is larger than a turnip with a purple to tan colored skin and the flesh is an orange color with a nutty, sweet taste when roasted. Turnips are white with a bit of purple on them, although some are all white and the flesh part is white and has a slight peppery taste. I’m sure that clears things right up.
Various root vegetables from the top left: turnip, rutabaga, daikon radish and the green one at the bottom is kohlrabi.
Rutabagas are a cold weather crop, like turnips, kohlrabi and others from the turnip family. They are primarily grown in the northern United States, Canada, Europe, and Great Britain.
Uses
Rutabagas can be cooked almost any way you cook a potato — roasted, sautéed, baked, fried, boiled, mashed and added to soups and stews. They can be shredded and added raw to salads. They make great French fries.
Fun Facts about the rutabaga
In 2011, the rutabaga entered the Guinness Book of World Records as the world’s largest vegetable when a gardener in the U.K. grew one that weighed 85.5 pounds! That is a big rutabaga!
People in the British Isles used to carve turnips and their larger cousins, the rutabaga into their equivalent of the pumpkin on Halloween. Called ‘tumshie heads” the children would carry them to ward off evil spirits. They have now been replaced for the most part with pumpkins.
The annual Rutabaga Curling Championship takes place annually at the Ithaca, New York, Farmers’ Market on the last day of the market season. They literally hurl or curl the rutabagas across the wooden floor.
Nutrition Information per 1 cup of cubed rutabaga (170 grams)
Calories: 66 Fat: 0 g Net Carbs: 12 g Protein: 2 g
Recipes
Here’s a couple of recipes from the Skinny Girl site that use rutabagas:
I originally found this recipe in the Betty Crocker International Cookbook and have only made a couple of changes to it to convert it to low carb.
2 to 3 medium Rutabagas, peeled and diced (about 6 cups)
2 Tablespoons Butter, divided
1/2 cup Cream
1/4 cup Water
1/2 cup Low Carb Breadcrumbs
1 teaspoon Salt
1/2 teaspoon Nutmeg
2 Eggs, slightly beaten
2 tablespoons Sugar-Free Pancake Syrup
Cooking spray
Cover rutabaga cubes in water in a large saucepan. Bring to a boil, then reduce the heat and simmer until fork tender. This is about 20 to 30 minutes. Drain and put in your food processor to puree or use a hand masher. Set aside to cool a little.
Preheat oven to 350 degrees (F.) Spray a casserole dish with cooking spray.
Mix together two tablespoons of the butter, cream, syrup, salt, nutmeg, breadcrumbs and eggs until well mixed, then add to the mashed rutabagas. Pour into the prepared casserole dish. Dot the rest of the butter over the top.
Bake for 45 minutes or until the top is lightly browned.
Makes 8 servings
Nutirion Info per serving:
Calories: 146.1 Fat: 11.3g Net Carbs: 6.4 g Protein: 3.2 g
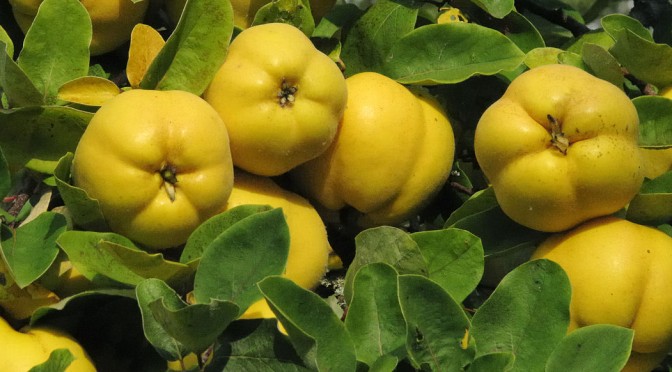
The only quince I knew when I was growing up was my Great Uncle Quince and I always thought it an unusual name. For many years, I had no idea it was also a fruit. I didn’t actually try that fruit until about two years ago when I found some at one of the local grocery stores. Although they look like an apple, they are not and you don’t eat them raw. They must be cooked. Once cooked, they taste similar to an apple and they pair very well with apples and pears. Even though they are related, the quince is the only one in its genus, which is Cydonia, although it is part of the Rosaceae family, along with apples and pears. So, related but not… does this make them like an in-law?
Like many fruits and vegetables, the quince has a long history that goes back to ancient Asia, Turkey, Iran and pretty much the rest of the Mediterranean. Although it likes the rocky slopes and woodland marshes of southwest Asia, do not confuse it with the Chinese Quince. The Akkadians called it supurgillu. The modern name came from 14th century France as a plural form of quoyn. The Greeks called it kydonion melon or kydonian apple.
It is possible that quince may have been cultivated before apples and it may be that many references translated to apple may actually have been quince. Customs surround the quince. Ancient Greeks used it a ritual offering at weddings because it had come from the Levant with Aphrodite and was sacred to her. The Greek bride would nibble on quince to perfume her breath prior to entering her bridal chamber. Paris awarded Aphrodite a quince and it was for a golden quince that Atalanta paused in her race. The Roman Apicius cookbook had recipes for stewing quince with honey and even combining them with leeks.
In the past, quince was once a staple in kitchens world-wide but now it is a novel fruit and is not seen too often. I can find it in the fall at one grocery store in Reno. There is a pineapple quince variety that grows in California, but the majority of them are imported from South America. Although interest has diminished in North America, it is still popular in many Latin American countries.
Uses
How is is used in different cultures? In many ways. In Moroccan, Persian, Romanian and Balkan cuisine, it is used as a confection. Quince can be added to meaty stews and in much the same way as apples or pears. Called melimelum by the Romans, the Greek name means “honey apple” because the fruit was preserved in honey for jam. The Portuguese called it marmelo, a name that combines melimelum and marmelado, which was a favorite confection. The British used it in tarts and pies.
With a high pectin content, quince is easy to turn into marmalade, conserves, jams or jelly. They can be poached, stewed, baked and pretty much treated as a cooked apple. You just can’t eat them raw. They should be cored and peeled before use. An easy way to peel them is to par boil them for about three minutes, then the skin slides right off.
Nutrition information for 1 fruit, peeled and cored
Calories: 52 Fat: 0.1 g Net Carbs: 9.7 g Protein: 0.4 g
Quince Apple Jam
Scone with Quince-Apple Jam. Photo by R. Averett
Adapted for low carb by Rene Averett
Easy to make and will only store a few weeks. Quince may be found in the fall and there are places where you can order it online. If you make more than you can eat in two or three weeks, freeze part of the batch in a freezer bag and store for several months.
1 Quince
1 Cooking Apple
1 cup sugar substitute (xylitol, like Ideal sugar)
2 cups of water
1 Tbs lemon juice
Peel and grate, or finely chop, the apple and the quince.
Bring the water to a boil and add the grated or chopped fruit. Let them cook, stirring now and then, until they are soft, about 10 minutes. Add the sugar substitute and lemon juice, lower the cook temperature to medium and continue to cook until the sauce thickens to a jam. Let cool, then ladle into a clean jar and store in refrigerator.
Makes about 1 cup of jam. About 16 servings.
Nutrition info per tablespoon of jam (1 serving) Calories:9.7 Fat: 0.0 Net Carbs: 2.6 g Protein: 0.1 g
Photo at top from Wikimedia Commons, used with permission – “Quitte Cydonia oblonga” by Dietrich Krieger – Own work. Licensed under CC BY-SA 3.0 via Wikimedia Commons –
My mother didn’t cook too often, usually stepping in to make something unusual or different from the standard fare that my grandmother served. Coming from a ranch family, my grandmother focused a lot on basic ranch food, meat and potatoes, chicken and hearty food. Mother liked to bake the unusual breads, the different cultural dishes. One of the things that she did every now and then was to make from-scratch enchilada sauce. I remember her coming home from a trip across the border with a bag filled with dried, very dark chiles. She pour boiling water over these and let them sit until they were soft, then put them through a sieve using a large pestle to mash them forcing out the chile juice and pulp that formed the base for the sauce. I believe that the chiles she used were Pasilla peppers.
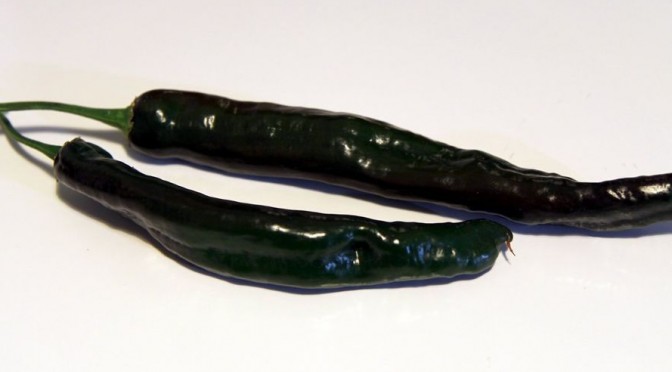
When I began looking into the background of these peppers, I found there is a bit of confusion about what exactly a pasilla pepper is. Several sites that sell them and Wikipedia are adamant that pasilla, also called chile negro, are the dried chilaca pepper. This is a long, narrow pepper in the Capsicum annum family. It is very dark, almost a chocolate brown color when dried and I am pretty sure these are the chiles that my mother used for her sauce. Like many chiles, it ranges from mild to a middle of the range hot.
However, it seems the California camp has muddied the culinary waters a bit as grocers and cooks in California call the dried form of the poblano chile a pasilla also. This creates two lines of thinking in regards to what a true pasilla is. A couple of recipes I read even include the ancho chile as pasilla, when an ancho is actually the dried form of the poblano. It’s clear that cooks aren’t certain what pasilla is. The word pasilla, pronounced pa-see-ya, translates to “little raisin”, which more properly describes the dark brown chilaca when it is dried.
Ancho chile from the poblano pepper. Photo from Wikimedia Commons, used with permission – “Capsicum annuum ancho dried” by User:Carstor – Own work. Licensed under CC BY-SA 2.5 via Wikimedia Commons –
Pasilla peppers from the chilaca chile. Photo from Wikimedia Commons, used with permission. “Capsicum annuum pasilla dried” by User:Carstor – Own work. Licensed under CC BY-SA 2.5 via Wikimedia Commons –
For cooking purposes, any dried chile will work to make enchilada sauce. The different chiles used will alter the taste and hotness of the sauce. Commercial chili powder uses a variety of chiles, such as ancho, jalapeno, New Mexico Hatch and pasilla. The chili powder is also excellent in making Tex-Mex Chili or any other kinds of stew chilies. One famous chef uses chili powder as the base for his enchilada sauce, so it can be a simple process to make homemade sauce or you can start from the dried peppers. One thing is pretty certain, it will be thicker and more flavorful than any canned enchilada sauce you buy.
Nutrition Information per 1 oz (28 grams) of pasilla
Calories: 97 Fat: 4.0 g Net Carbs: 6.0 g Protein: 3.0 g
Keep in mind that once pressed to get the liquid and pulp out, the nutrition value may decrease somewhat, but for calculating the recipe, it’s best to count the number of peppers rather than the finished quantity of sauce to be on the safe side.
Recipes:
So far, I haven’t tried making homemade enchilada sauce, but with Cinco de Mayo just around the corner, I am thinking I will give it a try. At least, I’ll make one beginning with chili powder or possibly one recipe that uses chipotle peppers, which you can buy canned in their sauce. So, I will refer you to a couple of recipes from other sites.
This recipe for Irma’s Red Enchilada Sauce starts with dried pasillas and dried Ancho or New Mexico chiles. If the pasillas are very crisp, they may already be roasted and you don’t need to roast them a second time.
Here’s a picture-by-picture recipe for Homemade sauce on Instructables using California or Hatch chiles.
And this is theChipotle sauce recipe that is a little simpler.
Coming next month, I will put up a low carb recipe for enchiladas using low carb whole wheat tortillas instead of corn tortillas and homemade enchilada sauce in time for Cinco de Mayo! (That’s the 5th of May celebration for those not familiar with Mexican customs.)
All comments relevant to my posts are welcome. SPAM is not. If the post has nothing to do with my site content, it will not be posted.
Top photo of pasillas is from Wiki Commons, used with permission- “Fresh chilaca chilies” by Jonathanischoice – Photographed on my kitchen bench. Licensed under CC BY-SA 3.0 via Wikimedia Commons –
I have a fairly good-sized prickly pear cactus growing in my yard that arrived there by bird farmers or some other means and it has yielded a few pears over the past two years. Our neighbor’s desert tortoise is particularly fond of the pads and she often snacks on them. The Mexican name for this cactus is nopal or nopales and it is a source of food, nutrition and, possibly, medicines for humans.
Nopales are native to Mexico and spread over the Southwest in general. The root species is the Opuntia cacti. There are actually 114 known species of this cactus family and the leaves of all of them are edible. In Mexico, the cactus pads are popular in many foods dishes, using both raw and cooked pads. In the spring, the cacti produce beautiful, colorful flowers that mature into prickly pears or tunas, a seedy fruit that can be made into jam, jellies and juices or eaten fresh. The taste is described as a blend of watermelon and strawberry, but I haven’t noticed it so much. I tasted the uncooked pad and found a similar taste to watermelon with just a touch of sweetness.
Using Cacti
When dealing with this cactus, you need to take care to avoid the many little spines that inspire the name prickly pear. Gloves or tongs are very useful in handling these items. In order to use the pads or the pears in cooking, you need to carefully remove the spines. Here’s a video from Rivenrock Gardens, a company that sells Nopales, on how to clean the pads. Cleaning Pads
The pears are equally as tricky to work with, but there is a quick trick to peeling them and using them without stabbing yourself. Using tongs or forks to handle the pear, you follow the basic directions in this video from The Produce Guy for cutting the pear, just being careful not to touch them with your hands. It helps to wear gloves. If you buy them at the grocery, they are probably already cleaned of the spines so they are safe to handle.
Here’s a tip: If you do get one of the spines in your hand, use white glue to remove it. Simply spread the glue over the sore spot, let it dry and pull it out. It will grab the hair fine spine with it.
Health Benefits
At this time, many of the possible health benefits are being researched, but it is believed to be of use in treating type 2 diabetes. It is high in fiber and pectin, which can reduce sugar absorption in the digestive tract. It is also rumored to be good for treating colitis, obesity and high cholesterol. As more research is done, it will be interesting to see if this is an effective food.
Nutrition information for 149 g (about 1 cup)
Calories:22 Fat:0 g Net Carbs:2.0 g Protein:2 g
I have only used Nopal a few times in the past couple of years, but here is a recipe from this site:
1 young Nopales Pad, cleaned trimmed, and cut into strips
1/2 cup Pico de Gallo
1 Serrano Pepper, chopped
4 large Eggs
1 teaspoon Mexican Oregano
1 teaspoon Chile Powder
1/2 cup Chorizo sausage
1/2 cup shredded Cheddar Jack Cheese
1/4 cup Queso Fresco
4 Low Carb Tortillas, 7 inch
Cook strips of nopalitos in water with 1/2 teaspoon salt and 1/2 teaspoon oregano. Drain when they are tender.
In a skillet, heat one tablespoon oil, then add the nopalitos for a few minutes. Add the Pico de Gallo, Mexican oregano and Serrano peppers and continue to cook until the onions are almost done. Remove to a bowl.
Add a little olive oil to the pan, then add chorizo sausage and stir fry until it is lightly cooked. Add the vegetables back to the pan and add chile powder.
Beat eggs in a bowl, add a bit of salt and pepper and a little more oregano. Add eggs into the mixture, continuing to stir as they cook. Sprinkle cheddar jack cheese over the top and remove from the heat.
Warm up tortillas over the burner or in the oven. Serve eggs and sprinkle a little Queso Fresco over the top.
Serve with tortillas. Makes 4 servings
Nutrition Info per serving Calories: 339 Fat: 24.1 g Net Carbs: 6.9 g Protein: 23.3 g
* If you can’t find tortillas, you can eat them with a low carb flat bread or pita bread or without bread. Low Carb tortillas are 3 nc per tortillas, so that would be 3.9 nc for the meat and vegetables.
All comments relevant to my posts are welcome. SPAM is not. If the post has nothing to do with my site content, it will not be posted